Thursday, July 30, 2009

Flavor of the Month...Texas Peach Pie

flavor large
peach pie w ice cream
There is something about making a fruit pie that makes me feel like my grandmother and a domestic goddess all rolled into one. Fruit pies are so homey and comforting, but since they've been surpassed by the cupcake, the cake truffle, the cookie...they also feel a bit exotic.

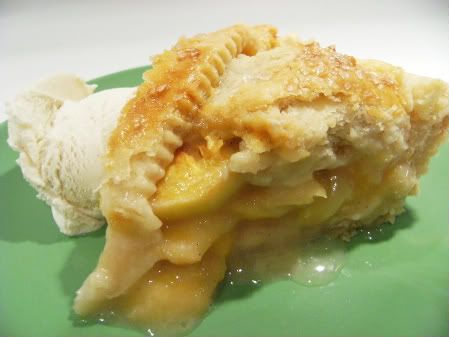
Peaches are probably my favorite part of Texas summers. (Actually, they might be one of the only redeeming things about Texas summers!) This year I decided to try a pie that I've wanted to make for 12 years. And, let me tell you, I won't wait 12 more to make another one. It was delicious!!!
peach pie filled single

We received a Williams-Sonoma Pies & Tarts cookbook for our wedding over 12 years ago. I always get seduced by the cherry and pumpkin pies....but not this time.
peach pie filled
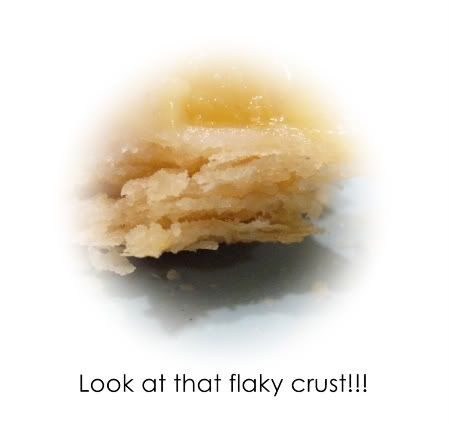
For the crust, I decided to give a new recipe a try and it was a winner. It comes from The King Arthur Flour Baker's Companion. It was THE BEST piecrust I've ever made...and I was pretty happy with the one I had been using, so that's saying something! :)
peach pie baked

Texas Peach Pie

(modified from my old William-Sonoma's Pies & Tarts cookbook)

pie pastry for a double crust pie (recipe follows)
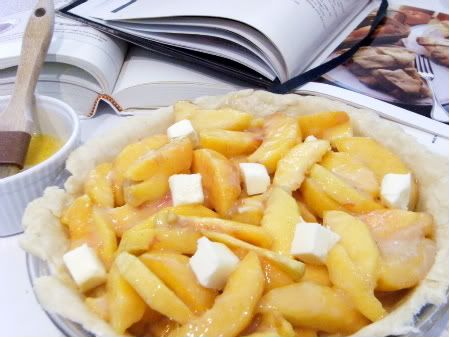
6 cups peeled, pitted and sliced Texas peaches (ok...or another state's peaches if you must)
2 TBSP fresh lemon juice
1/4 cup all-purpose flour
2/3 cup sugar
1/4 tsp salt
pinch freshly grated nutmeg
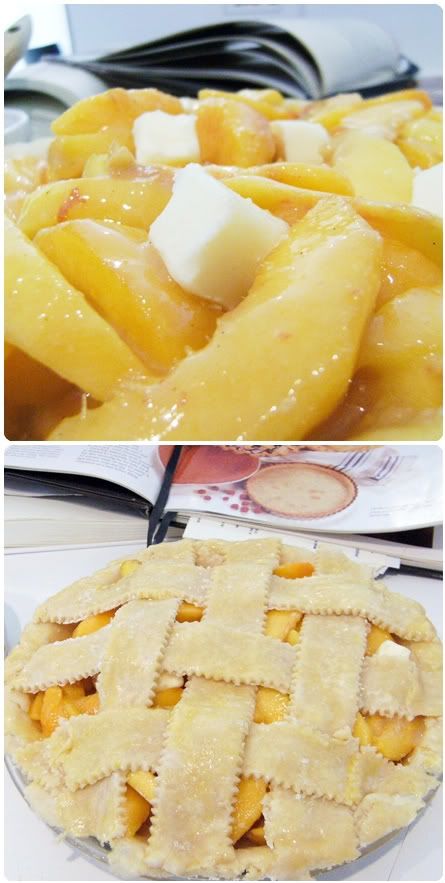
2 TBSP unsalted butter
beaten egg
sparkling sugar

Preheat oven to 425. Roll out dough for bottom crust and line a 9" pie pan. (Optional: brush bottom crust with lightly beaten egg white...it works to prevent a soggy crust!) Roll out dough and cut into strips for a lattice top and set aside.

Place peaches in a bowl. Sprinkle with lemon juice and toss to coat. In a small bowl, stir together the flour, sugar, salt and nutmeg. Add to the peaches and stir gently to combine.

Pile the fruit into the dough-lined pan. Dot with bits of butter.

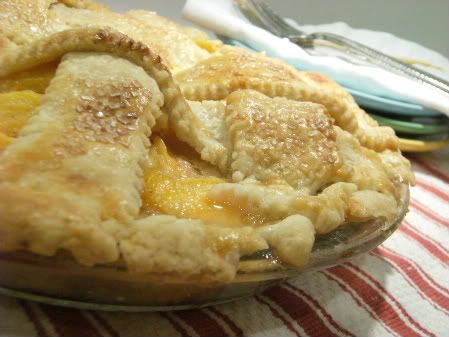
Use the strips to make a lattice top. Brush beaten egg on top of lattice and sprinkle with sparkling sugar.

Bake for 25 minutes, the reduce heat to 350 and bake about 25 minutes longer, until bubbly and top is browned. You may need to cover the edges during baking...I did.


crust rolled out
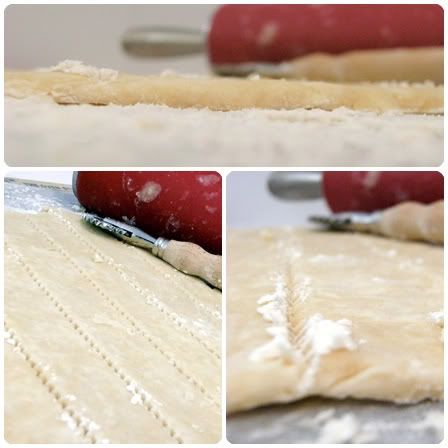
{See that marble pastry board? A gift from my dad...perfect for rolling piecrusts!}
flaky crust
For the crust:
(modified from The King Arthur Flour Baker's Companion)

2 & 1/2 c. unbleached, all-purpose flour
1 tsp salt
1/2 c. cold shortening (Crisco)
1 stick unsalted butter
1/4 to 1/2 c. ice water

Reserve a few tablespoons of flour, set aside. Whisk together remaining flour and salt. Cut in the shortening until it is crumbly.

Place the reserved flour on work surface and coat butter in it. Use a rolling pin or your hand to flatten the butter until it is about 1/2 inch thick. Break the flour-coated butter into 1 inch pieces and mix into the dough until it is evenly distributed.

Sprinkle water over the dough while tossing with a fork just until it is easily squeezed into a ball. Flatten into 2 disks, wrap in plastic wrap and refrigerate 30 minutes.

On a floured surface, roll each disk into a 12 x 9" rectangle (approx). Fold into thirds, like a letter, then fold again in thirds to form a square. Wrap both pieces again and refrigerate 30 more minutes.

After 30 minutes, let rest at room temperature for 5 minutes, then roll out to the size needed.


peach pie peek
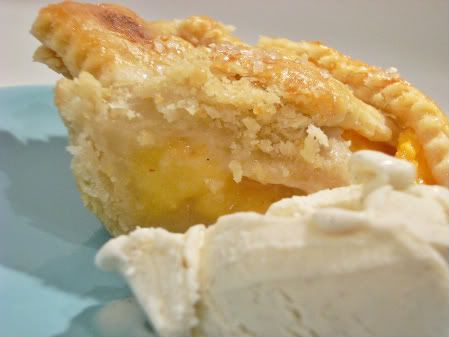
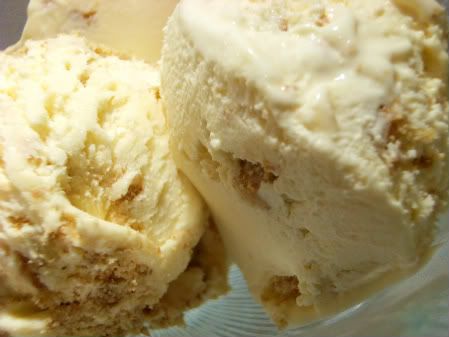
{One small side note...that ice cream is Haagen Dazs 5 Ingredient Vanilla...AMAZING!}

I can't wait to see what you all came up with!!! Please take some time and go check out the others participating in FOTM. :)

August's Flavor-of-the-Month theme: Pucker Up! Lemon, Lime or a combination...oh, the possibilities! Anyone can join in, please do!

Thank you so much for participating....or even if you didn't, thanks for visiting!

Here's where you link up...
(I'm new at this, too...here's hoping it works!)
The list will close in the wee hours of August 1st to discourage spammers.

Pies at the ready!


Are you ready?!?
flavor large
If you are participating in the first ever Flavor-of-the-Month (yay!), here are just a few tips for posting....

{I promise, if I can do it, you can do it....I'm so tech-savvy that my 10-year-old had to show my how to fast-forward through commercials on my iPod!}

1. Write and publish your Flavor-of-the-Month post on your blog.

2. Please link to Bake at 350 somewhere in your post. To get the beautiful logo, click here.

3. Now wait. :)

4. Before 12:01 am (probably a few hours before) on the last day of each month, you'll see MY post on Bake at 350. At the end of my post, you'll see a list. It will say something like "click here to add your post" or "you're next". Click there. (It will help to have your post in one window and my blog in another when you are linking.)

5. You'll have 2 lines to fill in. One will be your title. Your title will look like:
Your Blog Name (your awesome pie name)

6. The other line will be your POST URL, not your main blog address. Click on the title of your post. The URL is in your address bar. Copy and paste it into the appropriate box. For example, the URL for my soldier boy post from last week is:
http://bakeat350.blogspot.com/2009/07/soldier-boy.html

7. Enter. That's it!

8. Now, on Bake at 350, you should see you link along with everyone else's. If you don't see it right away, refresh the page a time or two. (You know how the internet can be sometimes.) :)
Here's what a BIG list looks like.

9. If you have a problem, please leave a message in the comments or email me.

10. OH! One more thing, I'll post next week's theme in my post. Be on the lookout!

New here? Want to know what we're talking about? Here ya go. Please join us! :)

Wednesday, July 29, 2009

Flip Flop, Flip Flop….the sounds of summer

flip flop
Y
ou know summer is here when "flip flop, flip flop" is the sound you hear wherever you go.

{For the rest of this post and instructions on making flip flop cookies, please follow me over to Blissfully Delish...}

Proud to be a Blissfully Domestic Contributor

Tuesday, July 28, 2009

Pasteurized Eggs...Works For Me Wednesday

Have you ever made ice cream with raw eggs and wondered whether it's safe or not?
key lime pie ice cream

Here's my solution: pasteurized eggs.
You can find them right in your grocery store along with the regular eggs. My store sells Davidson's (and they were nice enough to let me use some of their images on the blog).
I'll be honest, if I'm just making ice cream for our immediate family, I don't always worry about it, but if we're making it to share, I use pasteurized.

This nice thing is, you use them just like regular eggs and in any recipe. Use them for ice cream, and then finish the carton with your usual baking. AND...now we can all eat raw cookie dough without the guilt! ♥
chocolate cookie dough ice cream
Want to know who carries them in you area? Click here.
Pasteurized eggs work for me. Click on over to We Are THAT Family to find out what else is working this week. :)

Bake at 350's WFMW archives are here. :)

Friday, July 24, 2009

Soldier Boy

soldier boy
These cookies are special. A blog reader asked me to make them for her husband who was coming home from a year long deployment in Afghanistan. I know from watching my sister whose husband came home from Iraq last year what an emotional and happy time it is when they finally come home!!! I was happy that the cookies could be a just little part of it for this family.
soldier boys 3
soldiers flags stars
Because I've never made soldiers before, I was nervous, but in the end...I'm a little in love with them. :)

All week, I've had that 1960's song by The Shirelles "Soldier Boy" running through my head....
Soldier Boy,
oh, my little soldier boy,
I'll be true to you....
soldiers flags

Here's how to make them:
  1. Using a #2 tip and olive green icing (AmeriColor Avocado mixed with Super Black and Lemon Yellow) pipe in the putline of the shirt, pants and hat.
  2. With a #2 tip, pipe the outline of the face and hands using a flesh tone icing. (AmeriColor Copper/Fleshtone)
  3. Thin olive green, ivory, brown (for the camouflage) and flesh tone icing to the consistency of syrup. Cover with a damp cloth and let sit several minutes.(AmeriColor Ivory and Chocolate Brown)
  4. Stir gently to pop bubbles that have formed on top. Pour into a squeeze bottle and fill in outline of the face and hands with flesh tone. Use a toothpick to coax the icing into all corners and to edges.
  5. Fill in the shirt and pants with olive green, ivory and brown. Use a toothpick to swirl slightly.
  6. Let dry at least one hour.
  7. Using a #1 tip, pipe hair in brown icing.
  8. With the black icing and a #2 tip, pipe eyes on the face, make a belt and draw on shoes.
  9. With red icing and a #1 tip, pipe on a smile. (AmeriColor Super Red)
  10. With olive green icing and a #1 or 2 tip, pipe over the edges of the clothes and cap. Add button and pocket details to the shirt.
  11. Let dry overnight and give to a soldier! :)
Welcome Home, Dale!!!
soldier boy close

Want to support the troops? Check out these organizations:

Tuesday, July 21, 2009

Emergency Dessert...Works For Me Wednesday

You know those days when you don't have any dessert in the house? (Yes, it does happen around here!) Why is it when you have no dessert in the house, it's always on a day when you NEED dessert? ;) Those days when you'd just about kill for a piece of chocolate...
choc quesa wedge 2
My solution for such emergencies....Chocolate Quesadillas! They're quick and made from ingredients I always have on hand.

Here's all you need:
choc ques ingredients
  • chocolate chips (regular or mini)
  • cinnamon sugar
  • tortillas
  • powdered sugar (optional, but pretty)
choc quesa making
Just heat up a skillet on med/low with a little butter, oil, or cooking spray...whatever you have available. Cover one half of a flour tortilla with chocolate chips, sprinkle chips with cinnamon sugar. Fold in half, place in the pan and cook until golden brown. Flip and cook the other side.

Let sit for a couple of minutes so that all of the chocolate doesn't ooze out. Cut into wedges with a pizza cutter and dust with sifted powdered sugar. Voila...dessert in a flash!
choc quesas
Chocolate Quesadillas definitely work for me in a dessert emergency! We are THAT Family hosts all of the Works For Me Wednesday ideas, so go check 'em out!
For the archives of WFMW posts from me, click here.


choc quesa wedges

Sunday, July 19, 2009

I Scream, You Scream....

ice cream cones
...we all scream for Ice Cream!!!

So, they won't help to beat the Texas heat, but they're much easier to bring to a picnic!
ice cream cones white
Obviously, I really couldn't decide what sprinkles I liked best on these ice cream cone cookies.
ice cream cones close

Here's how to make them:
  1. Using a #3 tip, outline the ice cream scoop in white or pink (or whatever color you want) royal icing.
  2. Using a #2 tip, outline the cone in brown (AmeriColor Chocolate Brown mixed with AmeriColor Copper).
  3. Thin the icings with water until they reach the consistency of a thick syrup. Cover with a damp dish towel. Let sit several minutes.
  4. Run a rubber spatula through the icings and transfer to squeeze bottles.
  5. Fill in the ice cream using a toothpick to guide into corners.
  6. While the icing is still wet add the sprinkles of your choice.
  7. Fill in the cone in brown using a toothpick to guide into corners.
  8. Let dry at least one hour.
  9. Add the cone detail using the #2 tip in brown.

Thursday, July 16, 2009

A cake truffle a day keeps the doctor away...

...or something like that.
cake truffles
When the in-laws were in town, I decided we needed some cake truffles to have around for snacking. :) I went with what I think of as "the original," red velvet.
cake truffle mix
cake truffle bite

I used some extra white candy melts from making monograms to make toppers to go on the cake truffles. They're made just the same as monograms...pipe the shape, then add on the sprinkles. For more details, click here.
cake truffle platter

I thought it would be fun to make all lowercase "e's" for our last name, but they ended up looking like blobs, so I made a mix of E's and dots and stars and hearts. (Hope you can see in the picture.) To some, I just added sprinkles.
cake truffle E

And then, there was the extra chocolate. It just seemed wrong to waste it. SO, I dipped graham crackers. Oh man, were they good! I'll be doing that again!
cake truffle grahams

Want more? How about:

Tuesday, July 14, 2009

Moo MiniCards and coupon!...Works For Me Wednesday

Have you seen these? They are called Moo minicards. They are the cutest things!
moo cards case
moo cards
They are like business or calling cards, but they're smaller and with YOUR pictures! Use them for your etsy shop, or for a business card, or to promote your blog, or as a gift tag (wouldn't these be fun with your child's picture on the front?).

moo cards size
{You can see the size of them compared to a regular sized business card.}

Here's one piece of advice...TRIPLE CHECK your spelling. I ended up with bakeat350.blogPSot.com...nice. Very professional of me. :)
moo card oops

Oh, and how about a coupon? I got one in with my order for NEW customers to www.moo.com. Never ordered before...you're in luck, 15% off. Coupon code: 2RB2CK
moo coupon
Despite my misspelling, Mini Moo cards Work for Me!


What else works for me?

Saturday, July 11, 2009

Two Peas in a Pod

2 peas in a pod 1
I've made Pea in the Pod cookies before, but last week, I was really excited to get to make TWO peas in a pod!

These little babies went off to a baby shower...

2 peas in a pod

The idea of twins has always sounded so fun to me. Maybe that's because I don't have them? ;) My Papa was a twin, though, and I thought that was the neatest thing!
papa with uncle joe & mom
{My grandfather, Jack, on the right with his twin on the left and their mom. Thank you, Emily for uploading these old pictures!}

2 peas in a pod closer
Little Sweet Peas!

Here are links to a few more baby cookie ideas:

Wednesday, July 8, 2009

It's ON!

Alright, gals (and guys?)....Flavor-of-the-Month is officially ON! Yay! Thanks to everyone who took the time to answer the poll question. If you said "yes," I have your name and address, and will be contacting you if you do not participate. I KID! :)

First, July's theme: PIE!

This means you can make ANYTHING related to pie...cherry pie, banana cream pie, mini pies, hand pies, whoopie pies, key lime pie martinis...your choice. Summer just makes me think pie!

Post your creation on the last or next-to-last day of the month. I'll post my FOTM post by 12:01am on the last day of the month (and I'll include next month's theme).


PLEASE include a link back here to Bake at 350. Here's a logo to use in your FOTM posts (made by the wonderful Leslie who is on vacation right now, but I still wanted to give here a little plug anyway):

Two ways you can use this logo:
  1. Right click on the image and choose "save image as" and save to your computer. When posting time comes around, add that saved image as a picture in your post.
  2. Copy and paste the code above directly into your blog post. This provides the logo and links right back to Bake at 350.
(Leslie also made a darling little sidebar button, if you want to add it to your sidebar, please do...it's over in my left sidebar).

I'll give you a heads-up as we get close, especially this first month, with more details on how to link. If you've participated in Works For Me Wednesdays, it will work the same way. You'll just need to add your blog name and a short (3-4 words) title to sum up your post....ie:

Bake at 350 (cherry pie)
OR
Bake at 350 (pecan pie ice cream)
OR
Bake at 350 (coconut cream pie martinis)Align Center

That's what everyone will see. You'll also add the link to your post. (The link is what shows up in the address bar when you click on the actual post...not your MAIN webpage address.)

For example, my main blog address is:
http://www.bakeat350.blogspot.com/

BUT, the link to my Vanilla Extract post is:
http://bakeat350.blogspot.com/2009/07/pure-vanilla-extractworks-for-me.html

Make sense? Believe me, it's sounds much more technical than it actually is. I was so nervous the first time I participated in WFMW, but it's really a piece of cake pie! :)

ANYONE is welcome to join in...please do!!! And if you can't participate every month, that's ok, too.

Alright....I'll see you back on July 31st!
In the meantime, if you haven't seen the movie WAITRESS, please rent and watch it while you're making your pie! :) It's one of my favorites!