Thursday, March 31, 2011

April Fool's Day FOOD

For some reason, we never really celebrated April Fool's Day until a few years ago.  Now we're having the best time with our "funny food."

This year, I'm serving "sundaes" for dinner....

Kiddo is going to be so disappointed when he realizes we are not having ice cream for dinner, but that it is, in fact, mashed potatoes and gravy. 

{To make things super easy, we're using instant mashed potatoes and jarred gravy.  I know, I know...not the healthiest, but I won't tell if you won't.}

And how cute is that "cherry?"  I was SO excited to find that jar of Peppadew peppers at the grocery store! I might have squealed.

Here are a few blasts from April Fool's past:

Mashed Potato Cupcakes...

{I think these are my favorite.}

Meatloaf Cupcakes (yes, those are meat cakes, my friends)...


Spaghetti & Meatball Cupcakes...


 I also love these ideas and am filing them away for next year:

Macaron "sliders" from One Vanilla Bean
"Grilled Cheese" from Family Fun (will be in kiddo's lunchbox tomorrow)
Candy-filled Fruit Cup from Come Together Kids
"Lasagna" from Food Network
Candy Sushi from La Casserole Carree (in French, oo-la-la)
Ducky Punch (not an April Fool's post, but I still think it would be great) from TidyMom
"Fakin' and Eggs" from Making Memories (sold by the name alone!)

Do you have any April Fool's FOOD ideas?  I wanna hear 'em.

Tuesday, March 29, 2011

Bread : it's what's for dinner . . . Works for Me Wednesday

It occurs to me that I should be a marathon runner, not because I love to exercise, but because I am in a constant state of carbo-loading.

You guys....I LOVE bread.

Exhibit A: my "usual" at Panera.
 
French Onion Soup in a bread bowl with a side of baguette

Or as Mr. E called it this afternoon....

"Bread with a side of soup."

I admit it, I am smitten with bread...and Panera. And I LOVE than they give you the bread that was scooped out for the soup.  That chunk of bread is like a little piece of heaven. (Please tell me there is bread in heaven.)


Speaking of bread (and I can't believe I've never shared this recipe before)...this is the ULTIMATE white bread for sandwiches, toast, snacking (?). :) If you love bread like I do, I BEG you to make it.

{My pictures aren't great, but the bread....oh, it's incredible!  It's carbo-load time!}

White Bread 101 
{barely modified from The King Arthur Flour Baker's Companion }

3 c. all-purpose flour (you can subs. WHITE whole wheat flour here)
2 tsp instant yeast
1 & 1/2 tsp kosher salt
3 TBSP sugar
4 TBSP softened butter
1/4 c. dry milk
1/3 c. potato flakes
1 & 1/8 c. lukewarm water

Combine all ingredients together.  Dump onto a lightly floured surface and knead until you have a smooth dough...about 10 minutes.  Add more flour as needed, but add sparingly as more flour equals a heavier, drier loaf.

Transfer to a lightly oiled bowl; cover with oiled plastic wrap and let rise for 1 hour.

Transfer to a lightly greased work surface and shape into an 8" log.  Place in a lightly greased 8.5" x 4.5" loaf pan.  Cover loosely with the oiled plastic wrap and let rise about 1 hour....or until the dough has risen 1 inch over the rim.

Preheat oven to 350.  Uncover and bake the bread for 35-40 minutes, or until an instant thermometer reads 190 degrees. (Tent with foil during the last 10-15 minutes of baking if it is browning too quickly.)

Remove bread from the pan and place on a wire cooling rack.  After 15 minutes, brush with butter.  Cool completely before slicing.


Makes a mean grilled cheese or PB & J sandwich! 
works for me wednesday at we are that family


{This post about my love for "bread with a side of soup" is sponsored by Panera. My obsession with carbs, my love of French Onion soup and my extra 15 pounds are mine and mine alone.}

Sunday, March 27, 2011

A Vacation from Vacation . . . and a little something for you. :)

The boys and I went on a little getaway to San Antonio and a few surrounding small towns for Spring Break.

{Side note: Gruene, TX...officially my new favorite city.}

Isn't coming home from vacation always the best part?  Or am I weird?

Here's how you know you need a vacation from your vacation.....
  • a bird poops on your head in the first 15 minutes of strolling the RiverWalk,
  • your child & pollen do not mix and you spent 3 days subjecting fellow tourists to a hacking cough and lots of snuffling,
  • the hotel parking garage is full; driving around looking for another, your car overheats and smoke pours from under the hood (classy),
  • AND,  your husband forgets to pack PANTS.  
All in all, though, aren't those the vacations you remember?  "Hey, remember that time we went on vacation and Dad forgot to pack any pants?"   Yes, yes I do.

One place with NO mishaps was the Williams-Sonoma OUTLET, yes outlet, in San Marcos.  I am serious when I say my heart was going pitter-patter and I thought I might faint.  Oh, y'all...it's FUN! 

And, I brought home a little something for you, too!
  1. my beloved WS meringue powder,
  2. a jar of yellow sanding sugar, 
  3. and a darling little bunny spatula.
{Now here comes the infomercial part...} But WAIT, there's more!  I'm also including a $75 Williams-Sonoma gift card with your goodies.  

To enter:  tell me one of YOUR vacation stories (good or bad).

I'll draw a winner on April 1st (no foolin') at 8pm CST.  Giveaway CLOSED! Congrats, Samantha! 

{PS...this is not a sponsored post.  Just a little somethin' from me to you. :) Happy spring!}

Wednesday, March 23, 2011

Nutella-filled "Frenched" Tortillas

 
This post starts with a happy accident. 

I love to make french toast in the mornings for kiddo.  It's easy, no measuring....eggs, a little milk, sprinkle of sugar, dash of vanilla....whisk it all up...bread, pan, BAM!...french toast.

Well, a few weeks ago, I whisked up the eggs, milk, etc. and realized....I was OUT.OF. BREAD.

What's a girl to do?  In Texas, you might run out of bread, but you always have tortillas.  So, "frenched" tortillas were born and they are now a staple in our house.

Let me tell you how to make them.  Prepare....you are about to achieve domestic goddess status in 5 minutes.

OK....I like the start with these "ready-to-cook" tortillas.  But, these may be just a Texas thing. (They're in the refrigerated section at HEB, y'all.)  So, start with flour tortillas. (If they are the ready-to-cook kind, cook them.)

Whisk up 2 eggs, about 1/2 cup milk, a TBSP or so of sugar (or cinnamon-sugar), and a dash of vanilla.  (Eyeball it.)

Heat up a pan and add a pat of butter.....I like salted, but whatever you have.

Dip both sides of the tortilla in the egg mixture; let the excess drip off.  Cook briefly in the pan; flip and cook the other side (but you knew that).

Once cooked, add a spoonful (1-2 TBSP) of Nutella down the middle of each tortilla.  Roll.
 
{Don't you want to dive right in?}

Dust with powdered sugar.  If you're feeling fancy (and you probably are), heat up a bit of Nutella in the microwave.  Drizzle over the tortillas.

SOMEDAY, when kiddo goes off to college, he will come home for *THESE*.
Tidy Mom

Monday, March 21, 2011

Baby on Board Cookies . . . and a Virtual Baby Shower


Have you ever been to a VIRTUAL BABY SHOWER before?  Well, guess what?  You're attending one right now!

Our sweet, sweet friend and incredible baker, Amanda, from i am baker is having her fourth, yes 4th, baby (a boy!) next week.  And Kristan, from Confessions of a CookBook Queen, had this fabulous idea for some of us to throw Amanda a surprise baby shower.  SURPRISE, Amanda!!!

If by some chance, you've never met Amanda...well, first, where have you been?!?  Second....let me show you how amazing this woman is.

Y'all....she is ONE.SERIOUSLY.TALENTED.LADY.  Oh, and nice as can be, as well. And funny, did I say funny?  So, you can see why we all love her.

I volunteered to make cookies....I know it's a shocker.  We tried to coordinate the shower colors as best we could through Skype; we went with teal and orange.

So, go wish Amanda "Happy Baby!"  (Here she is on twitter, if you're the tweeting sort.)

OH!  And be sure to stop by the other shower hostess for more goodies today...

Drinks:

Add a Pinch – i am baby Shower Punch
TidyMom – Ducky Bath Blue Punch

Savory Bites:

Dine and Dish – Stuffed Mushrooms
GoodLife Eats – Cucumber Sandwich Recipe
My Baking Addiction – Crab Rangoons
Simple Bites РSpring Crudit̩, Buttermilk-Black Pepper Dip

Desserts:

A Farmgirl’s Dabbles – {i am baby} cakes
Bakers Royale – Baby Shower Cupcakes
Bluebonnets and Brownies – Mini Fruit Pizzas
Confessions of a Cookbook Queen – Homemade Butter Mints
Food for My Family – Baby Shower Macarons
Gourmande in the Kitchen – Chocolate Blueberry Truffles
My Kitchen Addiction – Sourdough Cinnamon Rolls
She Wears Many Hats – “B” is for Boy – Itty Bitty Baby Cupcakes
Smith Bites – Strawberries with Brown Sugar Dip
What’s Cooking with Kids – Hamentashen cookies

Last But Not Least:

Wenderly – Baby Cards

Can't wait to meet this sweet baby, Amanda!!!

Saturday, March 19, 2011

Don't Make Me Come Up There (a very special book giveaway)

Remember my friend and real-life next door neighbor, Kristen?  
Well, she has a BOOK!!! 

{Yes, I live next door to a famous author...and sweet tea addict, but that's for another post.}

Let me tell you about the book....

Kristen's book is called Don't Make Me Come Up There: quiet moments for busy moms.  Moms, you are going to love this book.

If you read Kristen's blog, you already know that she can make you laugh and tug at your heartstrings all in the same post.  The book is the same.  In each short chapter, Kristen will have you laughing, crying or nodding along with her stories about family and faith.  Every chapter ends with a Bible verse and prayer....it's the perfect quiet escape in a busy mom's day.

 
{I keep a copy in my car and read a chapter or two while waiting for kiddo to come out of school.}

Oh!  And do you want to SEE sweet Kristen?  Here she is in her book promo video...isn't she adorable?!?

"Don't Make Me Come Up There" Blog Tour Promo from Derek Harvey on Vimeo.

I've talked before about what a GOOD person Kristen is.  Here's more proof: all proceeds from her book are going to the charity she and her husband started, The Mercy House.  The Mercy House is a maternity home in Kenya; you can read more about it here.

So, do you want a copy of Don't Make Me Come Up There?  
I think you do.  TWO Bake at 350 readers will win a copy.  Here's how to enter: Giveaway closed. Congrats to jennaseverythingblog & pam!
  • Leave a comment here telling me if you would keep the book for yourself or give it to another mom.
For an extra entry (leave a separate comment):
Random winner will be chosen on Thursday, March 24st at 8pm CST. Giveaway closed. Congrats jennaseverythingblog & pam!

Make sure to include your email if your comment name doesn't link to one.  Good luck!


Thursday, March 17, 2011

Mint Cream Cheese Brownies


Still deciding what to make for a St. Patrick's Day dessert?  May I suggest....Mint Cream Cheese Brownies?

Not only are they fudgey, minty, rich and delicious....the recipe makes TWO!  Perfect for spreading some St. Patrick's Day cheer!

Mint Cream Cheese Brownies
{adapted from both the King Arthur Flour Catalog & The King Arthur Flour Cookie Companion}

For the brownies:

1 c. dutch-process cocoa
1 tsp. kosher salt
1/2 tsp. baking powder
1 & 1/2 sticks unsalted butter
2 c. sugar
1 TBSP. vanilla
3 eggs
1 c. flour
1 c. roughly chopped Andes mints, divided

For the mint cream cheese:

4 oz. cream cheese, softened
2 TBSP. sugar
1 TBSP. flour
1 egg yolk
1 tsp. cream or milk
1/2 tsp. peppermint extract
green food coloring (AmeriColor Leaf Green)

Preheat oven to 350.  Grease two 8" round pans.

Combine the cocoa, salt and baking powder, set aside.

In a medium saucepan, melt the butter over low heat.  Turn off the heat; add the sugar and stir to combine.  Return to the heat until it's hot again, but not bubbling.

Remove from heat.  Stir in the cocoa mixture. Whisk in the eggs and vanilla until smooth.  Stir in the flour and set aside.

Make the cream cheese mixture: beat the cream cheese, sugar and flour until smooth and combined.  Add the yolk, cream/milk, extract and one or two drops of green food coloring.  Beat until smooth.
 
{Make sure to get PEPPERMINT extract; mint extract is typically spearmint flavored.}

Assemble: Spoon out about half of the brownie batter, dividing between the prepared pans.

Scatter 1/2 c. of the chopped Andes mints on each.  Cover with the remaining batter.  (Use an offset spatula to spread.)

Fill a piping bag with the cream cheese mixture and top each brownie in a decorative design.

{Next time, I will just dollop it on and swirl it a bit with a toothpick. I did one polka dot and one shamrock.  The shamrock looked like this before baking:}

{...and separated like this after it cooled.  Oops.}

Bake for 20-25 minutes until the edges had started to pull away from the sides.  Cool completely on a cooling rack before removing from the pans.

Now, I was trying to get a "beauty shot" of one slice on a plate.  It looks like a pterodactyl head to me!

Happy, happy St. Patrick's Day to you...and you...and YOU!  Cheers!

Sunday, March 13, 2011

Easy as Pi . . . Happy Pi Day (3.14)!

Today is Pi Day!  You know, it's March 14th....3-14.  As in 3.14.....

I might as well confess....we are a family of nerds.

We like math.  There I said it.  Ok, I will draw the line at Trig and doing taxes, but working out math problems with pencil & paper?  I like it.

{Kiddo is currently memorizing the numbers of Pi.  He is up to 41 places after the decimal.  Is there college scholarship for that? Because I'm pretty sure he can be up to digit 150 by 12th grade. ;)}

I made these for kiddo's math teacher, so our nerdiness has been made public.  I think she knows, though, because kiddo owns this shirt and wears it on "free dress days" at school.

Want to know where this awesomely cool Pi cookie cutter came from?  Copper Gifts.  You might need one.

Happy Pi Day!  How will YOU celebrate? 

Saturday, March 12, 2011

Vintage St. Patrick's Day Postcard Cookies

Speaking of edible images....

Printing vintage images and pictures is my favorite way to use the icing printer.  I LOVE vintage postcards....the artwork, the verses....they are so sweet!  So I scanned some old St. Patrick's Day postcards and printed them on frosting sheets.

Curious to try themI uploaded the images to Scribd just for you!  Download the document and crop and resize until you get them the size that you would like.  Then, follow the tips for printing, either at home, or at a shop with an icing printer.

The images were just placed on wet royal icing.  I used a #16 star tip and stiff royal icing (piping consistency) for the edges.

Have fun!  And may the luck of the Irish be with you....and your icing printer! ;)

Tuesday, March 8, 2011

Tips for Edible Images, Icing Printers & Frosting Sheets . . . Works for Me Wednesday

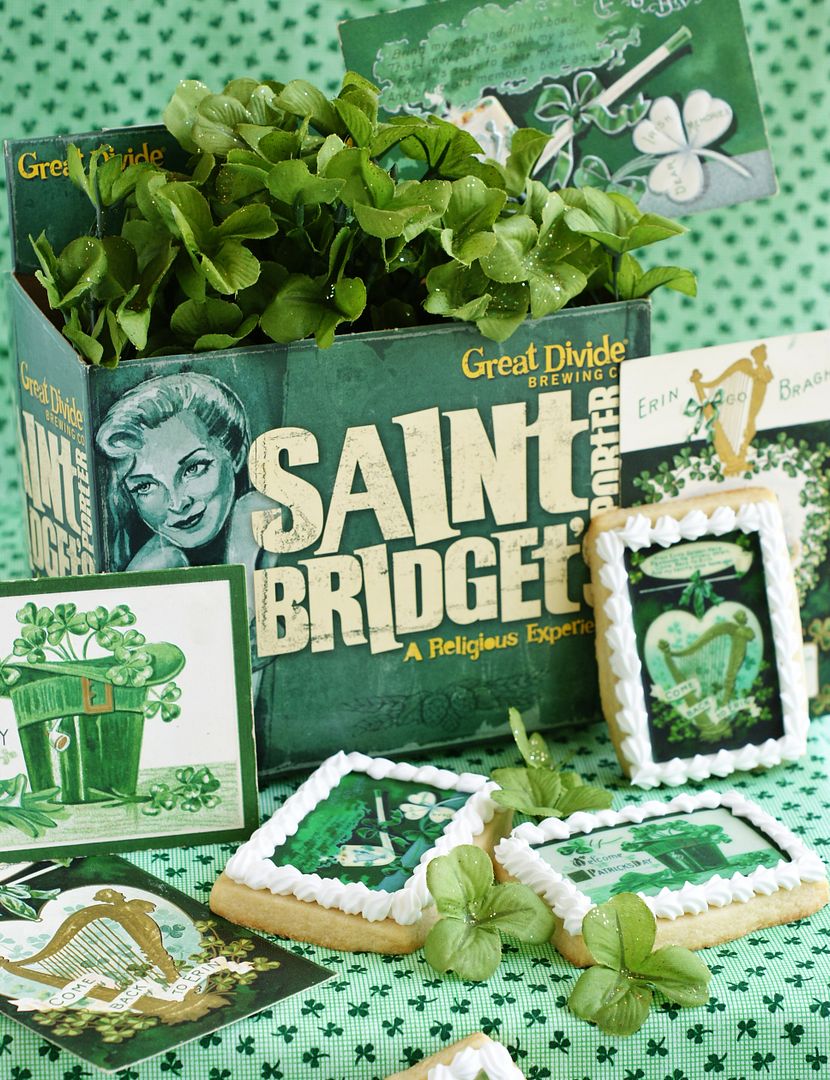
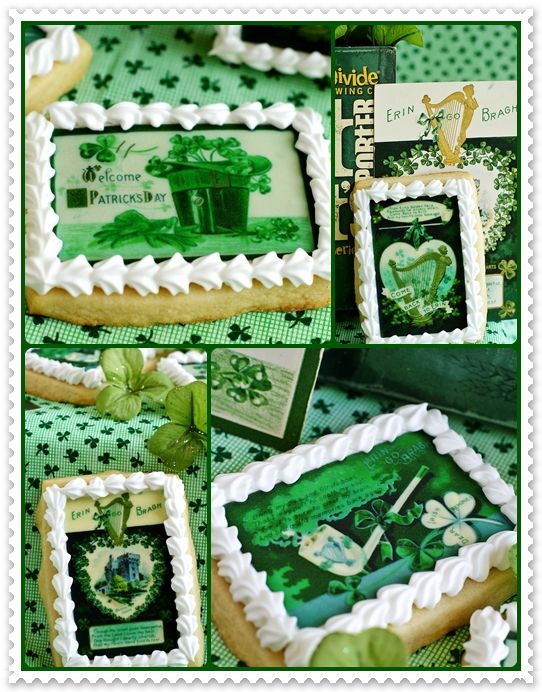
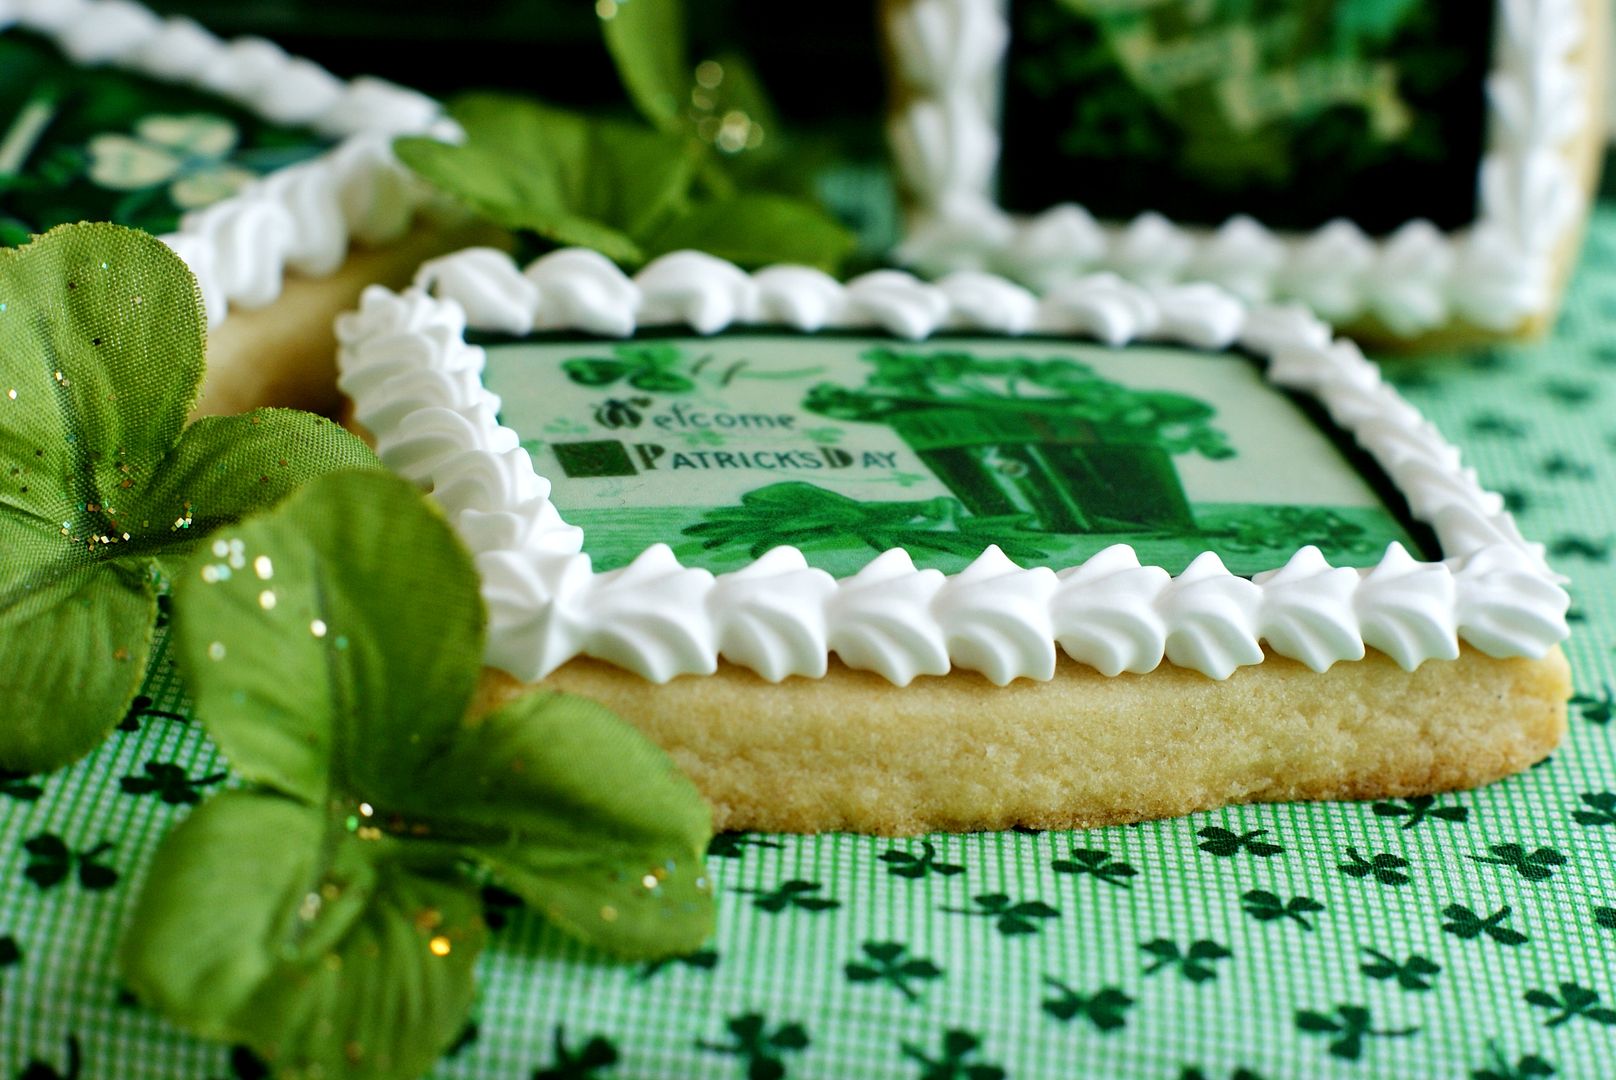
Last year, I bought an icing printer.  It hasn't been all sunshine and lollipops, but it has been kinda fun.  Here are a few of the cookies I've made using it:


First, let's talk about the printer itself.  You can go one of two ways....
  • buy a printer specifically made for icing printing, like the one sold here,
  • or, buy a NEW printer that is compatible with the food coloring "ink" cartridges.  (A list of those printers is here.)
I bought one of the compatible printers.....I chose an Epson WorkForce 30.  (I bought it from Amazon.)

Next, let's talk "ink."  Food coloring cartridges are, well, expensive.  Go to the list of compatible printers and find the edible ink that you need.

The ink for my printer is $90.  Yes, $90!  How long does it last?  Well, it depends.  Depends on the images printed, how much ink is wasted cleaning nozzles, running print checks, etc.  My guess is, you can get 30-40 pages out of a full set of ink.

The best tip for the ink that I've found is to refill is with these ink refills They are $10 a color and are SO nice to have on hand when you realize that you're out of magenta and your printer won't work without it.

{Refilling the tanks can get messy and I won't pretend I know any tricks to doing it, other than batting your eyelashes and seeing if you can get your hubby to take over.  Worked for me.}

Getting ready to print:

Scan your picture or save it on your computer.  Use a photo editing software (I like PhotoScape) to crop it to the size of your cookie cutter.  The easiest way to do this is to view the image at 100% and hold your cookie cutter up to the screen.  I like to make my images just a tad smaller than the actual cutter.

Put as many pictures as you can fit into a Word or Open Office document.  I typically get 6 per sheet, of course, you'll get more if your cookies are smaller.  The frosting sheets have a printing area of 7.5 x 10".

BEFORE PRINTING:
  • Run a nozzle check of the printer.
  • If any colors are not printing, run the print head cleaning (you may need to run it twice).
  • If one of the colors is still not printing, turn off the printer, remove the specific color and swab the nozzle with a damp QTip.
  • Print a test page on a plain sheet of paper.  (Once you see that it is printing correctly, you can cancel the print job to keep from wasting ink.)
 
Now, print the image/s onto the frosting sheet

There are a few ways to apply the sheets.  (And, I'm only talking cookies here, not applying to cakes.)

Once printed, I find the sheets a little easier to work with if they have "aged" a little.  Now, this could be because I live in a really humid area, I don't know.  But, when I've tried to used them immediately, I have had problems with tearing.

So, if I'm using them right after printing, I leave them out on the counter for a bit....at least 15 minutes to dry out.  You don't want to leave them out too long, or they will become brittle.   If I'm not going to use them the same day, I store them in a gallon-sized baggie.  Then, before using, I'll cut them into the size needed and let them sit out while I prep the cookies.

Method #1 (my favorite): Prepare the images by cutting the size needed, set aside. Outline and fill the cookie with royal icing.  While the icing is still wet, remove the backing from the frosting sheet and gently place on the cookie.  Pat the edges and corners down.  This may make up to 48 hours to dry.

Method #2 (I used this method on these St. Patrick's Day cookies):  Prepare the images by cutting the size needed, set aside. Thin piping consistency royal icing with water until it is loosened.  It should not be runny, just easily spreadable.  Remove the backing from the image and gently cover the back with the loosened icing.  Adhere to the cookie.  Because the icing is not as wet underneath, these don't take as long to dry.  (I like this method for when you don't want to add or see a border.)

Method #3 involves brushing corn syrup on the back of the image and applying it to a dry cookie.  I haven't had any luck with this method.  The corn syrup seemed to tear and stretch the sheets and the ones that didn't tear felt sticky to the touch. 

A few more tips....
  • "Hot hands" can tear the images. My hands are cold all the time....except when I decorate cookies.  If this happens to you, wash your hands in really cold water and dry thoroughly. Repeat as needed.  I also will take the ice pack for kiddo's lunchbox out of the freezer and hold onto it for a while.
  • A piped or sprinkled edge is a really nice way to finish the cookies or hide uneven edges.  I love a #16 star tip!
  • Use your printer once a week....even if you don't need to...to help prevent ink clogging.
  • Wait AT LEAST 24 hours before packaging. Tap gently on the image to see if it's dry.
  • Never use your icing printer with real ink. :)
Now, here's the real deal....would I buy one again?  I'm not sure.  It's nice to have, but the troubleshooting hasn't been fun.

If you don't have an icing printer, but want to use edible images, here's what you do.   Format your pictures and take your file on an SD card or flash drive to your local bakery supply (or even the grocery store).  Call first, but more than likely, they can print FOR you!  Our bakery supply charges about $7 per sheet.
works for me wednesday at we are that family
I'm not an expert at these edible images, so if I come across any other tips, I'll be sure to pass them along!

I know this post is LOOOOONG and wordy, so bear with me.  I want to let you know about a really neat event I'm participating in...and you can, too!

I’m co-hosting an upcoming class in the Web’s first-ever virtual cooking school, Cooking Connections, and I would love for all of you to participate! Here’s what you need to know:

When: Wednesday, March 9, at 1 p.m. ET

Where: TheMotherhood – here is the link to the page where the class will be held.

And here is the registration page for all Cooking Connections classes.

What: The class I am co-hosting is called “Sweet Treats,” and it is hosted by Julie Mastbrook (Mommie Cooks) and Kristen Doyle (Dine and Dish ). We all will be sharing our best resources for finding sweets; sweet snack suggestions and recipes for when we’re craving just a taste of sugar; and dessert recipes with kid-friendly instructions and cleanup, so your children can help you whip up delicious creations!

The class is sponsored by ConAgra and hosted by TheMotherhood.

I hope to see you there!

My other fabulous co-hosts are:

Cheryl Sousan, Tidy Mom
Kristan Roland, Confessions of a Cookbook Queen
Monet Moutrie, Anecdotes and Apple Cores
Dennis Littley, More than a Mountfull
Kim Kopp, Quit Eating Out
Naomi Robinson, Bakers Royale
Robyn Stone, Add a Pinch
Rebecca Spivack, Let It Marinate
Kaitlin Flannery, Whisk Kid
Cate O'Malley, Sweetnicks
Faith Gorsky, An Edible Mosaic

Saturday, March 5, 2011

I'm Irish . . . eat your heart out.

St. Patrick's Day has always been a *BIG DEAL* in our family.  Growing up, my sister & I would come downstairs for breakfast and there was always a little green "happy" sitting at our places.  {One year, I got a green bikini. ;)}

{And, I wore this pin on St. Patrick's Day EVERY YEAR from high school through college....and maybe a few years beyond that.  Yes, I am a total dork.}


I wanted to make something a little girlie for St. Patrick's Day.  So, I went with dresses.  Every Irish girl wants to look their best on St. Paddy's Day, right?


{"Kiss Me, I'm Irish!"  Yes, I also had that pin, but went for subtlety. ;)}

The dresses were made using edible image sheets.
  •  I bought digital scrapbook paper and printed an entire sheet. 
  • Using my cookie cutter as a guide, I traced the shape onto the paper using a thin food coloring pen.
  • Then, I cut the shapes out, and...
  • ...because I didn't want icing to show around the edges of the dresses, I applied  a thin coating of royal icing, that had been loosened with just a few drops of water, to the back.
  • I attached these to the cookies.
{Now, I took some pictures of this whole process WITHOUT THE SD CARD in my camera.  Please pretend you see those pictures now. Thank you.}

Note: Next time, I would make a regular sugar cookie, not chocolate. With the thin coating of icing on the back, the chocolate does show through in places.

{But, here is a great chocolate cookie recipe to try!}
 
So, how about you?  Do you celebrate St. Patrick's Day? What do you do?