Saturday, April 30, 2011

First Communion Cookies

Continuing on with the sacrament cookie motif ;)... (Remember the confirmation cookies earlier this week?  These are for the same sweet family.)

I was really looking forward to making these cookies again.  The last time I made them was for kiddo's First Communion....FOUR years ago.
{That picture on the left is one of my favorites ever.  Rockin' the powder blue suit, yo. Maybe we can find a blue tux for prom in a few years.}

OK...thanks for letting me reminisce.
These cookies start out with the perfect cutter I love this cutter...it's pricey because it's copper, but so worth it.


For the cookies, you'll need:
  • chalice and host cookies
  • royal icing tinted with AmeriColor Gold, Bright White, Regal Purple and Leaf Green
  • disposable icing bags
  • squeeze bottles
  • decorating tips (#1 & #2) and couplers
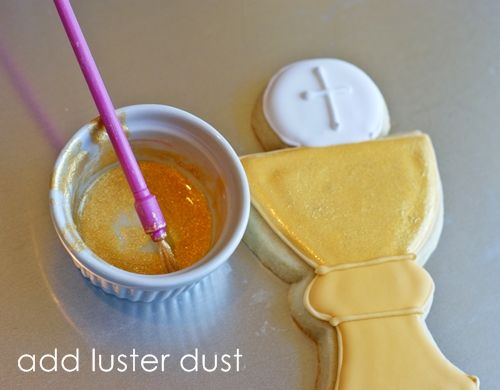
  • gold luster dust
  • vodka (yep.)
  • small paintbrush
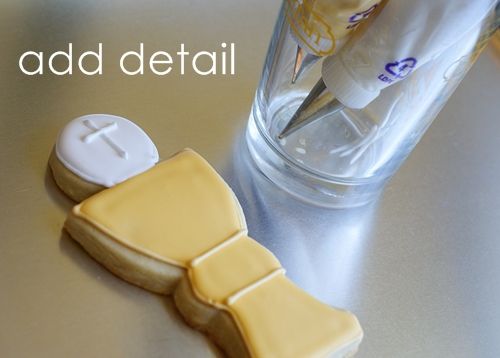
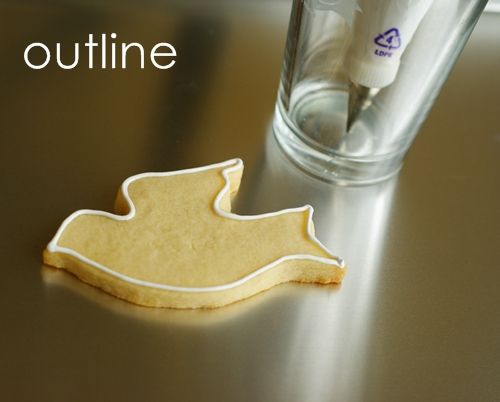
With a #2 tip, outline the chalice.

With another #2 tip, outline the host.

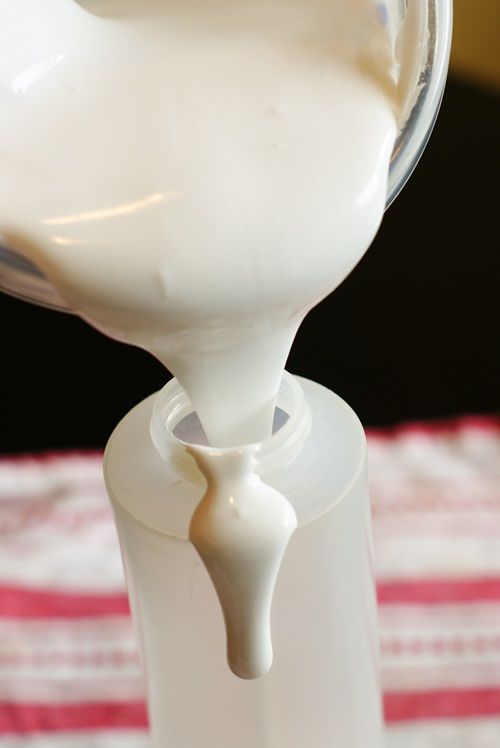
Thin the white & gold icings (reserve a bit for later) with water, a little at a time, until it is the consistency of thick syrup.  Cover with a damp dishtowel and let sit several minutes.

Stir gently with a rubber spatula to pop any large air bubbles that have formed. Transfer to squeeze bottles.

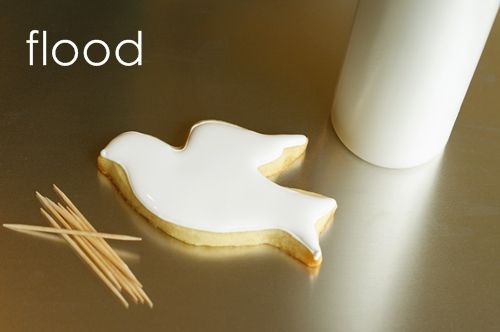
Fill in the chalice with the thinned gold icing.  Use a toothpick to guide into corners.

Fill in the host with the thinned  white icing.  Use a toothpick to guide into corners.

Let dry at least one hour.

Add the detail with the reserved white and gold piping icing.

Let dry overnight, or at least 6 hours.

Get out your luster dust supplies:  Luster dust, small ramekin, small paintbrush and vodka (a good excuse to always have vodka in the house).
This is "Golden Charm" luster dust.  I LOVE it and bought it at a little shop in Houston.  Can't seem to find it online, but any gold luster dust will do.

Mix up your luster dust with a few drops of the vodka and brush it on. (The alcohol will evaporate, leaving just the gold sheen.)  Add a few drops of vodka to the ramekin as you're working if it starts to get clumpy on you.  A little goes a long way, so don't worry about using all of the container in one shot.  (Here's a video about applying luster dust...)

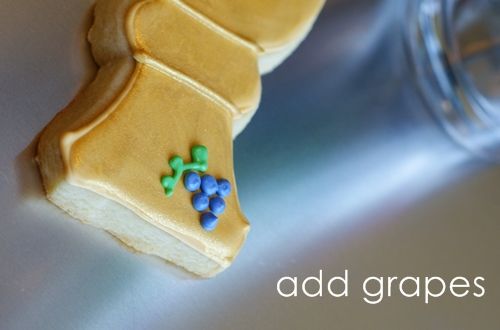
Then, with #1 tips, add the grapes and leaf/stem detail.


All ready for First Communion!

Wednesday, April 27, 2011

Confirmation Cookies . . .


There is something so sweet about a dove cookie.  Maybe it's the occasions they represent?  I've made them before for a baptism.  A friend's son is getting confirmed this week and these are for his confirmation class.


I really love the way the personalized ones came out. I think everyone likes to see their name on a cookie, don't you?


Wanna make 'em for a special occasion of your own?

Here's what you need:
 
Using a  #2 tip, outline the cookie in white royal icing. 

Thin the white icing (reserve a bit for later) with water, a little at a time, until it is the consistency of thick syrup.  Cover with a damp dishtowel and let sit several minutes.

Stir gently with a rubber spatula to pop any large air bubbles that have formed. Transfer to a squeeze bottle.

Fill in the outlined cookie with the flood icing.  Use a toothpick to spread into sides and corners.

Let sit 1 hour.

 
With the reserved white icing and #1 tip, add detail on wings, tail and add an eye.   Personalize, if you want.


Using another #2 tip, pipe the branch in leaf green.


With a #1 or 2 tip, pipe yellow flowers on the branches.

Let dry overnight before packaging.


Happy Confirmation, Matthew. :)

Tuesday, April 26, 2011

How to transfer flood icing to a squeeze bottle . . . Works for Me Wednesday

Over the last few weeks, I've gotten this question over and over again in the comments, in my email and on twitter:

"How do you get flood icing from the bowl into the squeeze bottles?"

Here's my secret...I don't have a secret.  I just pour it in.

Take an empty squeeze bottle,


and icing thinned for flooding,


preferably, do not try to do this while holding a camera in one hand.


Pour in s-l-o-w-l-y.


There we go; that's better.


I'm right-handed, so normally, I hold the container of icing in my left hand and with a silicone spatula in my right, carefully guide the icing into the bottle.


{Sometimes it gets messy, but usually I can make it with no spills.}

If it does plop over the side, wipe it up with a damp paper towel.

There it is...my non-secret secret.

I guessing someone has a better (neater) way.  Spill it, sister (not literally). 

Monday, April 25, 2011

Beer Bread, 4 ways

 
You might as well know...I like beer.  I come from a family of beer drinkers.  "I come from a family of neurosurgeons" might sound more impressive, but there ya go.
Even though I'd never had a beer until I was 21 *cough*, I'd gotten a little taste from my mom's famous beer bread.  It couldn't be simpler to make (FOUR INGREDIENTS), no kneading, no rising....just stir, bake, done.

Since my sister and her family were coming over for Easter, we decided to do a little "beer bread sampling."  Four beer breads, made with 4 different New Belgium beers.

Our breads were:
  1. Mom's Classic, made with Fat Tire,
  2. Gruyere & Rosemary, made with Blue Paddle,
  3. Orange Nutmeg, made with Mothership Wit
  4. and Cinnamon Chocolate Chip, made with 1554
Now, this was a tough, tough assignment.  Eat bread and drink beer. But we survived...and one bread came out the winner...
Gruyere & Rosemary was hands-down everyone's favorite.  And it IS delicious....especially served warm, with butter running down the sides.

I have to tell you though, I really loved the sweet versions.  (You're shocked, right?)
 
The orange nutmeg bread had these little flecks of orange zest throughout and the sweet orange glaze on the top? Oh so yummy.  And smells SO good!
Let's talk cinnamon chocolate chip bread, shall we? It's is calling my name right now.  This bread was so decadent at room temperature with its little pockets of bittersweet chocolate chips, but toasted? With butter? For breakfast?  Yes please, I'll have another.
And I can't forget the original....mom's classic beer bread.  Seriously, try it.  Warm bread, straight from the oven in one hour?  Try it with dinner tonight. You'll be glad you did.

Mom's Classic Beer Bread

3 c. self-rising flour
3 TBSP sugar
12 ounces room temperature beer
melted butter

Preheat oven to 350.  Grease a 9x 5" loaf pan with shortening.

Stir together the flour and sugar.  Add the beer and stir until combined.

Spoon into prepared loaf pan,  and bake 1 hour.  Remove immediately from pan and place on a cooling rack over a cookie sheet.  Pour melted butter on top of the bread, letting it drip down the sides.  Enjoy!


variations:
  • Gruyere-Rosemary: use a beer such as New Belgium's Blue Paddle Pilsner-Lager.  Stir in 1 cup shredded Gruyere cheese and 1 TBSP fresh rosemary to the basic dough.  Brush the top with melted butter after removing from the pan.
  • Orange Nutmeg: use a wheat beer, such as Mothership Wit. Zest a large orange and add the zest and 1/4 tsp. freshly grated nutmeg to the basic dough.  While the bread bakes, juice half of the orange.  Whisk with some powdered sugar to make a glaze.  Remove cooked bread from the pan, poke several holes in the top with a toothpick.  Pour the glaze over the bread, allowing it to drip down the sides.
  • Cinnamon Chocolate Chip: use a dark beer such as 1554.  Substitute brown sugar for the granulated.  Stir in 3/4 c. bittersweet chocolate chips (Ghiradelli) and 1/2 tsp cinnamon to the basic dough.  Sprinkle the dough with cinnamon-sugar before baking.  Rub the top of the bread with butter after removing from the pan, if desired.

As part of the Foodbuzz Tastemaker Program, I received a stipend to purchase New Belgium beer and ingredients. Thanks, FoodBuzz!

Thursday, April 21, 2011

Bunny Bait


If you are looking for something simple, quick and UTTERLY DELICIOUS to make and share for Easter, I have something for you.....Bunny Bait!

This idea actually comes from darling Kellie of This Blessed Nest and her Valentine Confetti.
{Why, yes, I have been dreaming about this since February.}

I followed Kellie's instructions (so pop over there for the recipe) with just a couple minor tweaks:

  • I used Easter m&m's (that was probably obvious),
  • and plain vanilla candy melts,
  • and 2 full bags of popcorn,
  • and added....

...Sprinkles!  


Here's my #1 tip for making Bunny Bait....
GET IT OUT OF THE HOUSE!!!

This stuff is highly addictive.  Bag it up and....Put it in your kiddo's lunchbox.  Send it to kiddo's teacher (Hi, Mrs. P!).  Run it over to the neighbors.  Send it with your hubby to work.
 
{And if your hubby is concerned about handing out something called "bunny bait" to his colleagues, tell him "Candied Popcorn" will work just fine.} ;)

Wednesday, April 20, 2011

Pretty Pink Seahorses . . . and finding inspiration


Once you've been making cookies a while, finding inspiration is not a problem...

"Ooo...that lamppost would make a great cookie!  Gosh, I think I'll make doorknob cookies." 

But if you're looking for some really CUTE inspiration, look no further than a printable site, like that of Living Locurto.  Amy of Living Locurto has the *most fun* party printables that are sure to spark some awesome cookie decorating  ideas!

Take a peek at these:
These seahorse cookies were made to go along with Amy's *darling* Mermaid Party printables.   Amy provided a template and the cookies were hand-cut around the design.  You can find the template on Amy's site, here.

{A note about using templates.  Hand-cutting designs is time-consuming.  One way to make it a bit faster is to use the template as a guide and then let your decorating define the shape.  You can see the difference above.  See how the one on the left has each little point and arch cut while the one on the right is just the general shape.}

To make the seahorse cookies, you'll need...

With a #3 tip (a #3 will allow the outline to show more), pipe the outline of the seahorse in the darker pink icing.

Thin both the light and the darker pinks with water, a teaspoon at a time, stirring by hand until it is the consistency of thick syrup.  Cover with a damp dishtowel and let sit for several minutes.

Stir gently with a silicone spatula to pop and large air bubbles and transfer to squeeze bottles.

Working 6-8 cookies at a time, fill in the cookies with light pink icing.  Use a toothpick to guide into corners.
 
Going back over the same 6-8 cookies, add the cheek and stripe detail on top of the wet icing.  Also, fill in the "crown" and fin of the seahorse with the thinned dark pink.


Now add the light pink detail on top of the dark pink.

Let the cookies dry overnight.  The next day, add the eyelash detail with a food coloring pen.


 Want sand?  Crush up some graham crackers on a platter....you have sand.  (FYI...making sand takes A LOT of graham crackers.  Have a few boxes on hand. You can always spread the extras with Nutella....it's part of a balanced breakfast.)

Now, wouldn't your little mermaid like some pink seahorses?!?  
And, remember to check out Amy's Mermaid Party

    *I'm linking these up to Cheryl's I'm Lovin' It party!*