Hey guys! A quick note to let you know there's a new vlog over at University of Cookie. This one is called "making royal icing."
Come take a peek! {I may or may not have invented a new drinking game to go along with it!} ;)
Friday, April 30, 2010
Wednesday, April 28, 2010
For a very POPular Teacher . . .


- Make sugar cookies using a candy corn cookie cutter (it's a multi-tasker) and let cool.
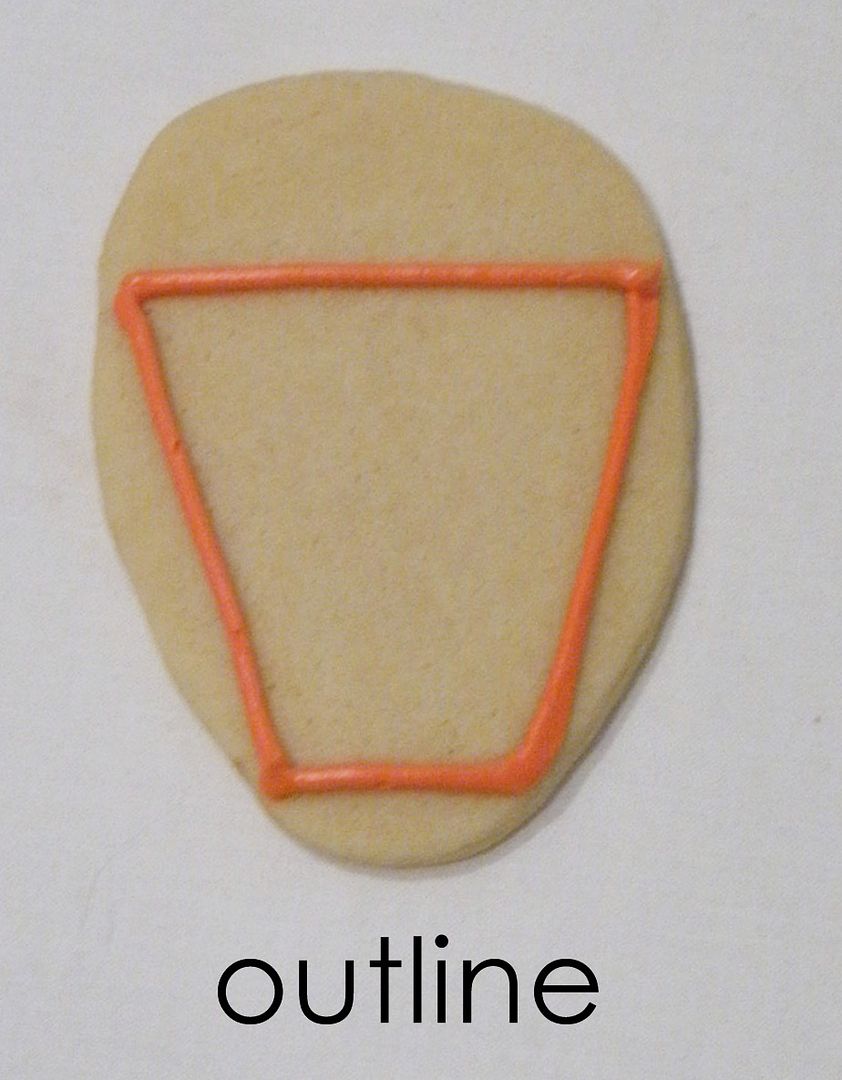
Using red royal icing and a #3 tip, pipe the outline of a popcorn box (AmeriColor Super Red).

- With a #2 tip, pipe a wide oval in yellow icing (AmeriColor Egg Yellow).

- With another #2 tip, pipe the outline of popped popcorn above the box in white (add AmeriColor Bright White for extra white).
- Thin the yellow icing with a bit of water, stirring gently until it is the consistency of thick syrup. Let sit several minutes covered with a damp dishtowel (see a video of this process here).
- Gently stir the icing with a rubber spatula to pop any air bubbles that have risen to the surface and transfer to a squeeze bottle.
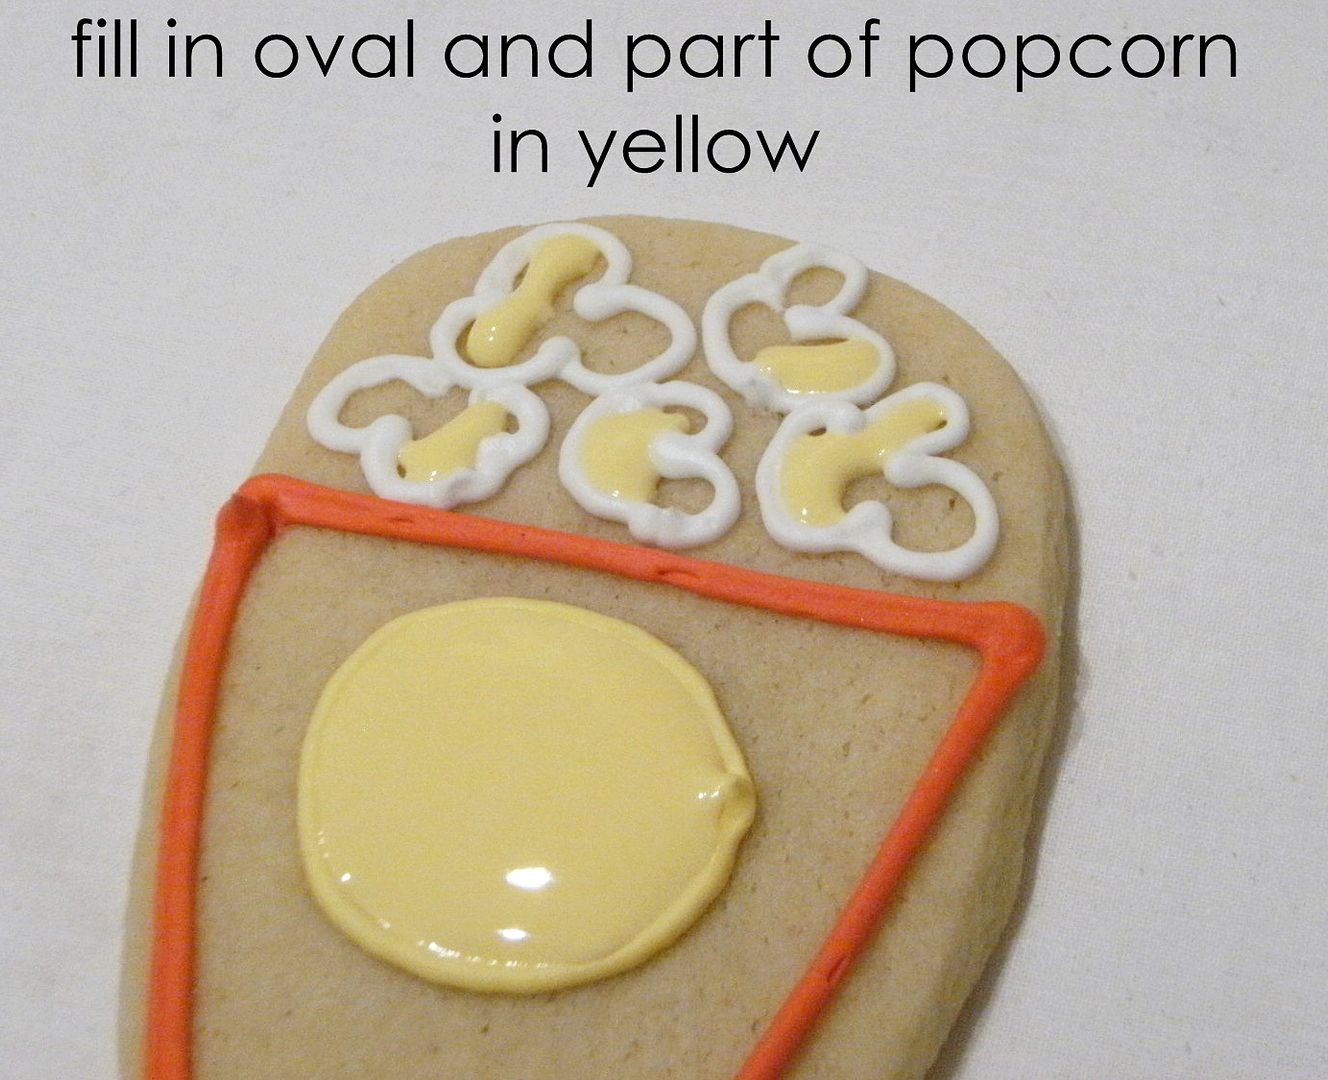
- Fill in the oval and part of each popcorn piece.
- Thin the white icing in a similar fashion.

- Fill in the popcorn box and the remainder of the popcorn. Swirl the yellow and white icings together on the popcorn.
- Let dry at least 1 hour.

- Using a #5 tip, add wide red stripes to the popcorn boxes.
- Switch to a #2 tip and pipe "POPcorn" in red on the oval.

- Outline the oval in red using the #2 tip.

- Let the cookies dry overnight before packaging.

The free printable topper is available from Domesticated Lady here.

If you want to make a few individual popcorn pieces to go along with these, check out these too cute cookies from The Decorated Cookie! Is that the cutest idea, or what?
You know what? I made popcorn cookies about 5 years ago and I am so glad to get a chance to update them. Wanna see?

I like this year's version much better!

Have you planned your teacher gifts yet?
Tuesday, April 27, 2010
Making Extra Cookies . . . Works For Me Wednesday
 Well, you probably knew it was coming after last week's WFMW, but something simple that works for me is making extra cookies.
I *always* make a mistake when decorating cookies. Even if only I can see it...there's always "the ugly one." Knowing I have cushion (and not just on my hips) takes the pressure off and I actually think I make fewer mistakes because of it.
Besides eating them myself, I find my husband is more than willing to eat the evidence of ugly cookies as are my neighbors. (Good neighbors like that are hard to find.)
What is working for you this week? I'll be linking to Works For Me Wednesday!
PS....any grill queens out there? I'm honored to be guest judging On The Grill at Our Homeschool Home starting tomorrow (Thursday). Link up your recipes and pictures. You'll get bragging rights, a darling WINNER button for your blog and a FANTASTIC prize! Get your GRILL on!!!
Sunday, April 25, 2010
Kiddo in the Kitchen: Milk Chocolate Pretzel Tart

But, I'm a mean mom and make him vary up his menu a little with fruit and protein, veggies, and well, cookies.

(This recipe has a lot of waiting time...chilling the dough, rolling and re-chilling, cooling the crust, cooling the ganache and finally time for the tart to set-up. That said, I don't think it's the best recipe to make with a 4-year-old. Not much instant gratification. :))
Milk Chocolate Pretzel Tart
1 stick unsalted butter, softened
1 & 1/2 c. thin pretzels, coarsely crushed
3/4 c. powdered sugar
1/2 c. flour
1 egg
2 oz. bittersweet chocolate, melted
1 & 1/2 c. heavy cream
3/4 lb. milk chocolate, chopped
Sea Salt (Maldon or Fleur de Sel)
crushed pretzels

Flatten the dough between 2 sheets of waxed paper and refrigerate at least 30 minutes.
Preheat oven to 350. Roll out the dough between the waxed paper to 12" round. Peel off the top sheet and invert over a 10" tart pan. Press dough into the corners and patch any tears. Trim dough and refrigerate 30 minutes.
{Kiddo wants you to know he did not CHOOSE the heart-shaped pan...it's the only one I have. Whew...crisis averted.}


{Or dried black-eyed peas in our case.}
Bake for 30 minutes. Remove the parchment and weights and bake for another 10 minutes. Cover the edges with foil if needed. Let cool completely.

In a medium saucepan, bring the cream to a simmer. Place the chopped chocolate in a bowl. Pour the cream over the chocolate; let stand 5 minutes. Whisk until smooth. Let sit at room temperature for 45 minutes, until it is a room temperature.
Pour the filling into the shell and refrigerate until set, at least 4 hours.


Before serving, sprinkle lightly with sea salt and crushed pretzels.


Kiddo gives it a...drum roll, please...

THE END

Friday, April 23, 2010
University of Cookie
Alright...it has taken me a few, well, 6 months, but I did it.
When I posted a survey back in October to find out what YOU wanted, it never occurred to me that you might say videos. But you did...or some of you did.
So, I present to you my first how-to video. I thought it would be easier to put all of the videos in one place on a new blog called University of Cookie!!!
Disclaimer #1:
University of Cookie is looking a little plain right now, but will be much cuter once the fabulous Jessica of The Frilly Coconut gets a hold of it!
Disclaimer #2:
Isn't it always a little disappointing when you've pictured someone in your head and then you SEE them and think...."that's not what they look like!"
Well, you're about to see and HEAR me. I have my apron tied a little too high, my hair is a mess and so on and so on. In my mind, I looked a little bit more like this:

So feel free to picture Giada in my place.
{Except for you, honey.}
So, pop on over to University of Cookie!!! And, boy, do I have some talented bakers who are going to join me there from time to time. Come see!
Tell me....what other cookie decorating videos would you find helpful?
When I posted a survey back in October to find out what YOU wanted, it never occurred to me that you might say videos. But you did...or some of you did.
So, I present to you my first how-to video. I thought it would be easier to put all of the videos in one place on a new blog called University of Cookie!!!
Disclaimer #1:
University of Cookie is looking a little plain right now, but will be much cuter once the fabulous Jessica of The Frilly Coconut gets a hold of it!
Disclaimer #2:
Isn't it always a little disappointing when you've pictured someone in your head and then you SEE them and think...."that's not what they look like!"
Well, you're about to see and HEAR me. I have my apron tied a little too high, my hair is a mess and so on and so on. In my mind, I looked a little bit more like this:
(photo source: www.giadadelaurentiis.com)
So feel free to picture Giada in my place.
{Except for you, honey.}
So, pop on over to University of Cookie!!! And, boy, do I have some talented bakers who are going to join me there from time to time. Come see!
Tell me....what other cookie decorating videos would you find helpful?
Thursday, April 22, 2010
This is as close as I'll ever come to quilting . . .

One of those people is Sheri Howard. Sheri is a quilter and author of quilting books (here's a link to her first one...so cute!). She asked if I could make cookies for the editor of her second book, Not Your Grandmother's Quilt.
 {Here it is...aren't those quilts pretty?!? See that one in the lower right corner? We decided to do a simple square based on that for the cookies.}
I really enjoyed making these quilt square cookies. My mom was a quilter...so is my sister, my aunt, my cousins.


Congratulations, Sheri, on your new book! I think I may need one for more quilted cookie inspiration!
 I'll be linking these up to TidyMom's I'm Lovin' It party!
Tuesday, April 20, 2010
Making Extra Icing . . . Works For Me Wednesday
 There is almost nothing worse when making cookies than running out of icing. You have to stop what you're doing, get out all the ingredients (that you just put away an hour ago!), make up another batch, then hope you tint it just the right shade to match what you had to begin with.
If I'm making more than a dozen cookies, I usually double this recipe.

- You never know what color you may run out of...
- Or, you could forget to make a color....oh, no!
- If you thin out your flood icing too much, add a little of your extra white. It won't change the color much and you've just saved yourself from a big headache.
Having a little extra white icing is like having an insurance policy. You hope you never need it, but you're glad it's there when you do.
I hope that helps! Can't wait to see all the other tips at Works For Me Wednesday!
PS...the sweet-smelling giveaway from Great Cakes Soapworks runs though Wednesday night. Be sure to enter! :)
Saturday, April 17, 2010
Stop and smell the goodies . . . (a giveaway)
Here's a little secret about me. I like to smell like food. Soap, lip balm, lotion, perfume...
It took me a good 2 months to find a perfume because I wanted vanilla-y, but not too vanilla-y...know what I mean? {I decided MAC MV2, in case you are really curious.}

In December, I discovered this little shop called Great Cakes Soapworks. I was looking for a lip balm...everything was making my lips MORE dry...and decided to try Great Cakes Lip Butter (in Vanilla Latte...back in stock Wednesday, btw).
OH MY. It rocked my world! Not only were my lips soft, they smelled heavenly. For weeks after getting it, I would walk around the house thinking, "what smells so good?" It was my lips! ;)
I also tried the peppermint soap. Totally lovely, rich, peppermint-y, and left my skin so moisturized.

When I talked to Amy about a giveaway, she sent me two "foodie" soaps to try Oatmeal, Milk & Honey and Moroccan Spice.
Oatmeal, Milk & Honey smells so pure and clean. I imagine it's the kind of soap Sandra Dee would have used in Grease. Milk, Honey, Oatmeal...perfect for layering with any other scent.
Moroccan Spice has coffee grounds for a little exfoliation. Every time I used it, I felt like I had been to the spa. The scent is spicy and wonderful...and is great for men, too.
Great Cakes even makes PEANUT BUTTER soaps!!! Those may be next on my list! I love that these soaps are handmade and natural. I think they last longer than those bottles of shower gel I had been buying.
Great Cakes Soapworks is generously giving one Bake at 350 reader...
And perfect timing to treat yourself or your mom for Mother's Day!!!
To enter, just pop on over and tell me what product you'd love to try. Tweet the giveaway for an extra entry (leave a separate comment). " Stop and smell the goodies! Sweet smelling giveaway from @bakeat350tweets : http://ow.ly/1zGvy Perfect for Mother's Day! "
Drawing will be held Wednesday, April 21st at 8pm. Good luck!
It took me a good 2 months to find a perfume because I wanted vanilla-y, but not too vanilla-y...know what I mean? {I decided MAC MV2, in case you are really curious.}
OH MY. It rocked my world! Not only were my lips soft, they smelled heavenly. For weeks after getting it, I would walk around the house thinking, "what smells so good?" It was my lips! ;)
I also tried the peppermint soap. Totally lovely, rich, peppermint-y, and left my skin so moisturized.
Oatmeal, Milk & Honey smells so pure and clean. I imagine it's the kind of soap Sandra Dee would have used in Grease. Milk, Honey, Oatmeal...perfect for layering with any other scent.
Moroccan Spice has coffee grounds for a little exfoliation. Every time I used it, I felt like I had been to the spa. The scent is spicy and wonderful...and is great for men, too.
Great Cakes even makes PEANUT BUTTER soaps!!! Those may be next on my list! I love that these soaps are handmade and natural. I think they last longer than those bottles of shower gel I had been buying.
Great Cakes Soapworks is generously giving one Bake at 350 reader...
- one bar Oatmeal, Milk & Honey
- one bar Moroccan Spice
- one bar soap of your choice
- one lip butter of your choice
How's THAT for smelling good?!?
And perfect timing to treat yourself or your mom for Mother's Day!!!
To enter, just pop on over and tell me what product you'd love to try. Tweet the giveaway for an extra entry (leave a separate comment). " Stop and smell the goodies! Sweet smelling giveaway from @bakeat350tweets : http://ow.ly/1zGvy Perfect for Mother's Day! "
Drawing will be held Wednesday, April 21st at 8pm. Good luck!
Thursday, April 15, 2010
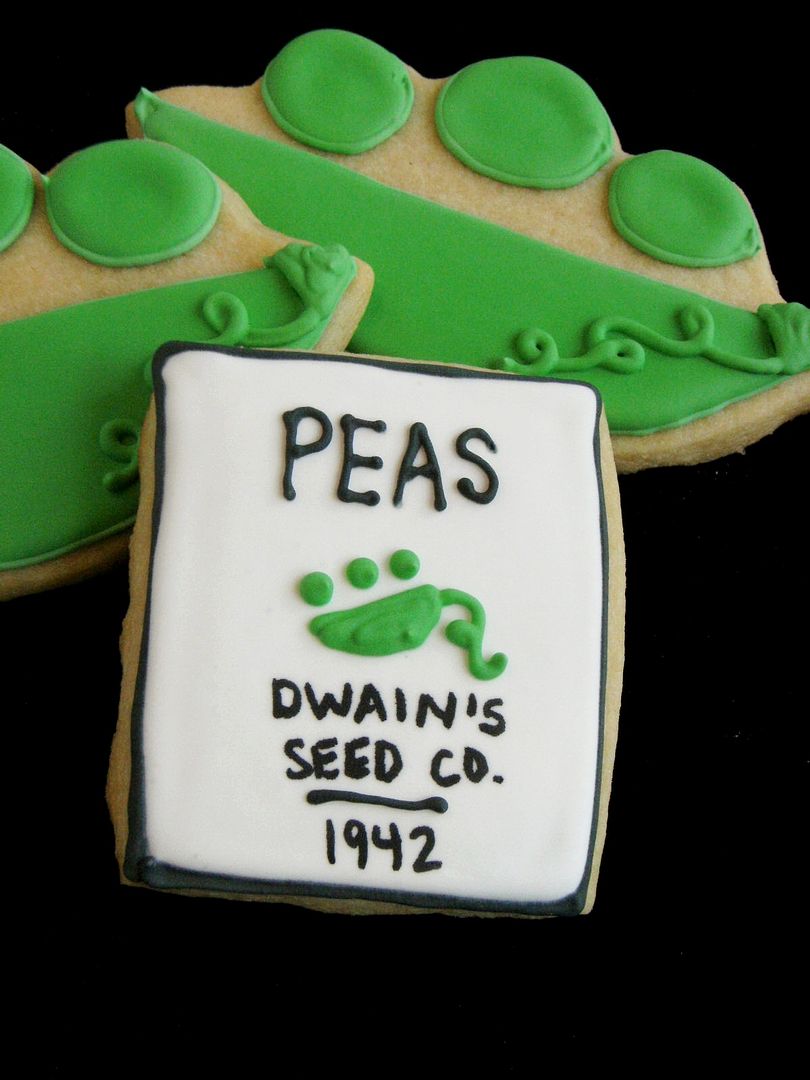
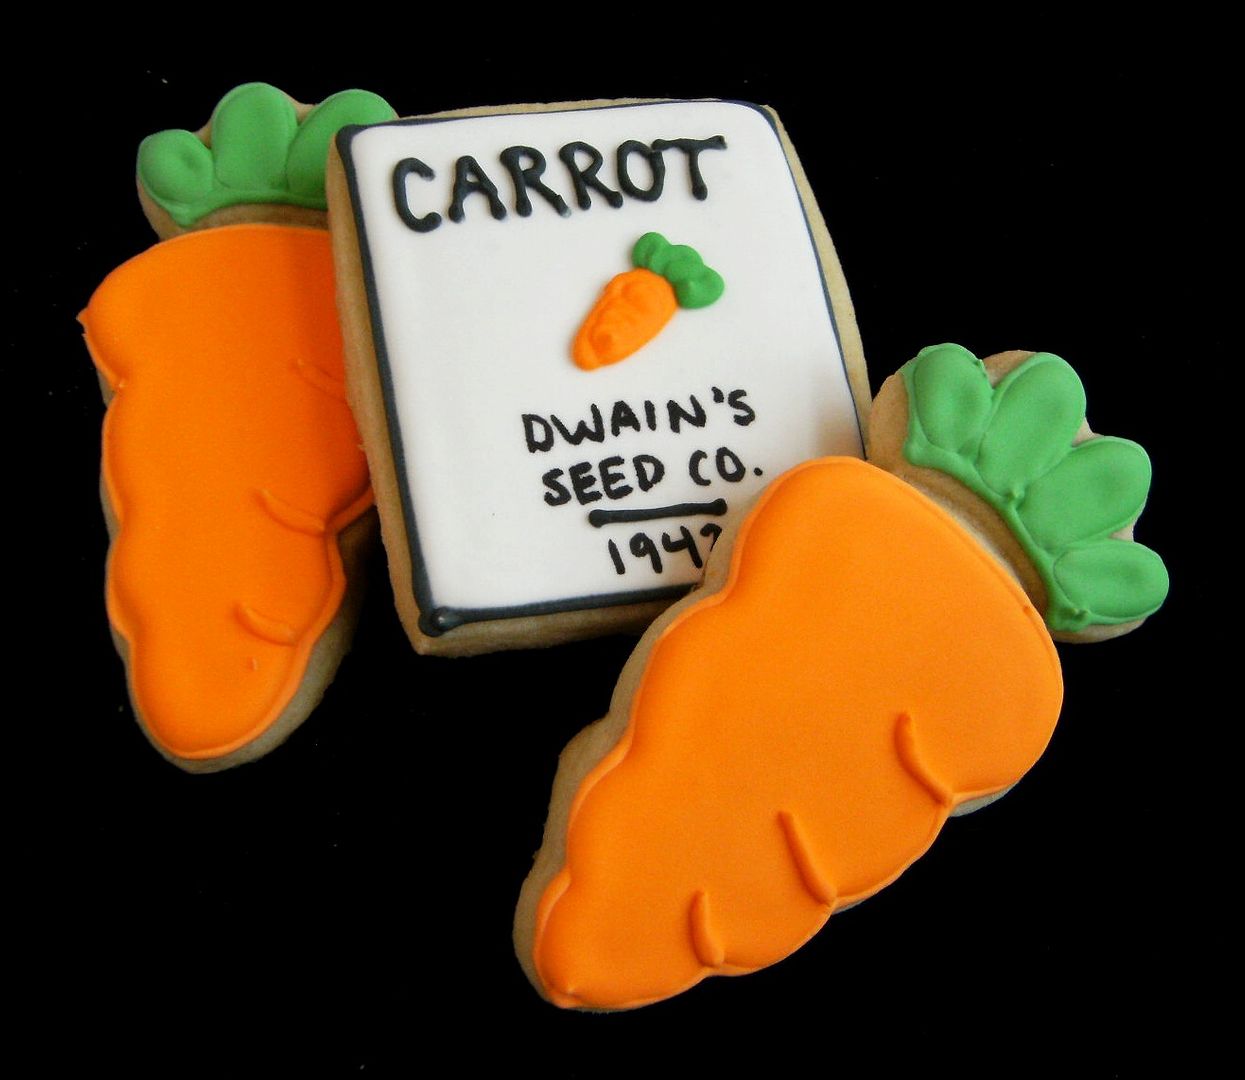
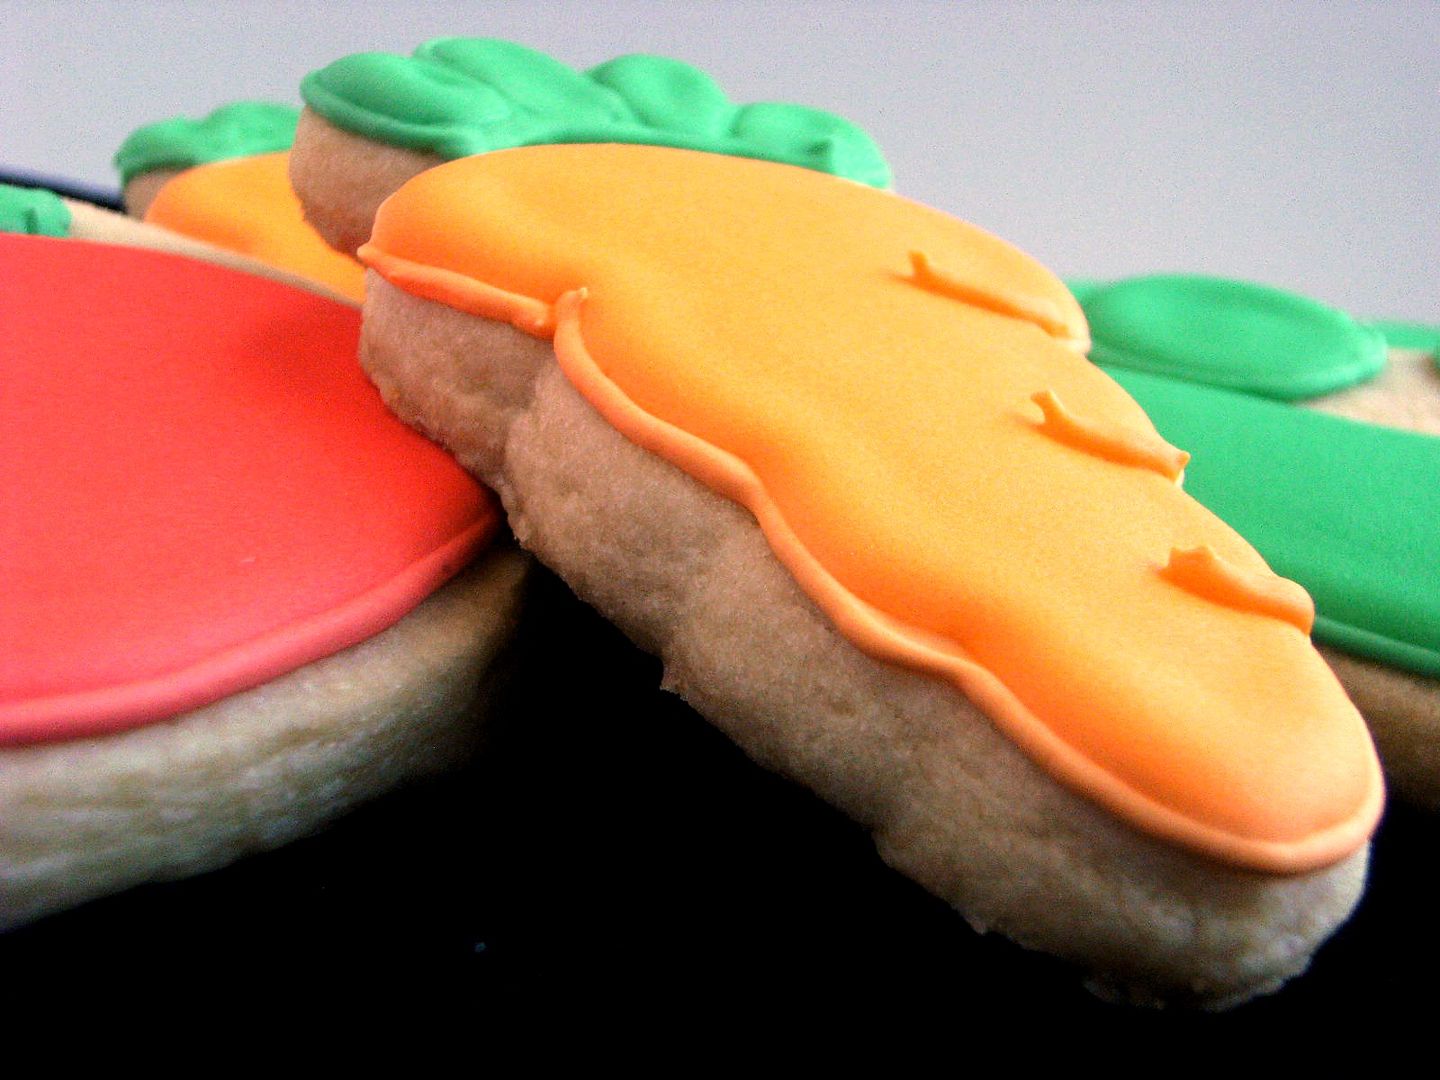
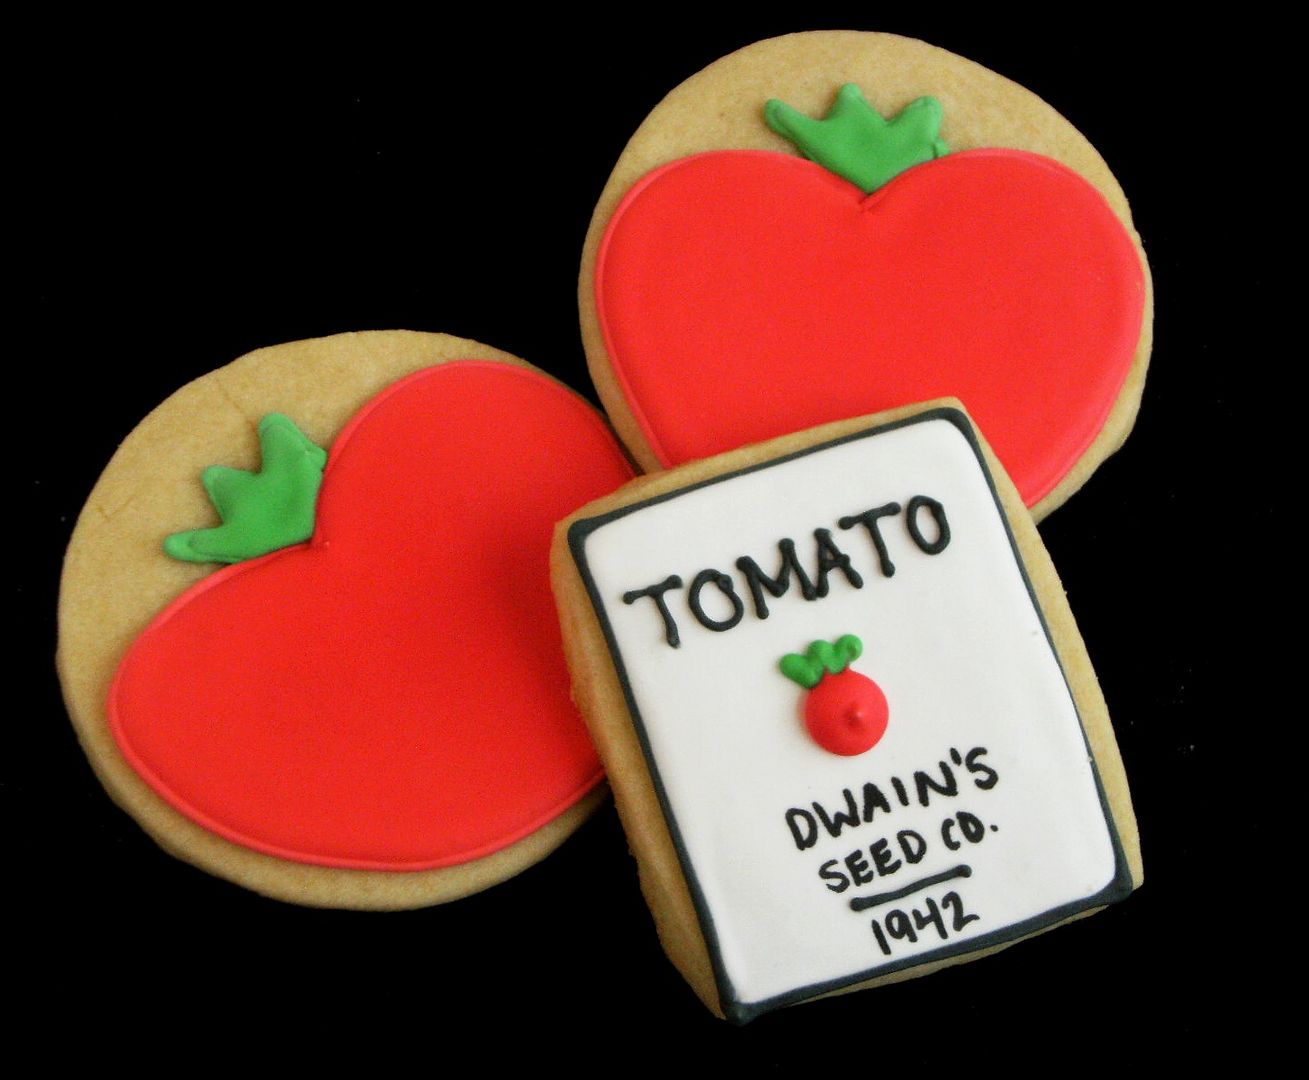
How does your garden grow?
Mine grows COOKIES!!!
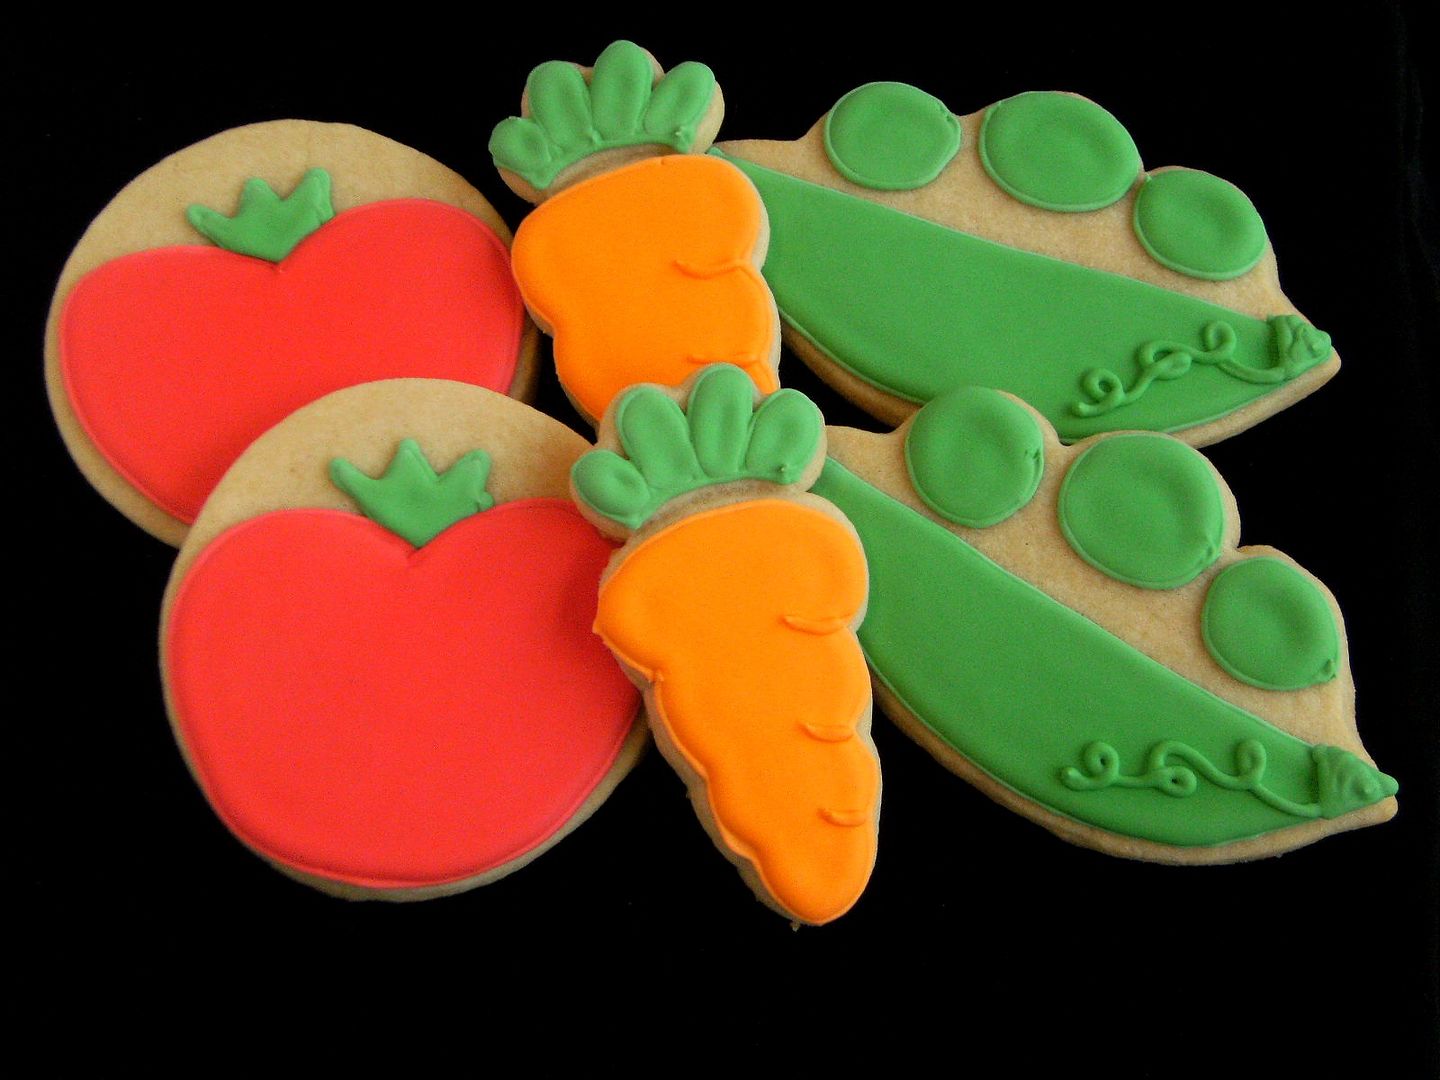
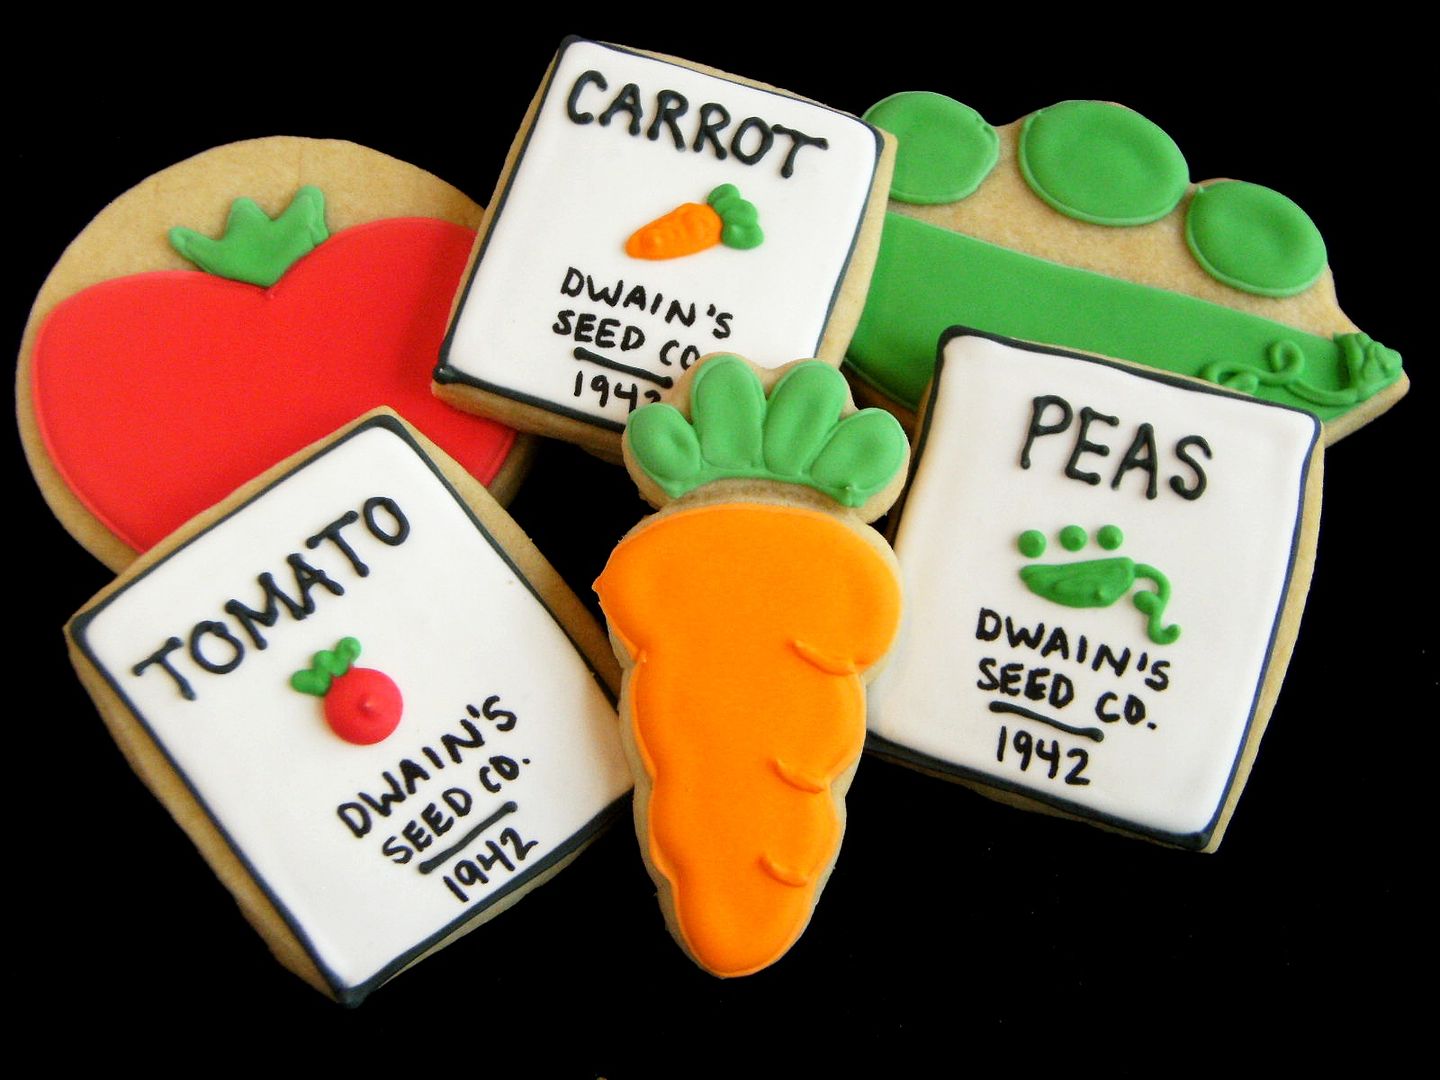
They are pretty simple to make, and might be some of my favorite cookies ever.
Just outline with royal icing...
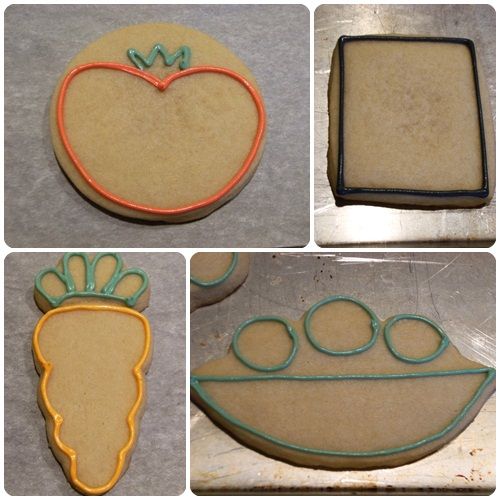
Fill with thinned icing...
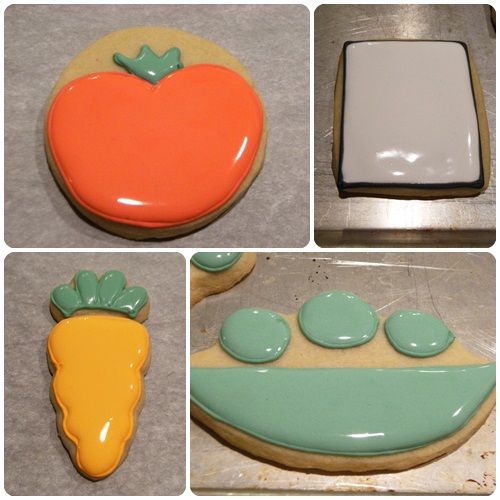
And add detail...
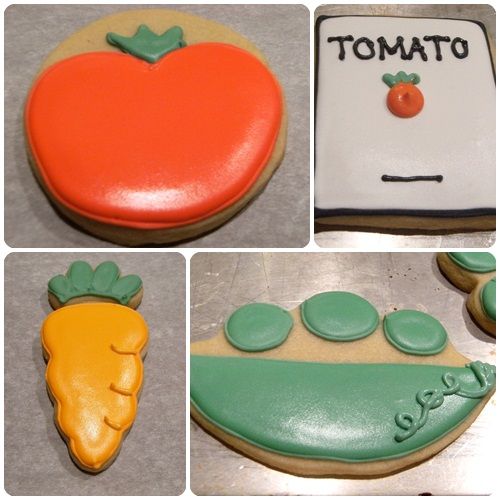
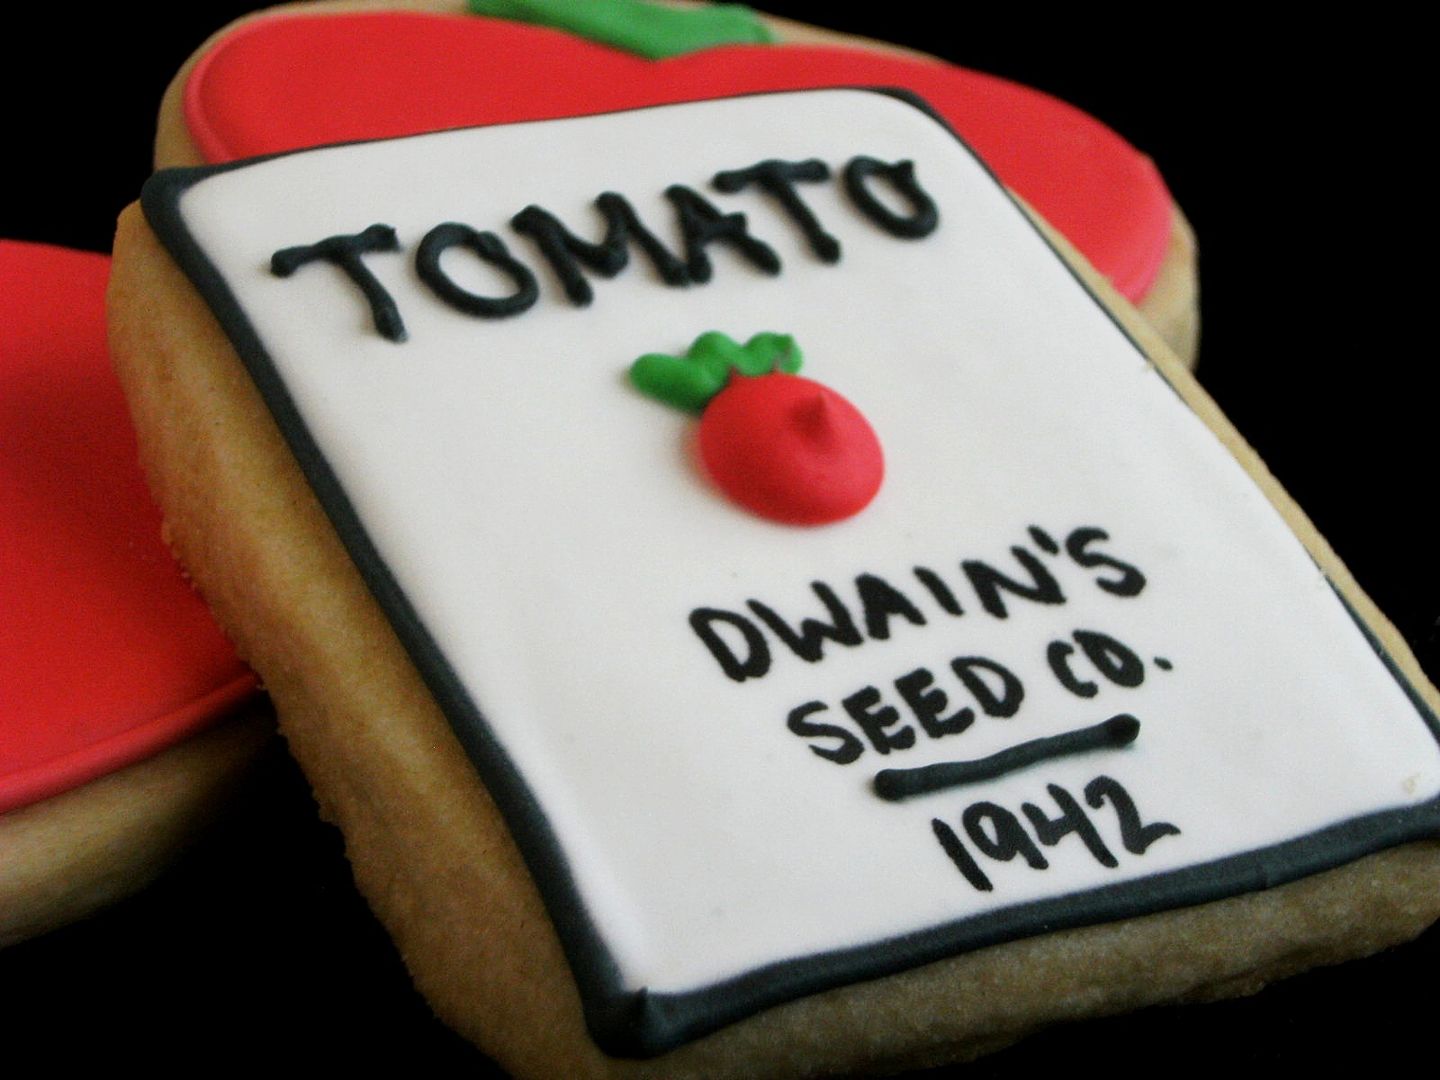
The name and year were added after the cookies dried over night with an AmeriColor Gourmet Writer food coloring pen. I wasn't sure I could get it all on the cookie in piped icing.
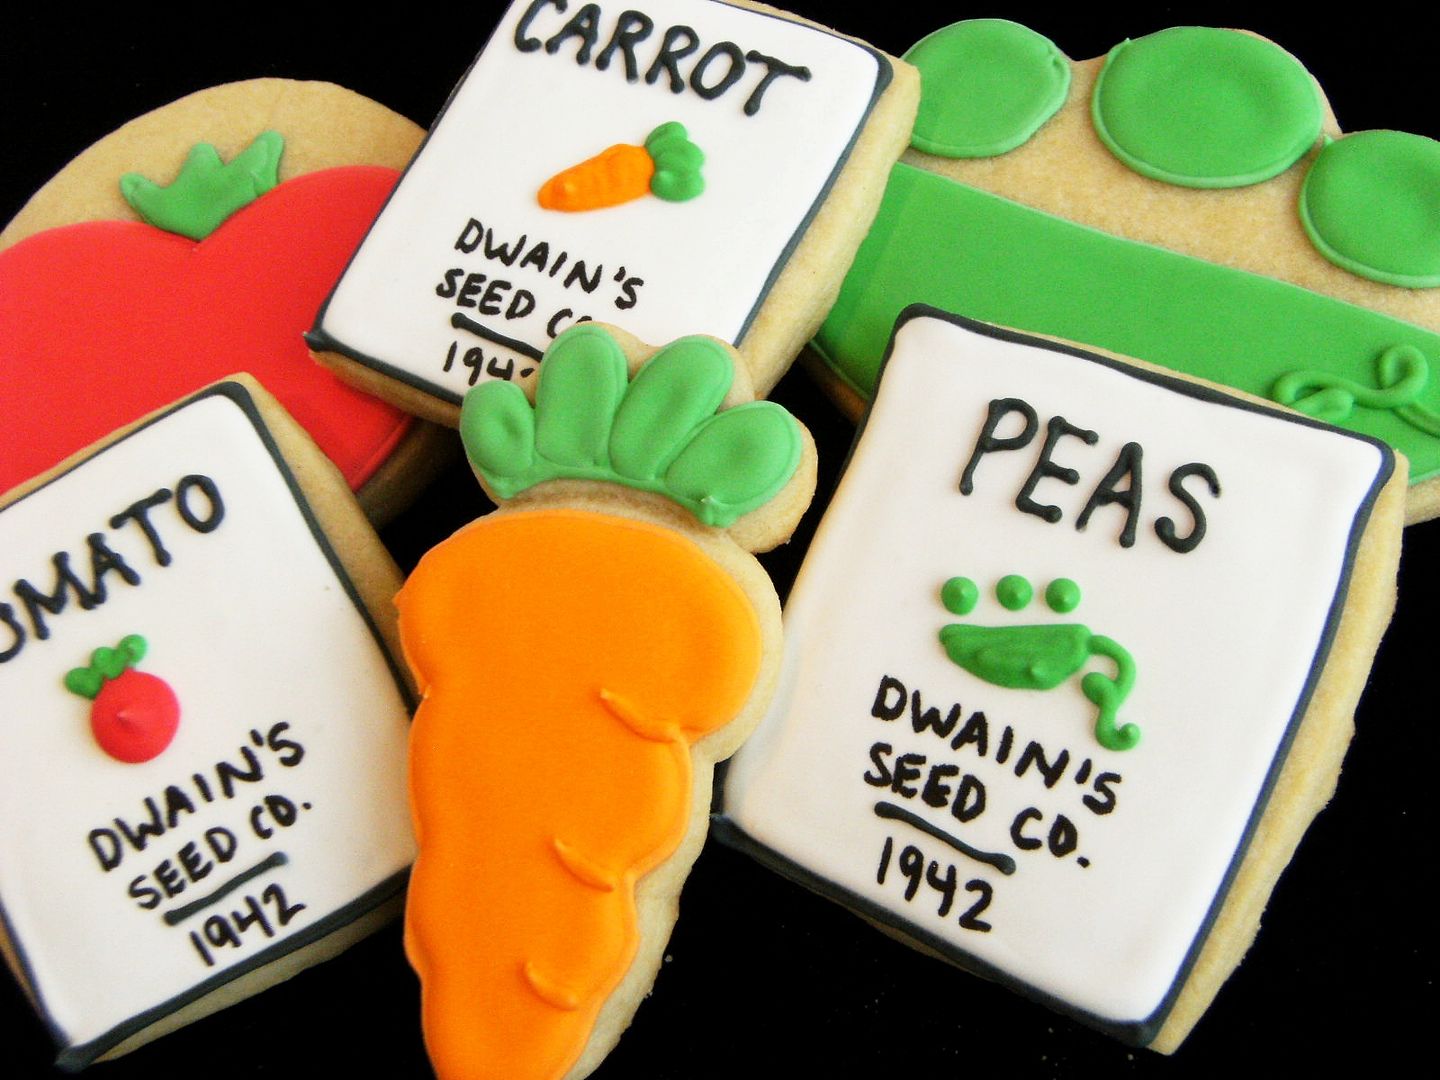
I also strongly recommend the AmeriColor Gourmet Writers over the other brands found at the grocery and craft stores. I've tried both and AmeriColor wins, hands down!
THIS is how I want to eat my veggies!
{With the exception of those homegrown tomatoes. Who wants to trade?}
Subscribe to:
Posts (Atom)