Friday, December 21, 2012
Choose The Right Portable Accommodation
Today, with an increasing number of classes, the separation of the age groups and a growing number of disciplines in the curriculum, many schools have begun to consider to make a portable building as a way to get more space and better resources. Portable classroom has been used for many years in schools across the country and has proved very popular with students who like adventure leaving primary school building for classes! There are a lot of portable buildings on the market and the beauty of this structure does not require planning permission and can be built in a few hours, it is very easy and can be moved immediately. You can adjust the size and configuration of the building and user-defined functions, such as lighting, heating, and even drinking water systems. Are you a new set of portable buildings for a new lesson, or just need more input from students this year, so you can create a series of buildings to be installed on the site. When choosing a mobile classroom tips are available, and you need the right size and features to suit your needs and the space you have to be fair. Portable buildings at many schools are located on the edge of a park or sports field. It's often the only place where the school requires free building, but the good news is that this building can be built on any solid surface, giving you the freedom to plan their lessons and put their classroom if needed. While some portable buildings designed as a temporary structure. The nature and style of the building, they would take many years new classrooms will be built carefully by the installer with years of experience in the installation and configuration of mobile buildings. These buildings offer great flexibility and are ideal if you use a large building in other areas of the school, you can take classes on a regular basis without interruption. Also ideal as an office building and come in a variety of floor plans. You can learn more about building mobile online on the internet, which is available in multiple sites such as the site http://cabins4hire.co.uk there. This site serves a range of accommodation There are other types of portable cabins available such as portable toilets, changing rooms and toilets, which can be placed in the area of your choice. Everything you need will be provided, and you can choose from a variety of configurations to suit your needs and availability of your shopping budget.
Wednesday, November 14, 2012
Information about The Portable Accommodation
So many people or customers have satisfied with our services and facilities in the field of portable accommodation, Modular Building Industry, Portable Cabins, Anti Vandal Site Accommodation, Modular Buildings And Storage Containers. Because we applied prices were very affordable and competitive than the others. Please you visit to our official site immediately to get more accurate and comprehensive information.
Tuesday, November 13, 2012
Sunday, November 11, 2012
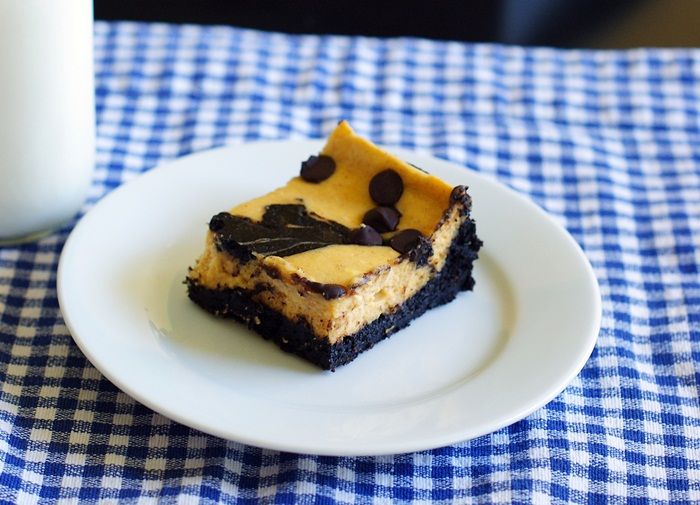
Pumpkin Cheesecake Brownies
I know I've been bossy lately..."you must make this," "you have to make that."
(My sister tells me I'm really good at bossy.)
 OK, but y'all...YOU.MUST.MAKE.THESE. Like this instant. Throw a trench over your pj's, pull your hair back into a ponytail, swipe on some lipstick and mascara, and RUN to the grocery store for these ingredients.
{That running will make you feel less guilty when you eat 3 of these in one sitting.}
 I apologize for the lack of pictures. You know how I love 27 pictures of every recipe. I made these while it was still dark outside so Mr. E could take them to work. I intended to send the entire tray, but Mr. E in all of his wisdom said, "let me take half, so we'll have some to eat at home." I love that guy.
The brownies are rich. They are luscious. They are decadent. I'd be willing to bet that people who say they don't like pumpkin would love these...they're more cheesecake than pumpkin.
 Let's get to it...

Pumpkin Cheesecake Brownies
for the cheesecake layer:
2 (8 oz.) packages (full-fat, people) cream cheese, at room temp.
1/2 cup pumpkin puree
3/4 cup sugar
2 teaspoons vanilla
1 teaspoon cinnamon
1/2 teaspoon ginger
1/4 teaspoon freshly grated nutmeg
1/4 teaspoon allspice
1/4 cup (regular, not light) sour cream
2 eggs, lightly beaten with a fork
for the brownies:
3/4 cup (1 1/2 sticks) unsalted butter
2 cups sugar
1 cup Dutch-process cocoa (such as Hershey's Special Dark)
1 teaspoon kosher salt
1/2 teaspoon baking powder
1 TBSP vanilla
3 eggs
1 cup unbleached, all-purpose flour
1/4 cup dark chocolate chips (such as Hershey's Special Dark)
Preheat oven to 325. Lightly grease a 9x13" pan. Set aside.
make the cheesecake mixture:
With the paddle attachment of an electric mixer, beat the cream cheese until no lumps remain. Add in the pumpkin, sugar, vanilla and spices, beat until smooth.
On low speed, add in the sour cream and eggs until well combined. Set aside.
make the brownies:
In a medium saucepan, melt the butter over low heat. Add the sugar and stir over low heat until combined and hot, not bubbly. You'll only need to heat it for a couple of minutes, until the mixture looks shiny.
Remove the pan from the heat, and stir in the cocoa powder, salt, baking powder and vanilla. Whisk in the eggs until smooth. Stir in the flour.
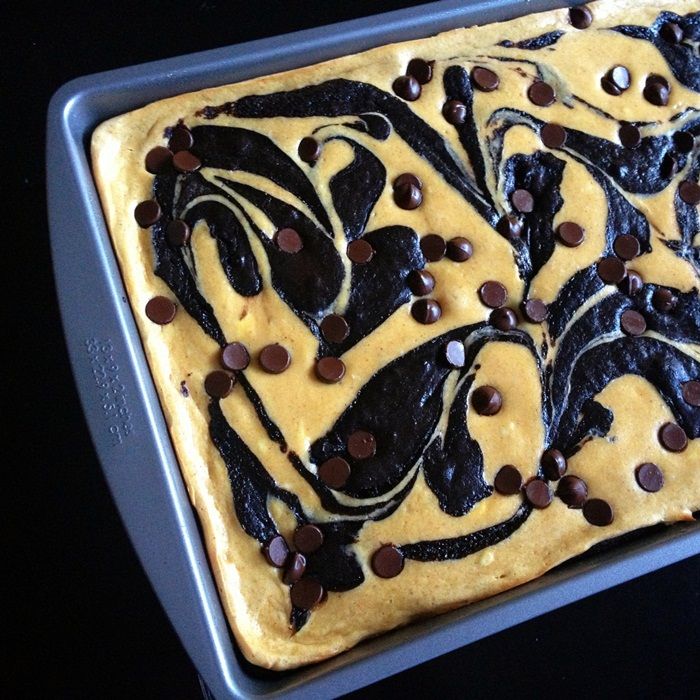
Pour about 3/4 of the brownie mixture into the prepared pan. Spread with an offset spatula. Pour the cheesecake batter over the brownie layer and spread evenly with an offset spatula. Drop the remaining brownie batter on top of the cheesecake layer. Use the offset spatula to swirl the brownie dollops into the cheesecake making a pretty, abstract pattern.
Sprinkle with the chocolate chips.
Bake for 35 minutes or so, until the cheesecake layer is set. Let cool completely on a wire rack, then chill and store in the refrigerator. A bench scraper makes a great tool for cutting them.
{Brownie layer adapted from King Arthur Cookie Companion}
Here's a comment from one of the guys Mr. E works with:
Also, if you love the idea pumpkin and brownies, please check out these recipes from Picky Palate & Cookies and Cups!

(My sister tells me I'm really good at bossy.)
{That running will make you feel less guilty when you eat 3 of these in one sitting.}
{I managed to snap this with my phone before cutting and sending them on their way.}
The brownies are rich. They are luscious. They are decadent. I'd be willing to bet that people who say they don't like pumpkin would love these...they're more cheesecake than pumpkin.
Pumpkin Cheesecake Brownies
for the cheesecake layer:
2 (8 oz.) packages (full-fat, people) cream cheese, at room temp.
1/2 cup pumpkin puree
3/4 cup sugar
2 teaspoons vanilla
1 teaspoon cinnamon
1/2 teaspoon ginger
1/4 teaspoon freshly grated nutmeg
1/4 teaspoon allspice
1/4 cup (regular, not light) sour cream
2 eggs, lightly beaten with a fork
for the brownies:
3/4 cup (1 1/2 sticks) unsalted butter
2 cups sugar
1 cup Dutch-process cocoa (such as Hershey's Special Dark)
1 teaspoon kosher salt
1/2 teaspoon baking powder
1 TBSP vanilla
3 eggs
1 cup unbleached, all-purpose flour
1/4 cup dark chocolate chips (such as Hershey's Special Dark)
Preheat oven to 325. Lightly grease a 9x13" pan. Set aside.
make the cheesecake mixture:
With the paddle attachment of an electric mixer, beat the cream cheese until no lumps remain. Add in the pumpkin, sugar, vanilla and spices, beat until smooth.
On low speed, add in the sour cream and eggs until well combined. Set aside.
make the brownies:
In a medium saucepan, melt the butter over low heat. Add the sugar and stir over low heat until combined and hot, not bubbly. You'll only need to heat it for a couple of minutes, until the mixture looks shiny.
Remove the pan from the heat, and stir in the cocoa powder, salt, baking powder and vanilla. Whisk in the eggs until smooth. Stir in the flour.
Pour about 3/4 of the brownie mixture into the prepared pan. Spread with an offset spatula. Pour the cheesecake batter over the brownie layer and spread evenly with an offset spatula. Drop the remaining brownie batter on top of the cheesecake layer. Use the offset spatula to swirl the brownie dollops into the cheesecake making a pretty, abstract pattern.
Sprinkle with the chocolate chips.
Bake for 35 minutes or so, until the cheesecake layer is set. Let cool completely on a wire rack, then chill and store in the refrigerator. A bench scraper makes a great tool for cutting them.
{Brownie layer adapted from King Arthur Cookie Companion}
Here's a comment from one of the guys Mr. E works with:
"If my girlfriend made these, I might have to buy an engagement ring."
Single ladies...let me know if it works.
Also, if you love the idea pumpkin and brownies, please check out these recipes from Picky Palate & Cookies and Cups!
♥Pumpkin + Brownies forever!!!♥
Wednesday, November 7, 2012
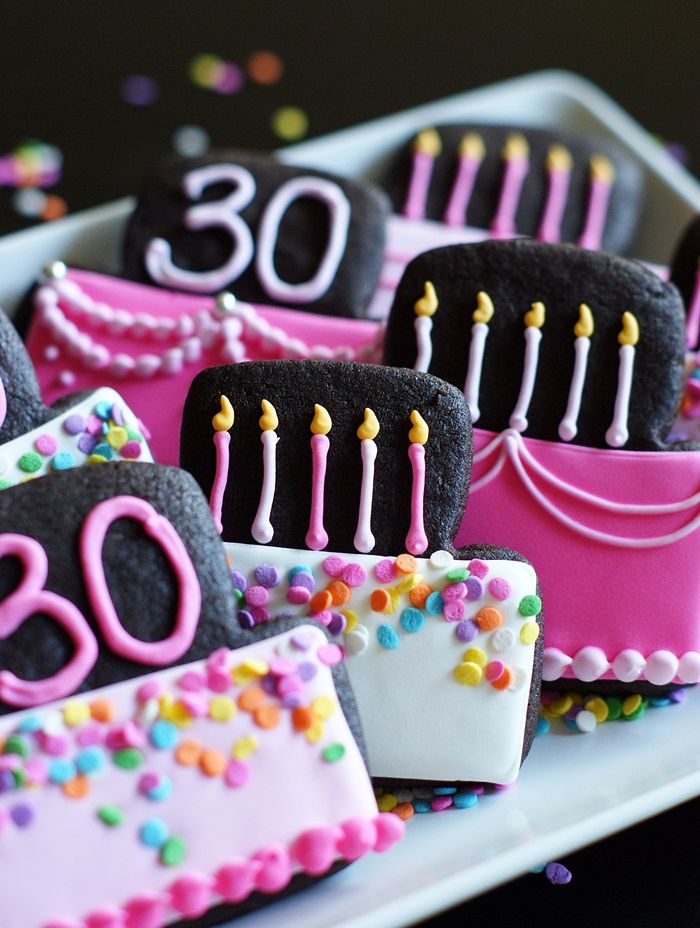
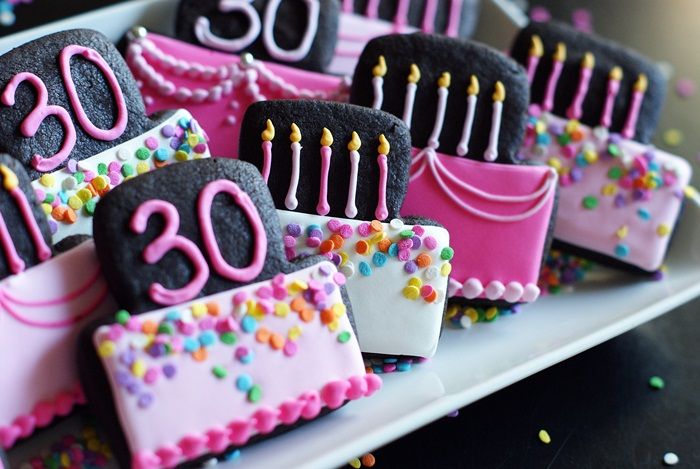
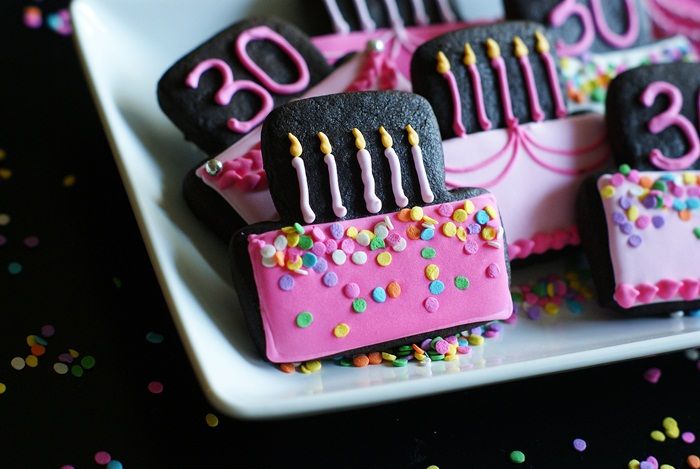
Chocolate Peanut Butter Cut-out Cookies...and a very special birthday!
I've talked before about how my very favorite part of blogging is something that I never, ever expected. I always thought the sugar would be the highlight of blogging, but no...it's the people I've had the pleasure to meet.
That leads me to Jessica from the blog, How Sweet It Is.
Jessica is having a milestone birthday today...
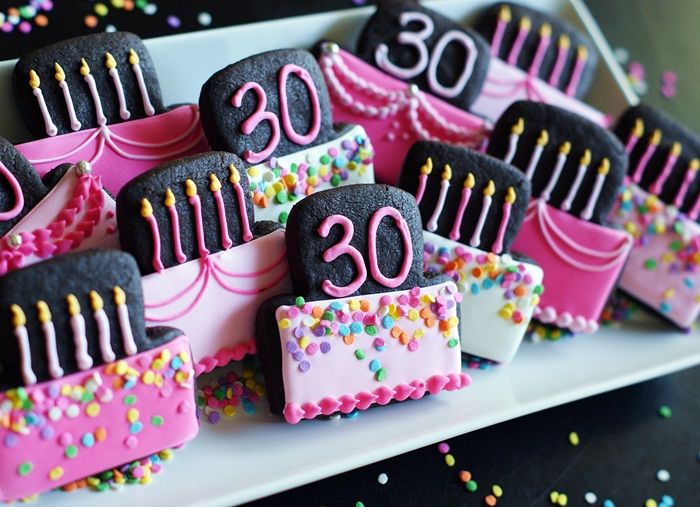 THIRTY!!!
{Ahhh, I remember 30. Kinda.}
 Now, Jessica has been one of my favorite bloggers for a long time. I love this girl. I admire Jessica for her amazingly creative and delicious recipes...her stunning photography...her hilarious sense of humor and writing...her impeccable style...her blogging and social media smarts...and her beautiful, fun spirit.
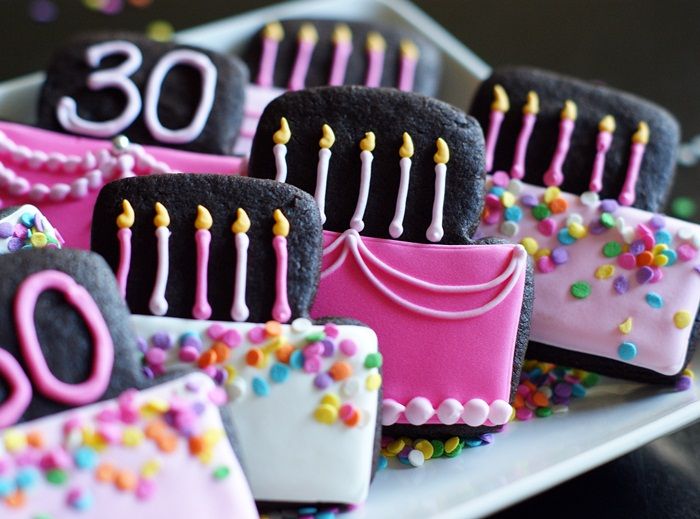
In August, I met Jessica and I can tell you, she's even more lovely in person. (I won't hold it against her that she was BORN just about the same time I was going to see Grease 2 (2!) with my fellow 13-year-old girlfriends.) I wanted to make a little something to celebrate her big day.
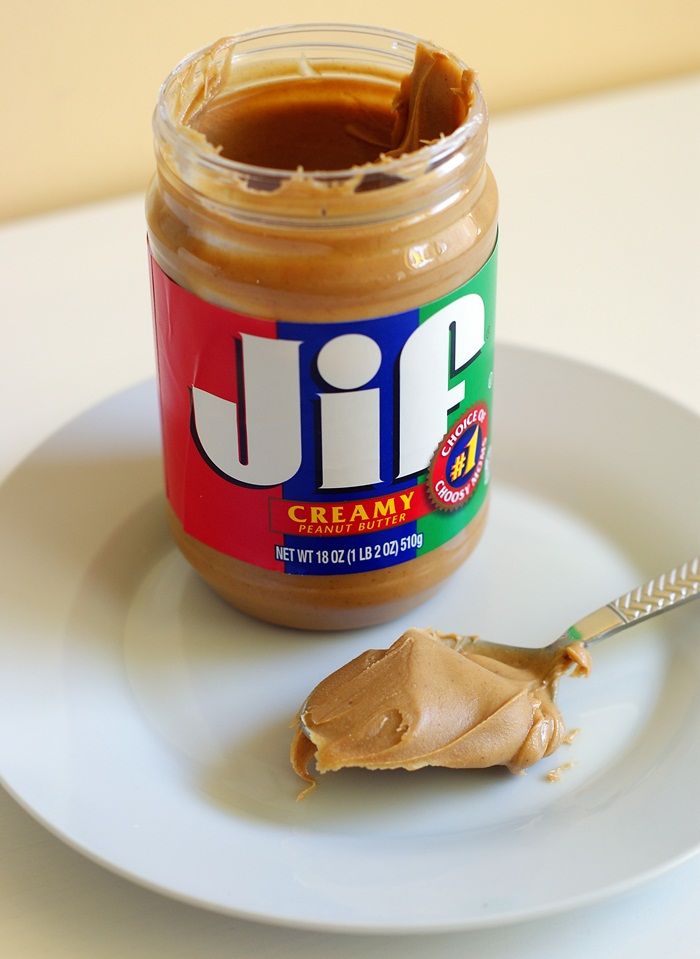
 I just had this inkling that Jessica likes peanut butter and chocolate. Maybe it was Jessica's Peanut Butter Stuffed Hot Fudge Cupcakes, or Chocolate Chip Cookie Dough Peanut Butter Cups, or Peanut Butter Fudge Brownie Trifle, or maybe Peanut Butter S'mores Squares...I sensed a trend.
 So, I made cookies. I made Chocolate Peanut Butter Cut-out Cookies. And, y'all...you need to make them, too.
Chocolate Peanut Butter Cut-out Cookies for Jessica
{makes 12-18, depending on size}
2 & 1/2 cups unbleached, all-purpose flour
1/2 cup dutch-processed cocoa (such as Hershey's Special Dark)
2 teaspoons baking powder
1/8 teaspoon kosher salt
2 sticks (1 cup) salted butter, cut into chunks
1 cup sugar
1/2 cup smooth peanut butter (not all-natural)
1 egg
1 teaspoon vanilla
Preheat oven to 350. Line cookie sheets with parchment paper.
In a medium bowl, whisk together the flour, cocoa, baking powder, and salt. Set aside.
In a large bowl, use a paddle attachment to beat the butter and sugar together until light and fluffy. Beat in the peanut butter until smooth. Beat in the egg and vanilla.
In three additions, add in the flour mixture beating on low until just combined. Scrape the bowl to incorporate any dry bits on the bottom of the bowl.
Divide the dough in half, form into two discs, and wrap in plastic wrap. Refrigerate at least 30 minutes.
Mix flour and cocoa powder together to coat the rolling pin and rolling surface. Roll the dough to about 1/4"-3/8" thickness. Freeze the cut-outs on the cookie sheet for 10 minutes before baking.
Bake for 9-12 minutes. Cool on the cookie sheet for 1 minute, then remove to wire rack to cool completely.
Decorate as desired with royal icing.
That leads me to Jessica from the blog, How Sweet It Is.
Jessica is having a milestone birthday today...
{Ahhh, I remember 30. Kinda.}
{Jessica...this hot pink was as close as I could get to neon. ;)}
In August, I met Jessica and I can tell you, she's even more lovely in person. (I won't hold it against her that she was BORN just about the same time I was going to see Grease 2 (2!) with my fellow 13-year-old girlfriends.) I wanted to make a little something to celebrate her big day.
Chocolate Peanut Butter Cut-out Cookies for Jessica
{makes 12-18, depending on size}
2 & 1/2 cups unbleached, all-purpose flour
1/2 cup dutch-processed cocoa (such as Hershey's Special Dark)
2 teaspoons baking powder
1/8 teaspoon kosher salt
2 sticks (1 cup) salted butter, cut into chunks
1 cup sugar
1/2 cup smooth peanut butter (not all-natural)
1 egg
1 teaspoon vanilla
Preheat oven to 350. Line cookie sheets with parchment paper.
In a medium bowl, whisk together the flour, cocoa, baking powder, and salt. Set aside.
In a large bowl, use a paddle attachment to beat the butter and sugar together until light and fluffy. Beat in the peanut butter until smooth. Beat in the egg and vanilla.
In three additions, add in the flour mixture beating on low until just combined. Scrape the bowl to incorporate any dry bits on the bottom of the bowl.
Divide the dough in half, form into two discs, and wrap in plastic wrap. Refrigerate at least 30 minutes.
Mix flour and cocoa powder together to coat the rolling pin and rolling surface. Roll the dough to about 1/4"-3/8" thickness. Freeze the cut-outs on the cookie sheet for 10 minutes before baking.
Bake for 9-12 minutes. Cool on the cookie sheet for 1 minute, then remove to wire rack to cool completely.
Decorate as desired with royal icing.
OH! And, Jessica? I ate them for you, too. ;)
HAPPY BIRTHDAY, sweet girl!!!
Sunday, November 4, 2012
I Just Blogged to Say I Love You (Vol. 3)
Here we are...November. I hear there's some sort of election thing going down on Tuesday.
 1. In keeping with election week, I'm about to go all political on you. Ben Franklin. I like him. Judging from this, I'd say he'd have been one awesome blogger.
2. My friend Rebecca from Foodie with Family made a Chocolate Nutter Butter cake. Tell me you won't be dreaming about that tonight.
3. Speaking of Rebecca, she also introduced me to a little website called SnorgTees. I think we all need this shirt. Pluto Forever!!!
4. Have you started your fall comfort baking, yet? I think these Applesauce Bars from Kristan are the epitome of fall comfort food. Plus...Carmel Cinnamon frosting! Make them...feel free to ship them to me.
5. Pumpkin Gruyere Gougeres. I have always, always wanted to make gougeres. I'm not sure what the heck has been stopping me, but these beauties from Heidi have just pushed me over the edge from wanting to make them to GOING to make them!
 6. YOU! That's right...I love you. About two weeks ago, there was a little book signing in my town. And people came!!! Seriously! And not just any people...the *nicest* people EVER...with the cutest and most polite kiddos EVER. You guys made the day so incredibly fun...I can't even tell you how much I enjoyed meeting every.single.one of you. My sweet sister who flew in for the day...my sweet friends who stopped by...I love you guys, too. Y'all ROCK! Thank YOU!!!
2. My friend Rebecca from Foodie with Family made a Chocolate Nutter Butter cake. Tell me you won't be dreaming about that tonight.
3. Speaking of Rebecca, she also introduced me to a little website called SnorgTees. I think we all need this shirt. Pluto Forever!!!
4. Have you started your fall comfort baking, yet? I think these Applesauce Bars from Kristan are the epitome of fall comfort food. Plus...Carmel Cinnamon frosting! Make them...feel free to ship them to me.
5. Pumpkin Gruyere Gougeres. I have always, always wanted to make gougeres. I'm not sure what the heck has been stopping me, but these beauties from Heidi have just pushed me over the edge from wanting to make them to GOING to make them!
{{PS...if you're one of the ones who stopped by after the book sold out, the next shipment should be to H&H soon!}}
Let's hear it. What's on your "love list" with week?
Thursday, November 1, 2012
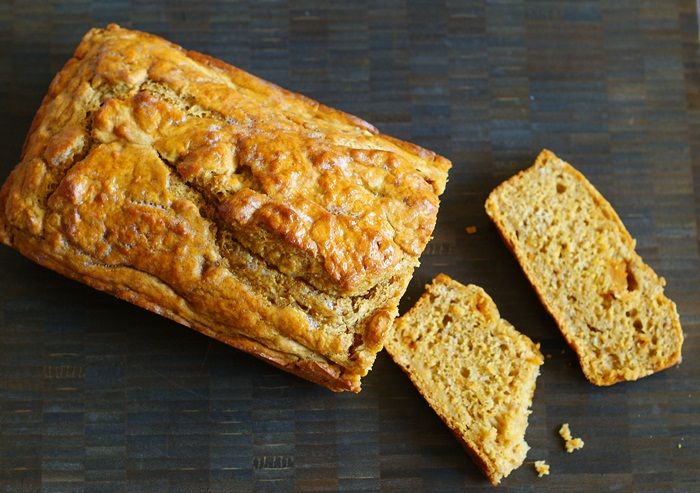
Pumpkin Beer Bread
Happy November!!!
 {I can't believe I just said that.}
You know what November needs? More pumpkin. Kinda like more cowbell. I mean, really...can you have too much?
If you've never made beer bread, now is the time. It's about the easiest thing you'll ever make. Click here for my mom's recipe and a few variations.
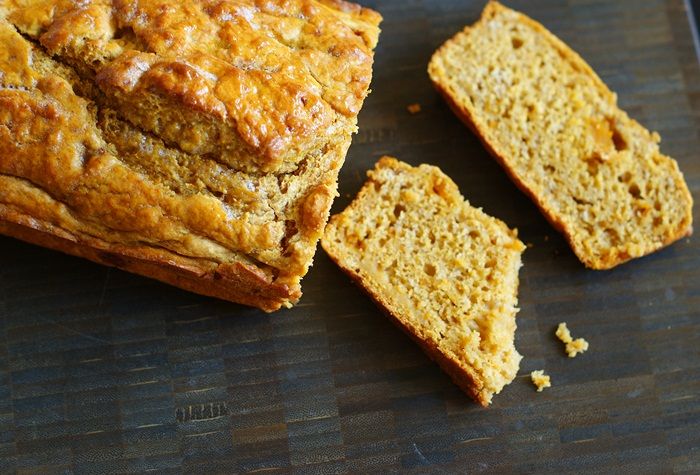
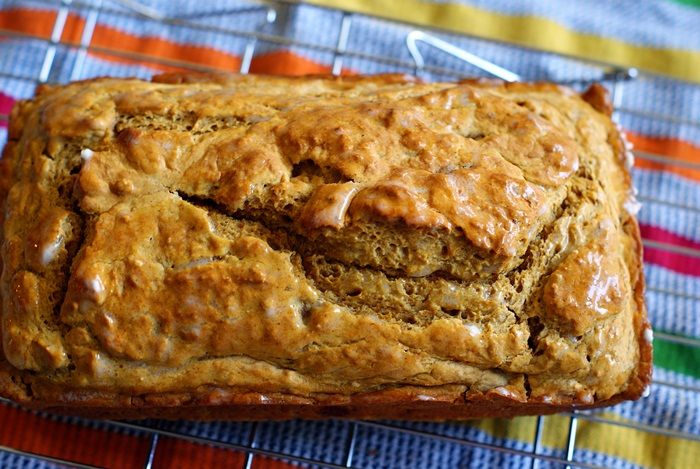 This bread is not a sweet bread, so don't expect it to taste like the pumpkin bread at Starbucks. It's pretty much a classic beer bread with some warm spices...delicious slathered with butter, warm from the oven...delicious toasted with butter alone or with a sprinkle cinnamon sugar.
You'll need these...
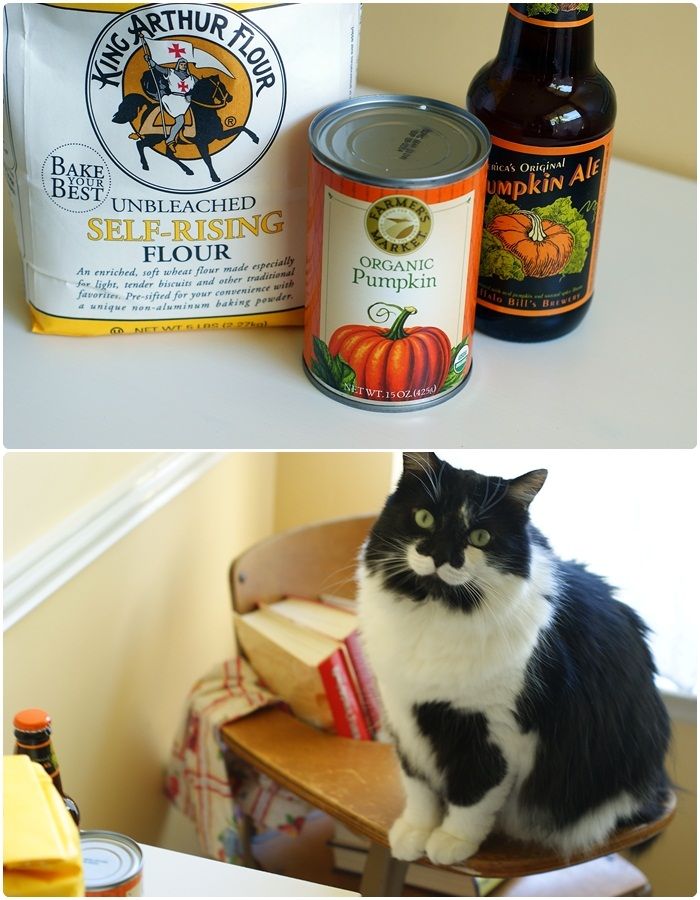 ...kitty to check your ingredients is totally optional.
Pumpkin Beer Bread
3 cups unbleached, self-rising flour
3 TBSP light brown sugar
1 teaspoon cinnamon
1/2 teaspoon ginger
1/4 teaspoon freshly grated nutmeg
1/8 teaspoon allspice
1 cup pumpkin
12 ounces room temperature pumpkin beer
butter
Preheat oven to 350. Grease a 9x 5" loaf pan with shortening.
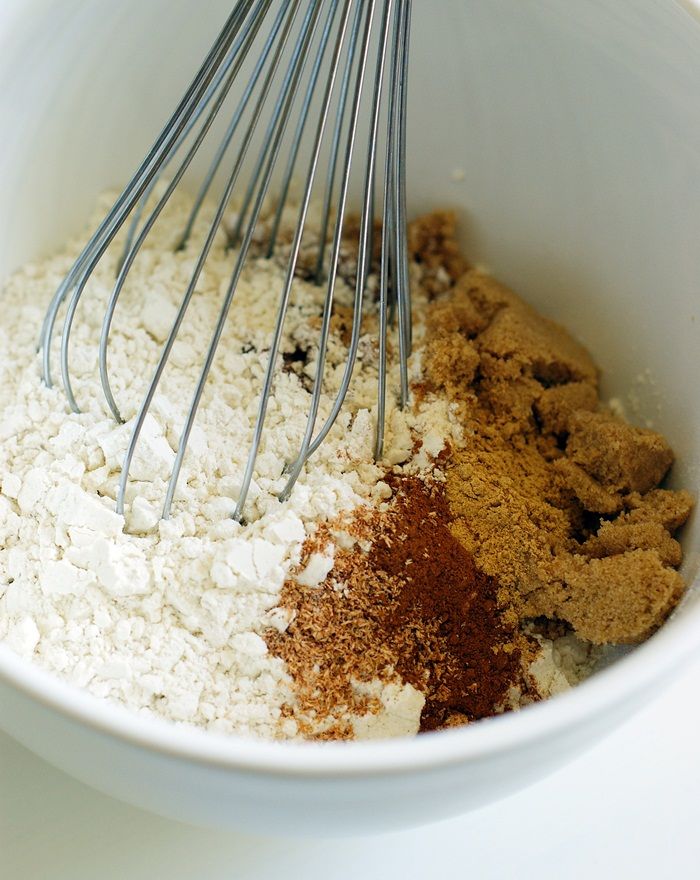 Whisk together the flour, sugar and spices.
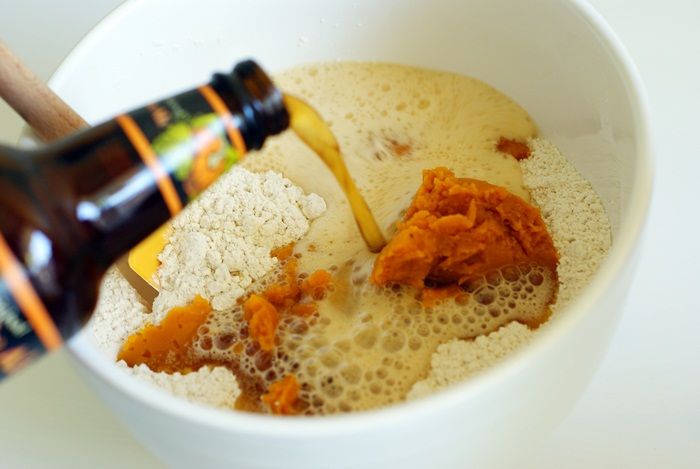 Add the pumpkin and the beer and stir until combined.
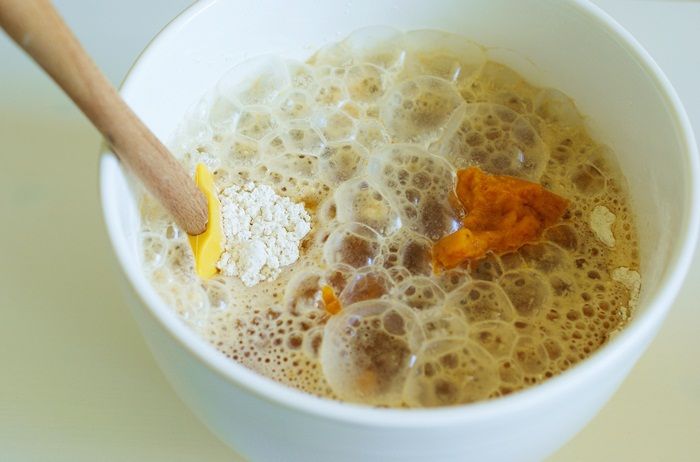
Spoon into prepared loaf pan, and bake about 1 hour. Let cool in the pan 5 minutes. Remove from pan and place on a cooling rack.
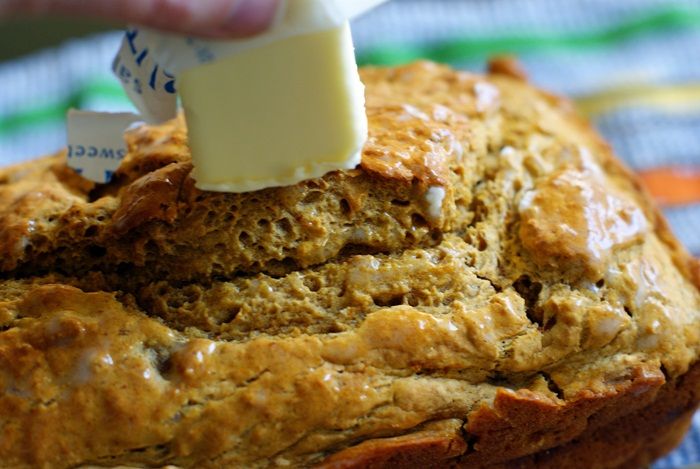 Pour melted butter on top of the bread or, just rub a stick of butter over the top, letting it drip down the sides. Enjoy while still warm, or toasted and oodles of butter.
You know what November needs? More pumpkin. Kinda like more cowbell. I mean, really...can you have too much?
If you've never made beer bread, now is the time. It's about the easiest thing you'll ever make. Click here for my mom's recipe and a few variations.
You'll need these...
Pumpkin Beer Bread
3 cups unbleached, self-rising flour
3 TBSP light brown sugar
1 teaspoon cinnamon
1/2 teaspoon ginger
1/4 teaspoon freshly grated nutmeg
1/8 teaspoon allspice
1 cup pumpkin
12 ounces room temperature pumpkin beer
butter
Preheat oven to 350. Grease a 9x 5" loaf pan with shortening.
Spoon into prepared loaf pan, and bake about 1 hour. Let cool in the pan 5 minutes. Remove from pan and place on a cooling rack.
Sunday, October 28, 2012
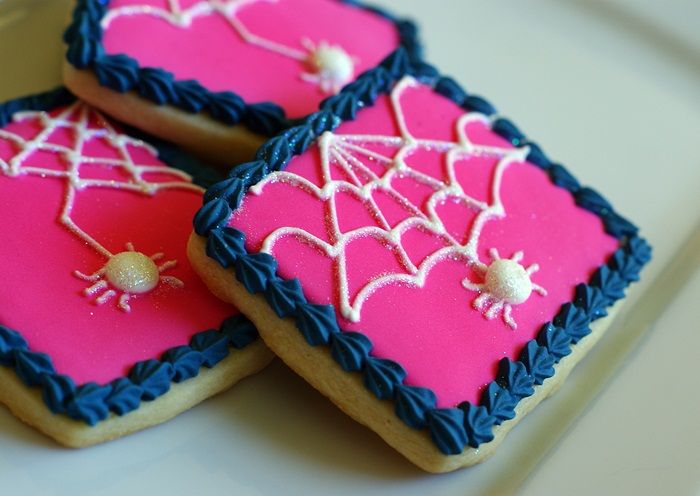
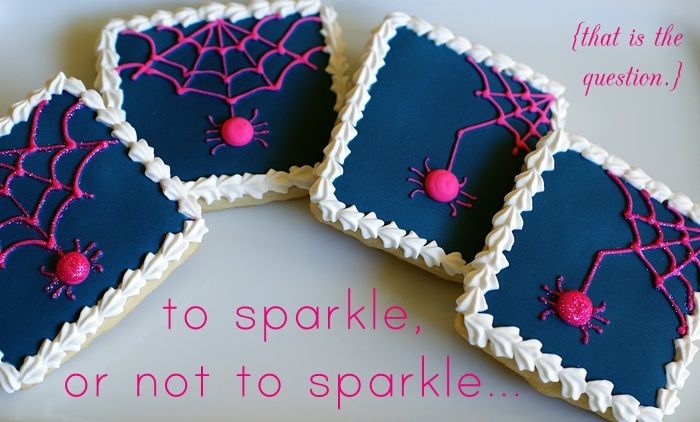
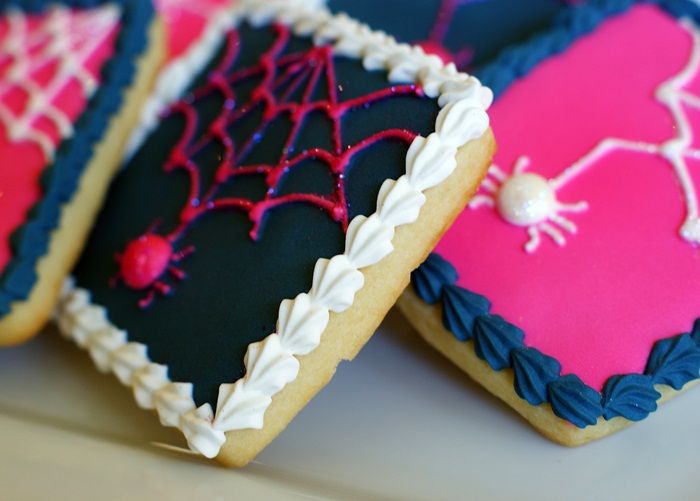
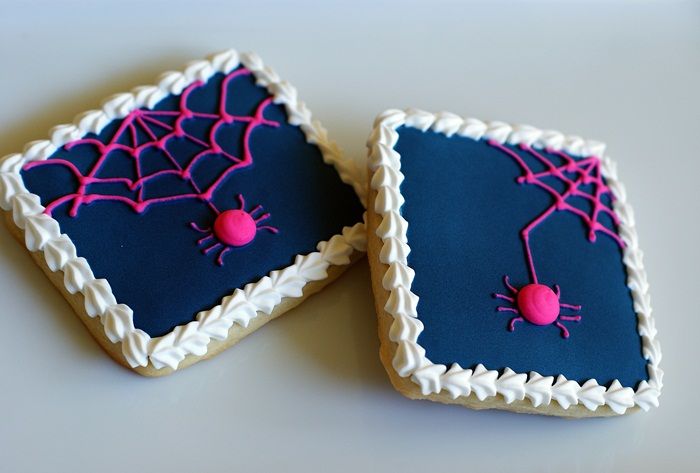
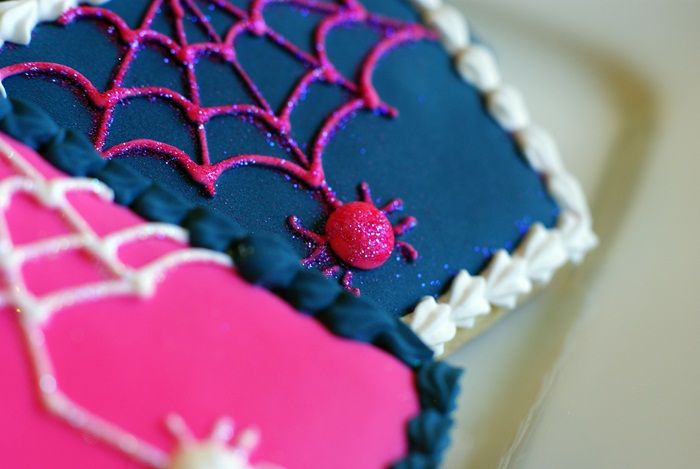
When Spiders Go a Little Preppy...
I mean, really, who said spiders and spiderwebs have to be black & orange anyway?
 This is the second year that kiddo has decided he's not going trick-or-treating. I miss Halloween costumes. I'll be honest, Mr. E made a lot of them. One of my favorites: a traffic light. He made it so the red and green lights really lit up and the yellow light could be pushed out from the inside to retrieve the candy. (Would it surprise you to know that Mr. E has an engineering degree?)
That same year, Martha Stewart asked readers to send in their best kid's costume pictures and it made it onto her website!!! Yes, kiddo is on Martha's website. You never know...it could be framed in her office, too. Or in her wallet. (Stranger things have happened.)
That picture was from 4th grade. Kiddo is now in 8th grade...and looks like this.
{{Hug your babies, you guys. Time flies.}}
 I *do* love seeing the little ghouls & goblins come to the door for candy, though...and so does kiddo. Looks like we've moved from the trick-or-treating phase into the "opening-the-door-for-trick-or-treaters, eating-more-candy-than-we-give-away" phase. It's not all bad.
So, the cookies. I knew I wanted to make some spiderwebs. I wanted to use some different colors, but all I could visualize were black, orange, purple, green...black, orange, purple, green...black, orange, purple, green. Don't get me wrong, I like those colors. Then, it came to me in a flash of 80's nostalgia...preppy.
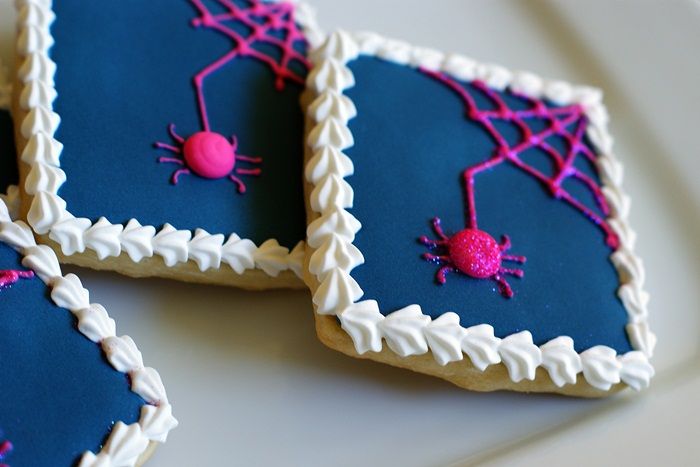 The cookies are super simple, and even though these are sprinkled with disco dust, you can totally leave that off. You can see I was having some issues deciding whether or not to dust...
One note about the navy color. I mixed AmeriColor Navy with AmeriColor Super Black. You'll want to bring the color to a deep blue, but it won't look navy until it dries. (You'll see from the how-to pictures how much the color deepens.)
To make the sparkly spiderwebs, you'll need:
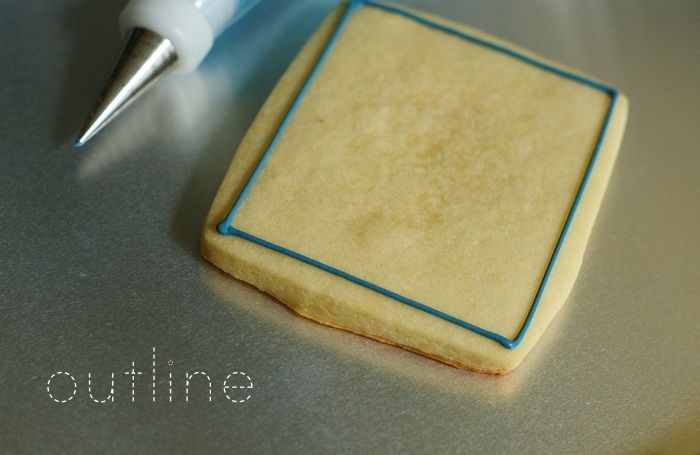 Use a #2 tip to outline the cookies in the base colors.
Thin the base color icing with water, a bit at a time, stirring with a silicone spatula, until it is the consistency of a thick syrup. You'll want to drop a "ribbon" of icing back into the bowl and have it disappear in a count of "one thousand one, one thousand two." Four is too thick, one is too thin. Count of 2-3 is good. Cover with a damp dishcloth and let sit for several minutes.
Stir gently with a silicone spatula to pop and large air bubbles that have formed. Pour into squeeze bottle.
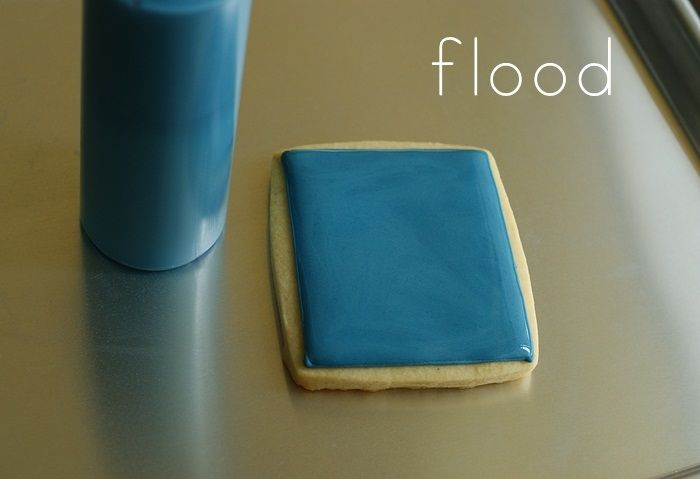 Fill in the outline with the thinned flood icing, using a toothpick to guide to the edges and to pop large air bubbles.
Let the cookies dry for at least one hour.
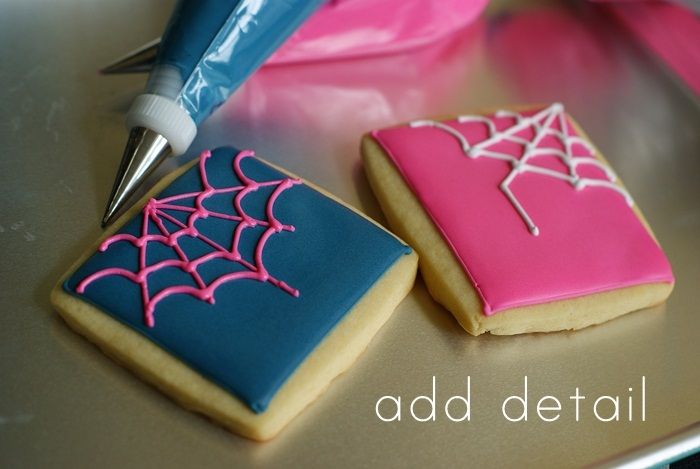 Use a #2 tip to pipe a spiderweb outline in a contrasting color. Start from one corner, or from the top center.
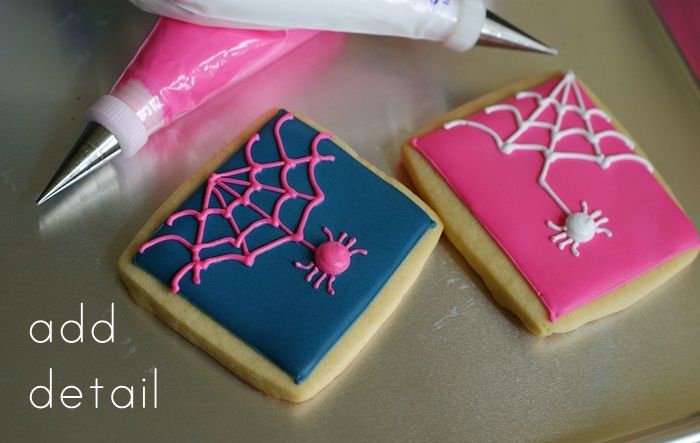 Use a #5 tip to pipe a spider body and a #1 tip to pipe the legs.
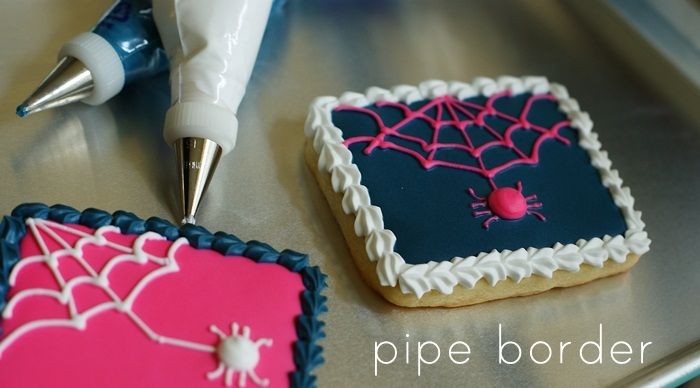 Use a #15 star tip to pipe a border along the edge of the cookies, using a pulsing motion.
 {This is one of the easiest ways to make your cookies look fancy. You'll need a fairly stiff icing to hold the design...I always test my icing on a plate first. If the ridges fall, just stir in some sifted powdered sugar.}
 Let the cookies dry uncovered 6-8 hours, or overnight.
If desired, add the disco dust. Details on applying it are here. I used a very thin paintbrush to go over the web and legs of the spider.
After the dusted cookies have dried about 30 minutes or more, use a dry paintbrush to brush away the excess.
That same year, Martha Stewart asked readers to send in their best kid's costume pictures and it made it onto her website!!! Yes, kiddo is on Martha's website. You never know...it could be framed in her office, too. Or in her wallet. (Stranger things have happened.)
That picture was from 4th grade. Kiddo is now in 8th grade...and looks like this.
{{Hug your babies, you guys. Time flies.}}
So, the cookies. I knew I wanted to make some spiderwebs. I wanted to use some different colors, but all I could visualize were black, orange, purple, green...black, orange, purple, green...black, orange, purple, green. Don't get me wrong, I like those colors. Then, it came to me in a flash of 80's nostalgia...preppy.
One note about the navy color. I mixed AmeriColor Navy with AmeriColor Super Black. You'll want to bring the color to a deep blue, but it won't look navy until it dries. (You'll see from the how-to pictures how much the color deepens.)
To make the sparkly spiderwebs, you'll need:
- rectangle or square sugar cookies
- royal icing, divided and tinted navy (using AmeriColor Navy & Super Black), Bright White, and Electric Pink
- couplers and tips: #2, 5, 1, star 15
- disposable icing bags
- toothpicks
- squeeze bottles
- optional: disco dust, rainbow & raspberry
- meringue powder
- paintbrushes
Thin the base color icing with water, a bit at a time, stirring with a silicone spatula, until it is the consistency of a thick syrup. You'll want to drop a "ribbon" of icing back into the bowl and have it disappear in a count of "one thousand one, one thousand two." Four is too thick, one is too thin. Count of 2-3 is good. Cover with a damp dishcloth and let sit for several minutes.
Stir gently with a silicone spatula to pop and large air bubbles that have formed. Pour into squeeze bottle.
Let the cookies dry for at least one hour.
If desired, add the disco dust. Details on applying it are here. I used a very thin paintbrush to go over the web and legs of the spider.
After the dusted cookies have dried about 30 minutes or more, use a dry paintbrush to brush away the excess.
Let me live vicariously through you. What are your kids, grandkids, nieces, nephews going to be this Halloween?!?
Wednesday, October 24, 2012
Spiced Poppy Seed Cake with Almond Buttercream Frosting
{Just go ahead and start adding these ingredients to your grocery list now.}
 I'm not sure why I don't bake cakes very often. Wait...yes, I have an inkling. I don't make cakes very often because I feel like they have to look spectacular. I love a spectacular cake. My Pinterest cake board is filled with them. I have immense respect for Amanda, and Rosie, and Heather, and Gail, and Melissa because they make them.
My cakes, though, are not pretty. I've decided to make peace with that fact.
After coming to terms with this truth, I decided my birthday was the perfect excuse to make a cake I'd been dreaming about from the book Cake Ladies. (Found on Amazon and B&N.}
 It's a poppy seed cake made with warm spices, honey, and a little whole wheat flour. The frosting is a rich, fluffy, American buttercream flavored with almond & vanilla. {Are you swooning, yet?}
Three things:
 OK, ok...you want the recipe. Here ya go:
Spiced Poppy Seed Cake with Almond Buttercream Frosting
{slightly modified from Cake Ladies}
for the cake:
1 & 1/2 cups unbleached, all-purpose flour
1 & 1/2 cups white whole wheat flour
1 TBSP baking powder
1/4 cup cornstarch
1 teaspoon freshly grated nutmeg
1 teaspoon cinnamon
1/8 teaspoon cardamom
6 large eggs, separated, at room temperature
1/2 teaspoon cream of tartar
2 sticks (1 cup) salted butter, at room temperature
2 cups sugar
1/2 cup honey
2 cups milk, at room temperature
2 TBSP vinegar
1 TBSP almond extract
1/2 cup poppy seeds
for the frosting:
3 sticks (1 & 1/2 cups) salted butter, at room temperature
7 & 1/2 cups powdered sugar
1 & 1/2 teaspoons vanilla extract
1 & 1/2 teaspoons almond extract
6 TBSP half-and-half, plus more if needed
poppy seeds for sprinkling
Make the cake:
Preheat oven to 350. Grease three 9" round cake pans with shortening; line the bottoms with parchment.
Sift the flours, baking powder, cornstarch, nutmeg, cinnamon, and cardamom together. Set aside.
With the whisk attachment of a stand mixer, whip the egg whites with the cream of tartar on high speed until soft peaks form. Set aside.
In another bowl, use the paddle attachment to cream together the butter, sugar, and honey until light and fluffy. On low speed, add the egg yolks one at a time, beating after each addition. Scrape the bottom and sides of the bowl and beat until the mixture is smooth and creamy.
In a bowl, combine the milk, vinegar, and almond extract. (Don't worry if it curdles.)
Add the dry mixture in three additions, alternating with the milk/vinegar mixture. Mix lightly, between additions, just until combined. Scrape down the sides and bottom of bowl as needed.
Fold in the poppy seeds, then fold in the whipped egg whites in three additions. (Re-whip the egg whites first if they have separated.)
Pour the batter into the prepared pans and bake for 30-40 minutes, or until done. Cool in the pans for 10 minutes, then remove to wire cooling racks. Once the cakes are cool enough to handle, but still warm, wrap in plastic wrap, then in foil and freeze overnight, or until you're ready to frost.
{This tip is from my friend, Gail, and guarantees a moist cake.}
The day you're going to frost the cake, take the layers out of the freezer and place in the refrigerator for several hours to defrost.
Make the frosting:
Cream the butter and powdered sugar together using the paddle attachment of a stand mixer until it forms a thick "paste." Beat in the vanilla and almond extracts, then the half-and-half. Beat until fully combined. Add more half-and-half as needed to get to a fluffy consistency. Beat until fluffy and no lumps remain.
 With an offset spatula, spread a heaping 1/2 cup of frosting over each cake layer, then frost the top and sides.
 Sprinkle on the poppy seeds and add a little piping detail with a large star tip, if desired.
Will keep covered at room temperature for 2 days, or refrigerated for about 1 week.
My cakes, though, are not pretty. I've decided to make peace with that fact.
After coming to terms with this truth, I decided my birthday was the perfect excuse to make a cake I'd been dreaming about from the book Cake Ladies. (Found on Amazon and B&N.}
Three things:
- If you happen to have a friend who is a beekeeper, this cake is even more special. Yes, I'm lucky enough to have such a friend...Amy from She Wears Many Hats. Is that totally cool, or what? I loved that the honey for this cake came from her bees!
- Cake Ladies...if you haven't seen this book, take a look online or next time you're out at a bookshop. Not only is it filled with delicious tried-and-true cake recipes, but the book showcases 17 southern "cake ladies," and their stories are so wonderful.
- For the moistest cake, make the cake at least a day ahead of frosting...more on this in the instructions. Trust me.

Spiced Poppy Seed Cake with Almond Buttercream Frosting
{slightly modified from Cake Ladies}
for the cake:
1 & 1/2 cups unbleached, all-purpose flour
1 & 1/2 cups white whole wheat flour
1 TBSP baking powder
1/4 cup cornstarch
1 teaspoon freshly grated nutmeg
1 teaspoon cinnamon
1/8 teaspoon cardamom
6 large eggs, separated, at room temperature
1/2 teaspoon cream of tartar
2 sticks (1 cup) salted butter, at room temperature
2 cups sugar
1/2 cup honey
2 cups milk, at room temperature
2 TBSP vinegar
1 TBSP almond extract
1/2 cup poppy seeds
for the frosting:
3 sticks (1 & 1/2 cups) salted butter, at room temperature
7 & 1/2 cups powdered sugar
1 & 1/2 teaspoons vanilla extract
1 & 1/2 teaspoons almond extract
6 TBSP half-and-half, plus more if needed
poppy seeds for sprinkling
Make the cake:
Preheat oven to 350. Grease three 9" round cake pans with shortening; line the bottoms with parchment.
Sift the flours, baking powder, cornstarch, nutmeg, cinnamon, and cardamom together. Set aside.
With the whisk attachment of a stand mixer, whip the egg whites with the cream of tartar on high speed until soft peaks form. Set aside.
In another bowl, use the paddle attachment to cream together the butter, sugar, and honey until light and fluffy. On low speed, add the egg yolks one at a time, beating after each addition. Scrape the bottom and sides of the bowl and beat until the mixture is smooth and creamy.
In a bowl, combine the milk, vinegar, and almond extract. (Don't worry if it curdles.)
Add the dry mixture in three additions, alternating with the milk/vinegar mixture. Mix lightly, between additions, just until combined. Scrape down the sides and bottom of bowl as needed.
Fold in the poppy seeds, then fold in the whipped egg whites in three additions. (Re-whip the egg whites first if they have separated.)
Pour the batter into the prepared pans and bake for 30-40 minutes, or until done. Cool in the pans for 10 minutes, then remove to wire cooling racks. Once the cakes are cool enough to handle, but still warm, wrap in plastic wrap, then in foil and freeze overnight, or until you're ready to frost.
{This tip is from my friend, Gail, and guarantees a moist cake.}
The day you're going to frost the cake, take the layers out of the freezer and place in the refrigerator for several hours to defrost.
Make the frosting:
Cream the butter and powdered sugar together using the paddle attachment of a stand mixer until it forms a thick "paste." Beat in the vanilla and almond extracts, then the half-and-half. Beat until fully combined. Add more half-and-half as needed to get to a fluffy consistency. Beat until fluffy and no lumps remain.
Will keep covered at room temperature for 2 days, or refrigerated for about 1 week.
Don't wait until your birthday...make it NOW!
Monday, October 22, 2012
Rosy Little Pumpkin Cupcakes
Rosy Little Pumpkin Cupcakes for a sweet little pumpkin named Lucy...
 Kristan's baby girl is expected in just a few weeks and since she will be a fall little pumpkin, I thought some pumpkin cupcakes might be in order.
 I feel sure you all know Kristan from Confessions of a Cookbook Queen. I would say that Kristan is one of my very favorite bloggers, but you know what? She's more than that. She's one of my very favorite people. Her little Lucy is about to be welcomed into one adorable and loving family, full of sparkles and big brother's magic tricks.
 The cupcakes are a doctored up cake mix batter loaded with pumpkin and spices. The frosting...oh, the frosting! How about a buttery, cinnamon cream cheese frosting that's so good, you'll contemplate buying one of those beer helmets and converting it to a frosting helmet.
{Listen, cupcake ATMs are a real thing; why not frosting helmets?}
Pumpkin Cupcakes with Cinnamon Cream Cheese Frosting
{adapted from Kraft}
for the cupcakes:
 1 box French Vanilla cake mix
1 & 1/2 teaspoons cinnamon
3/4 teaspoon ginger
1/2 teaspoon freshly grated nutmeg
1/8 teaspoon allspice
1/8 teaspoon cloves
1 (15 oz) can pumpkin
1 (8 oz) container sour cream
1/4 cup oil
3 eggs
for the frosting:
8 oz. cream cheese, at room temperature
6 TBSP salted butter, at room temperature
1 lb. powdered sugar
1 teaspoon vanilla
1 teaspoon cinnamon
Preheat oven to 350. Line 22 muffin cups with liners.
Whisk together the cake mix and spices. Add in the remaining cake ingredients. Mix on low until combined, then beat 2 minutes on medium.
Scoop the batter into the lined tins and bake for 20 minutes, or until done. Let cool in the pan for 10 minutes, then remove to cool completely on wire racks.
 To make the frosting, beat together the cream cheese and butter until combined. Add the sugar in three additions, scraping the bowl as needed. Beat in the vanilla and cinnamon.
(If frosting the cupcakes generously, like these roses, double the recipe.)
 To make the rose frosting, I used Created by Diane's video as a guide. I didn't have the correct tip on hand (I used an Ateco 828 star tip), but I still think they turned out pretty.
Since Kristan likes sparkles, I sprinkled the rosy icing with a bit of sanding sugar.

You know how all of us love a chance to celebrate a new bloggy baby, so there are lots of us celebrating Kristan & Lucy today. Go take a peek!
{Listen, cupcake ATMs are a real thing; why not frosting helmets?}
Pumpkin Cupcakes with Cinnamon Cream Cheese Frosting
{adapted from Kraft}
for the cupcakes:
1 & 1/2 teaspoons cinnamon
3/4 teaspoon ginger
1/2 teaspoon freshly grated nutmeg
1/8 teaspoon allspice
1/8 teaspoon cloves
1 (15 oz) can pumpkin
1 (8 oz) container sour cream
1/4 cup oil
3 eggs
for the frosting:
8 oz. cream cheese, at room temperature
6 TBSP salted butter, at room temperature
1 lb. powdered sugar
1 teaspoon vanilla
1 teaspoon cinnamon
Preheat oven to 350. Line 22 muffin cups with liners.
Whisk together the cake mix and spices. Add in the remaining cake ingredients. Mix on low until combined, then beat 2 minutes on medium.
Scoop the batter into the lined tins and bake for 20 minutes, or until done. Let cool in the pan for 10 minutes, then remove to cool completely on wire racks.
(If frosting the cupcakes generously, like these roses, double the recipe.)
Since Kristan likes sparkles, I sprinkled the rosy icing with a bit of sanding sugar.
You know how all of us love a chance to celebrate a new bloggy baby, so there are lots of us celebrating Kristan & Lucy today. Go take a peek!
Cookies and Cups | Zebra Cake Cupcakes
The Hungry Housewife | WhiteCupcakes
She Wears Many Hats | Pretty in Pink Party Marshmallows
Two Peas and Their Pod | Dark Chocolate Raspberry Cupcakes
Bluebonnets and Brownies | Apple Cider Cupcakes with Salted Caramel Frosting
My Baking Addiction | Sugar and Spice Cupcakes
Picky Palate | Pumpkin Brownie Cupcakes with Vanilla Bean Buttercream
Blooming on Bainbridge | Twinkie Cupcakes with Pink Cherry Frosting
Food For My Family | Pomegranate and Lime Olive Oil Yogurt Cupcakes
Bakingdom | Homemade Twinkie Cupcakes
Sprinkle Bakes | Princess Torte Cupcakes
Glorious Treats | Sweet Baby Cupcakes with Easy Fondant Toppers
Sweet Sugarbelle | Damask Cookies
Buns In My Oven | Maple Cupcakes with Maple Frosting
Dine and Dish | Neapolitan Cream Filled Cupcakes
Chocolate and Carrots | Whole Wheat Chocolate Cupcakes
Living Locurto | Baby Shower Printables (coming soon)
We can't wait to meet you, little Lucy! ♥
Subscribe to:
Posts (Atom)