Wednesday, August 31, 2011

Pea Pod Petits Fours

 
You are attending a baby shower right this very minute.  A VIRTUAL baby shower for the adorable Maria and Josh of Two Peas & Their Pod

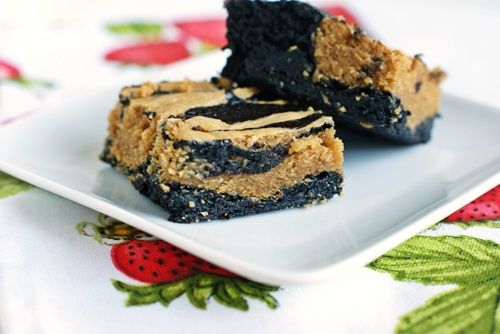
You probably already know this couple and their blog for yummy treats like: Golden Grahams S'Mores Bars, Soft Pretzel Bites, and Cinnamon Streusel Pancakes.  Their latest creation...

...a new pea for their pod...a baby boy, who is almost here!!!

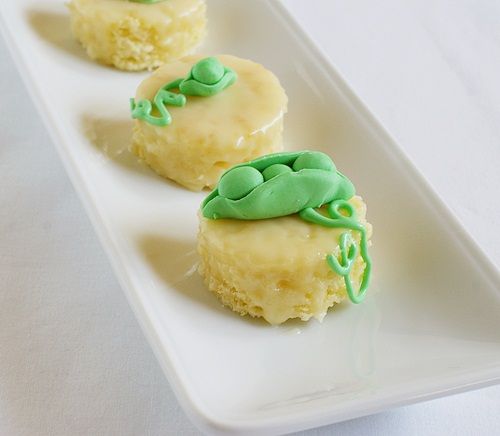
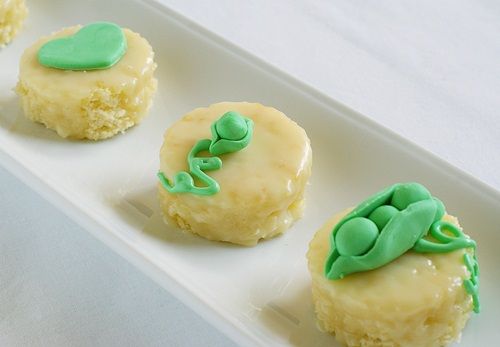
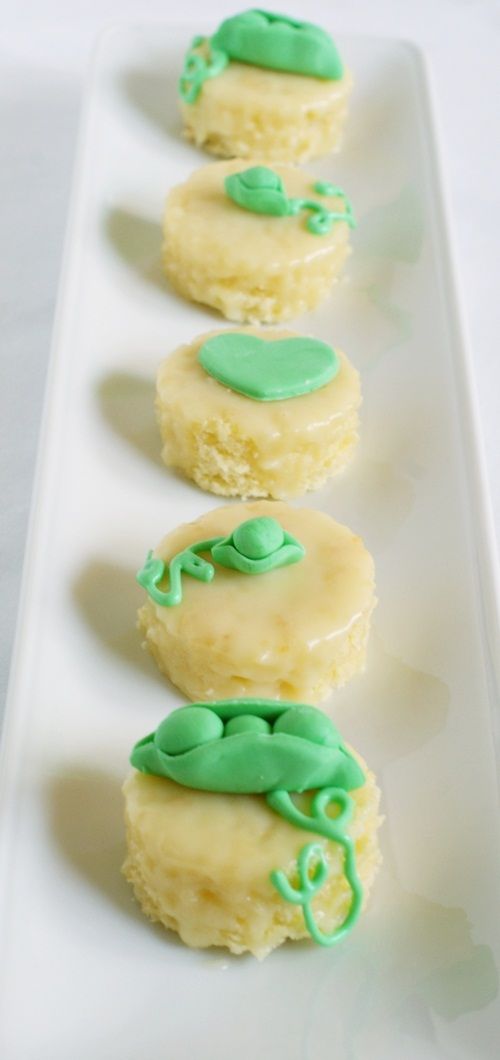
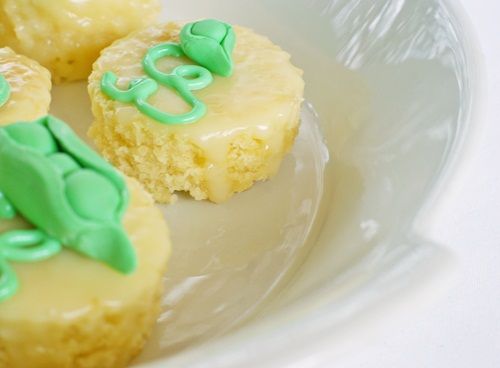
I'll tell you more about the cake part of these petits fours in another post, but let me show you how to make the pea pods.

You'll need:
  • fondant (I used homemade)

  • leaf green food coloring

  • large and small pastry tips

  • royal icing (optional)

Tint the fondant.  Roll out on a surface dusted with corn starch to about 1/8 inch.


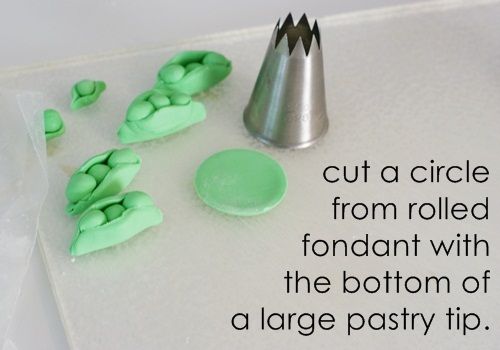
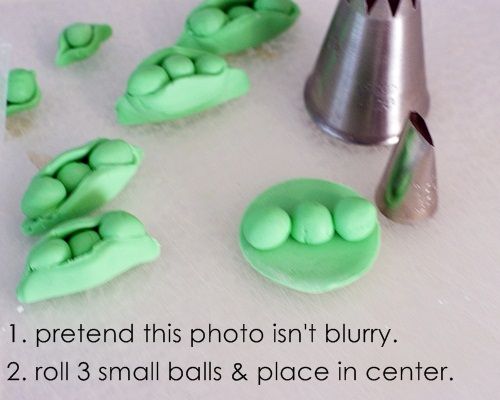
{Use the bottom of the small tip to cut fondant for the peas.}


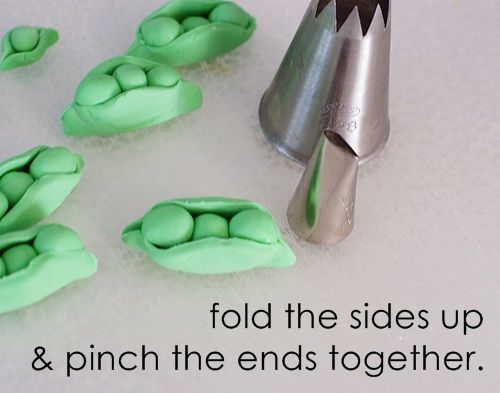
Place on the petits fours.  Add vine detail with green royal icing, if desired.


Maria & Josh....we are all so happy for you...and your new little sweet pea!

Can't get enough sweet peas?  Click on over for some Sweet Pea cookies! :)

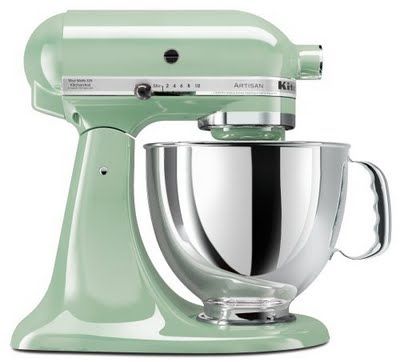
Be sure to visit the rest of the shower "hosts."  And...pop by the giveaway going on right now.  Hint: it's a lean, green, mixing machine! ;)

Drinks
Simple Bites - Lemon Balm infused Lemonade
Ingredients, Inc. - Healthy Fruit Punch
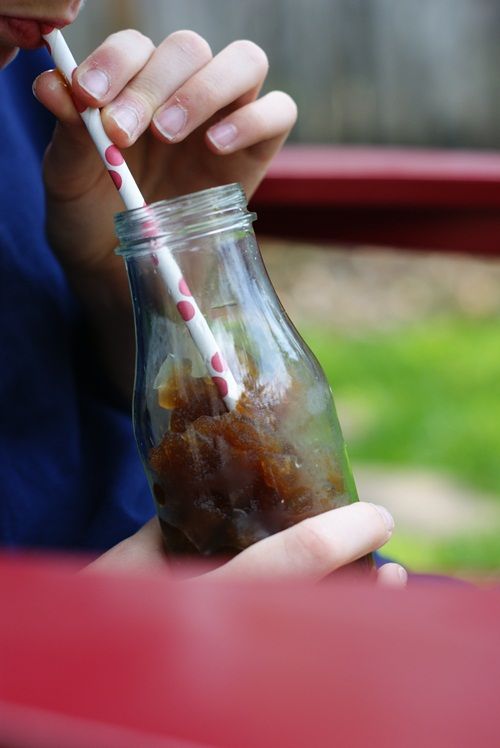
Food for My Family - Lemongrass Soda
Heather's Dish - Mixed Fruit Punch
She Wears Many Hats - Mini Pistachio Smoothies
Georgia Pellegrini - Watermelon Agua Fresca & a New Pea

Appetizers/Savory Bites
With Style and Grace - Truffle Popcorn
Family Fresh Cooking - Baby Peas & Cheese Frittata
Barbara Bakes - Creamy Orange Fruit Dip and Fruit
Aggie’s Kitchen - Pasta Salad with Balsamic Basil Vinaigrette
Reluctant Entertainer - Nutella Berry Bruschetta

Dessert
TidyMom - Blue and Chocolate Cake Balls
i am baker - Baby Pea Baby Shower Cake
Brown Eyed Baker - Pavlova
Picky Palate - Chocolate Chip Oatmeal Cookie Sandwich
What’s Gaby Cooking - Coconut Cupcakes with Cream Cheese Icing
Cookin’ Canuck - Nutella & Cream Cheese Swirled Blondies
Kevin and Amanda - Baby Blue Chocolate Chip Oatmeal Cookie Cups
Sweetopia - Decorated Sugar Cookies
Mountain Mama Cooks - Lavender Shortbread Cookies
Sweetapolita - Decorated Sugar Cookies
RecipeGirl - Baby Button Cookies
RecipeBoy - Mud Cups with Gummy Worms
Add a Pinch - Blackberry Tartlets
Dine and Dish - Oven Baked Cinnamon Apples
Vintage Mixer - Mint Chocolate Pudding Shots
Dorie Greespan - French Lemon Cream Tart 

Crafts
Wenderly - Handmade Sweet Pea Cards
Our Best Bites - How To: Make a Diaper Cake Centerpiece

Tuesday, August 30, 2011

KitchenAid, Reality TV and Exercise. Yes, exercise.

{Hang on, hang on...we're going to get to this little beauty in a minute.}

Let's talk first about exercise.  You might be surprised to learn that I have a piece of exercise equipment that I actually use.  It's this: a mini stair-stepper.  Yes, I owe this body to that mini stair-stepper.

{Makes you want to run right out and buy one, right?}

The key to using it is to DVR TV shows that make you forget that you might be breaking a sweat.  Hard-hitting, serious, current events-type programming, like What Not to Wear, Barefoot Contessa, and most recently, to my shame, Real Housewives of New Jersey. (It's better than you think, people.)

Anyway...I have a new show to watch now...Top Chef Just Desserts on Bravo.  A show about DESSERTS!  It's really riveting.  I watched the first episode while on the stair-stepper last week and almost forgot I was exercising.

Here's a little clip, so you can get an idea of the show...
{Those are REAL pastry chefs, my friends. I already have a few favorite contenders picked out...and they don't include that guy with the creepy laugh. ;)}

OK...so what does this have to do with this lovely KitchenAid mixer?  Well, the folks at Bravo thought we might like to celebrate this new season of Top Chef Just Desserts. One of you is going to win this mixer!!!  Woot!
You know how I feel about KitchenAid...I couldn't live without mine...and this one is a beauty.

To enter:
     *leave a comment on this post answering this question:
"If you were in a dessert competition, what would you make?"


Giveaway closed! Congrats to Jessica!!!

PLEASE, PLEASE make sure your comment includes an email address or links to one.  It would be really,  really sad if your name was chosen and I couldn't contact you. 
*Random winner will be chosen Monday, September 5th at 8am CST.  US residents only. Good luck!*

{{psst...the second episode of Just Desserts airs Wednesday, August 31st and 10/9c.}}

{disclaimer: This prize was provided by the BRAVO Network but BRAVO is not a sponsor, administrator, or involved in any other way with this giveaway. All opinions expressed in the post are my own and not those of BRAVO. Although, I'm pretty sure they'd approve of my exercise regimen.}

Sunday, August 28, 2011

The Butter, the Wranglers, the Ranch. . . oh my!


 {from top: Flavia, me (hi!), Nina, Amanda, Karen, Sandi, Kristen}
We had a little Pioneer Woman watch party at the Bake at 350 house on Saturday.  You DO know about Ree's new show on Food Network, right?  Right?

What can I say about Ree?  I've been smitten with her blog since the first day I discovered it.  A friend sent me a link, and I started reading, and reading and reading.  Four hours later, I was packing up Mr. E and the kiddo and heading to Oklahoma.  {As Mr. E's job is here in Texas, we decided to stay put.}

So, Ree's show debuted on Saturday and I invited a few friends (and fellow PW fans) over to watch, eat, and cheer Ree on!

It started with food...as it always does around here.

Yes, I got a picture of the menu and not the food.  (psst...those "diet killers" are here.) 
Except for the Nutella Scones...

{More on these later.}


...and a bowl of fruit...ooo, how exciting!

What I loved about the Pioneer Woman show was not only the food...chicken fried steak, decadent mashed potatoes...but the glimpse into ranch life. It looks like a lot of work, but also, a lot of fun....especially if Ree is doing the cooking!

We watched...


And dreamed...


And ate... (did I mention the Nutella?)


Nutella Scones
{slightly modified from the magnificent Baked Explorations}

about 1 cup hazelnuts
2 cups unbleached all-purpose flour
1/4 cup sugar
1/4 cup dutch-process cocoa powder (such as Hershey's Special Dark)
1 TBSP baking powder
1/2 tsp. coarse salt
6 tablespoons cold unsalted butter, cut into chunks
1 large egg
1/2 cup heavy cream
1/2 cup Nutella, divided

Preheat oven to 350.  Place the hazelnuts on a cookie sheet and bake for 15 minutes, or until the papery skins begin to crack and loosen. Rub the hazelnuts with a dish towel to remove most of the skin.  Let cool.  Coarsely chop and set aside.

Increase the oven temp. to 375 and place the rack in the center. Line a baking sheet with parchment paper.

In a large bowl, whisk the flour, sugar, cocoa powder, baking powder, and salt until combined. Add the butter. Use a pastry cutter (or your fingers) to cut the butter into the mixture until the butter is pea size and the mixture is coarse.

In a separate bowl, whisk together the egg and cream. Pour the wet ingredients into the dry ingredients and stir until the dough just comes together. Gently and briefly knead the dough with your hands. Add the 3/4 cup toasted hazelnuts and knead gently to incorporate.

Dump the dough onto a lightly floured surface. Flatten the dough into a rectangle approximately 6 by 12" (it does not need to be precise) and spread 1/4 cup of the Nutella on top. Roll the dough up and make a cylinder about 6 inches long, turn it on its end, and gently flatten it into a disk about 1 and 3/4 inches high. Do not overwork the dough.

Use a bench scraper to cut the dough into 8 wedges and place them on the prepared baking sheet, about 2 inches apart. Bake the scones for 18 to 20 minutes, rotating the baking sheet halfway through, or until a toothpick inserted into the center of a scone comes out clean.

Transfer the scones to a wire rack to cool completely. Place the baking sheet with the parchment still underneath the rack.

For the topping:
Heat the remaining 1/4 cup Nutella (or add a little more) in a microwave until pourable, about 10-20 seconds on high. Transfer the Nutella to a pastry bag, cut off the tip and drip the warm Nutella in a zigzag pattern over the tops of the scones. The scones are best eaten the day they are made.


 {from top: Flavia, me, Molly (my sister), Nina, Amanda, Sandi, Kristen}

Watch parties with friends?  Highly recommended!
Pioneer Woman's new Food Network show?  My new favorite! I'll be tuning in EVERY week! 

{And I'm pretty sure Mr. E is getting a pair of Wranglers for Christmas.}

Thursday, August 25, 2011

Good Luck with that.

 
We could all use a little luck, couldn't we?

Starting college,
Job interview,
Moving to a new city,
Losing weight (ok...maybe these aren't the best choice for that)

These horseshoe cookies are really easy...and the flowers can be changed to any color of the rainbow to customize for the recipient.


First, you'll need a horseshoe cookie cutter.  I got mine here.
{I used my "go-to" cookie recipe.}

Next, you'll need all of this:
  • royal icing tinted with AmeriColor Gold, Regal Purple, Bright White, Sky Blue and Leaf Green

  • disposable icing bags

  • couplers and tips: #2, #1 

  • squeeze bottle

  • toothpicks

  • gold luster dust

  • vodka

  • small paintbrush

 
First, outline the horseshoes in gold, using a #2 tip.

Thin the gold icing with water (reserve some of the piping consistency for later), a little at a time, until it is the consistency of thick syrup.  Cover with a damp dishtowel and let sit several minutes.

Stir gently with a rubber spatula to pop any large air bubbles that have formed. Transfer to a squeeze bottle.


Fill in the horseshoe with the thinned icing.  Use a toothpick to guide into corners, edges and pop any air bubbles.

Let the cookies sit for 1 hour.

{Will you pretend that you see pictures for the rest of the tutorial?  Oh, good.}

OK...use a #1 tip to pipe "Good Luck" on the cookies.

Use a #2 tip, add flower "dots" in purple.

Use a #1 tip to pipe flowers in white.

Use a #1 tip to pipe small dots in blue.

Use a #1 tip to add leaves in green.

Let the cookies dry overnight.

The next day, apply the luster dust.  You'll need: luster dust, small ramekin, small paintbrush and vodka (or EverClear says the guy at the bakery supply shop....I don't happen to keep EverClear in the house ;)).

Starbucks is optional, but recommended.

Mix up your luster dust with a few drops of the vodka and brush it on. (The alcohol will evaporate, leaving just the gold sheen.)  Add a few drops of vodka to the ramekin as you're working if it starts to get clumpy on you.  A little goes a long way, so don't worry about using all of the container in one shot.  (Here's a video about applying luster dust...)

Now, if you want your cookies to look perfect, apply the luster dust, THEN pipe the flowers.  Those little buggers were hard to get around with the luster dust.  But, I still think they're ok.

Could you use a little luck this week?

Monday, August 22, 2011

The *Best* Back-to-School Cookies

 
Don't turn me in to the Parenting Police.  I know I should be giving kiddo apple slices (organic), cheese (but not too much), and crackers (whole-grain) for an after-school snack, but I give him cookies instead.

Before school started this week, I asked him what kind of cookies he wanted...for snacks and for his lunchbox.  He said "Peanut Butter Chocolate Chip" and my heart did a little leap!  I knew exactly which cookies I would make...
 
Jessica's Puffy Peanut Butter Cookies with Chocolate Chips
{You know Jessica from How Sweet It Is, right?  Right??!?  Oh, if you don't, are you EVER in for a treat.  Pop over, go ahead, just come back in a few hours.}


So, the recipe starts with meting butter and peanut butter together.  I mean, how can it NOT be good?!?


You mix it all up and add chocolate chips.


Then you eat as much as the raw dough as you can without making yourself sick.


I mean, you scoop it onto a cookie sheet.  Yeah, that's it.

And then, you pack a few extra in your kid's lunchbox so he can share.   And, you are a bad mom and give him a few more as an after-school snack.  And, you hope those cookies convince him to tell you about every second and every detail of school....because you want to know EVERYTHING.  (Or is that just me?)

Anyway...these cookies?  You need them.  They are quite possibly the best first-week-of-school cookies EVER.  Promise. 

Thank you, Jessica!  (The recipe? It's right here.)


Thursday, August 18, 2011

You choose . . .

I couldn't decide.

Give away 2 jars of Biscoff Spread...

....or a beautiful, red Cuisinart ice cream maker?

How about both?
You choose.

Does your bowl look like this:

{You might need an ice cream maker.}

You know, to make...

Dark Chocolate-Peanut Butter Ice Cream


Key Lime Pie Ice Cream,


or, 3-Ingredient Chocolate Sorbet,


or, even Coke Icees!


But, maybe you have an ice cream maker, and you feel like you need to make some...


....Biscoff brownies.  (You do *need* them, by the way.)


To enter:
giveaway closed.
winners: jrlemkemann (ice cream maker)
               Jennifer Rzasa (Biscoff Spread)
  • If you would like the ice cream maker, tell me so and your favorite ice cream flavor.

  • If you would like the Biscoff Spread, tell me so and what you would do with it.

  • Yes, if you *need* both, you may leave 2 separate comments. ;)


One winner will be chosen for each on Tuesday, August 23rd and 8pm CST.  
giveaway closed; winners have been notified and are listed above.

Good luck! ♥

Tuesday, August 16, 2011

I'm not an ice cream stylist, nor do I play one on TV.

Let's face it.  I don't take pretty pictures of ice cream.
 
But, please, PLEASE, I beg you...grab your ice cream maker RIGHT NOW and make this ice cream.

{If you don't own and ice cream maker, we'll see what we can do about that later this week.} ;)

Let me introduce you to Nutella Ice Cream with Toasted Almonds.

{I know, I know, Nutella is made with hazelnuts, not almonds, but my hazelnuts tasted funny.  And you know what?  Almonds are always delicious.}

Nutella Ice Cream with Toasted Almonds

1/2 cup blanched, slivered almonds
2 oz. unsweetened chocolate (I like Ghiradelli)
1/3 cup dutch-process cocoa powder (such as Hershey's Special Dark)
1 & 1/2 cups milk
2 eggs
1 cup sugar
1 cup heavy cream
1 tsp vanilla
1/2 cup Nutella

{This ice cream is made with uncooked eggs, so if you feel uneasy about that or are serving to someone with a compromised immune system, try using pasteurized eggs.}

Preheat oven to 350.  Pour the almonds onto a cookie sheet and bake for 3-5 minutes, until lightly toasted.  Set aside.

Place a heatproof bowl over a pot of simmering (not boiling) water.  Melt the unsweetened chocolate. Gradually add the cocoa; the mixture may clump up in the whisk...that's ok.  Slowly pour in the milk, whisking with the chocolate mixture until combined and smooth.  Remove from heat and let cool several minutes.

Whisk the eggs in a large bowl until light and fluffy, 1-2 minutes.  Add the sugar, a little at a time, whisking constantly.  Once all the sugar has been added, whisk 1 minute more.

Add the cream and vanilla; whisk to combine.

Pour the chocolate mixture into the cream mixture and stir.  Cover and refrigerate a few hours or overnight.

Before transferring to an ice cream maker, remove 1 cup of the mixture into a separate bowl and whisk in the Nutella until smooth. *sigh*

Add this back into the main mixture and stir. Process in an ice cream maker.  About 3 minutes before the freezing cycle is complete, add the toasted almonds.

Once the freezing cycle finishes, transfer to a freezer-safe container and freeze a few hours to firm up.
 
***Even if you think you don't like Nutella....oh, I know who you are (I'm lookin' at YOU, Amanda), try this ice cream.  Mr. E "doesn't like Nutella" and ate two servings tonight.  The Nutella makes the ice cream super creamy, dreamy and rich.***

Go make it.  I'm serious....GO!

{PS...you need some cake to go with that?  Check out my friend Amy's glorious Chocolate Hazelnut Cake.}

Thursday, August 11, 2011

Biscoff Brownies


It all started innocently enough...with my first job out of college...as a flight attendant for Delta Airlines.

We served these:

Biscoff Cookies.  If you've never had one, they are crunchy, cinnamon-y, and perfect.  Delta, I believe I owe you $724 for the cookies I consumed while on board.

So, while tweeting about my love for Biscoff with Kristen one day, the people FROM BISCOFF tweeted me (*happy dance*) and asked if I knew about the Biscoff Spread (um, no).  Would I like to try it?  (Um, YES!!!)

Biscoff Spread is a lot like peanut butter...except yummier. (Sorry, peanut butter.)  It tastes just like the cookies.  We've been eating it on graham crackers and the rice cakes that I buy once a summer thinking they'll help me look like Heidi Klum.

So, I thought...why not brownies?!?  And you guys, they are delicious!


{And aren't they pretty?}

Biscoff Brownies

For the Biscoff swirl:
1/2 cup Biscoff Spread
4 ounces cream cheese
2 TBSP sugar
1 egg

For the brownies:
1 cup dutch-process cocoa
1 tsp. kosher salt
1/2 tsp. baking powder
1 & 1/2 sticks unsalted butter
2 cups sugar
1 TBSP vanilla
3 eggs
1 cup flour

Preheat oven to 325.  Grease a 9 x 13" pan.


Beat the all of the ingredients for the Biscoff swirl until well combined.  Set aside.

Combine the cocoa, salt and baking powder, set aside.

In a medium saucepan, melt the butter over low heat.  Turn off the heat; add the sugar and stir to combine.  Return to the heat until it's hot again, but not bubbling.

 
Remove from heat.  Stir in the cocoa mixture. Whisk in the eggs and vanilla until smooth.

 
Stir in the flour.  Pour into the prepared pan and smooth evenly.


{This little drip makes me happy.}


Dollop the Biscoff mixture on top of the brownie batter.


Use a table knife to gently swirl the mixture, making sure each piece with have a little bit of the swirl.


Bake for 30-35 minutes.  The swirl will look set, but the brownies will still look soft in the middle.  Cool on a wire rack before cutting.


For more Biscoff love, be sure to take a peek at: